Fortifications can form the cornerstone of an army’s defence; some of the hardest fought battles in the 41st Millennium have revolved around the grand siege or stalwart defence of one mighty fortress or another, with countless warriors laying down their lives to storm or secure these vital sites. This book introduces six Siege War missions that explore the kind of conflicts that revolve around fortifications, as well as rules for linking them together in an epic campaign of prolonged siege warfare. The missions illustrate the different sorts of strategies used to attack and defend fortifications, and provide new tests of your tactical ability as a commander.
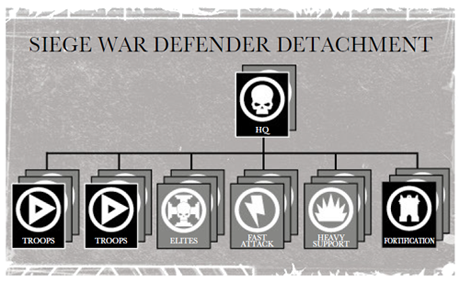
It is also worth arranging to play a Siege War mission in advance so you can both prepare your forces; the Attacker and Defender in Stronghold Assault can take different compositions of forces to reflect the warriors they will require to secure victory in their designated role. As you might expect, the Defender is required to take several fortifications from which to repel the enemy, whilst the Attacker will be bringing their biggest guns to besiege the foe. If you are playing a Siege War Mission, you can choose to use the Siege War Attacker or Defender Detachments (if you are the Attacker or Defender respectively), when selecting your armies. 1
SIEGE WAR
:
BreakthroughThe initial phase of the war has gone well and all that now stands in the invader’s way are a series of fortifications and
a garrison of warriors determined to hold the line at all costs. The attacker must not lose any momentum and so must strike quickly, crossing no man’s land under heavy fire and breaking through the defender’s front lines. 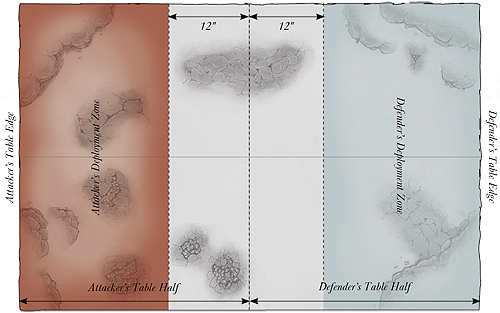 Agree which player will be the Attacker, and which will be the Defender. Both players then choose armies as described in Warhammer 40,000: The Rules. The Defender must take at least one fortification in their army. THE BATTLEFIELD Use the deployment map included with this mission. The Defender first places their fortification(s) on the board, anywhere in their deployment zone. All buildings start the game claimed by the Defender. Once all fortifications have been placed, the Defender can set up any other terrain on the table in a manner of their choosing. Objective Markers After setting up the terrain, the Defender places 3 Objective Markers. These are placed in the Defender’s deployment zone, and can be placed on top of battlements or on fortifications that are battlefield debris (such as defence lines), but cannot be placed inside buildings. DEPLOYMENT The players must first determine their Warlord Traits. The Defender deploys their forces first anywhere in their deployment zone. The Attacker then deploys all of their forces anywhere in their deployment zone. FIRST TURN The Defender goes first unless the Attacker can Seize the Initiative. GAME LENGTH The mission uses Variable Game Length. VICTORY CONDITIONS At the end of the game, the player who has scored the most Victory Points is the winner. If both players have the same number of Victory Points, the game is a draw. Primary Objectives At the end of the game, the Defender scores 3 Victory Points for each Objective Marker they control. In addition, at the end of the game, the Defender scores 1 Victory Point for each enemy unit that has been completely destroyed. Units that are Falling Back at the end of the game, and units that are not on the board (excluding those that have exited the Defender’s table edge using the Punch Through Their Defences rule, below) at the end of the game, count as destroyed for the purposes of this mission. Remember that Independent Characters and Dedicated Transports are individual units and award Victory Points if they are destroyed. At the end of the game, the Attacker scores 1 Victory Point for each of their units that is in the Defender’s deployment zone, and D3 Victory Points for each non-Flyer unit that has exited the board via the Defender’s table edge (see the Punch Through Their Defences rule, below). Secondary Objectives First Blood, Linebreaker*, Slay the Warlord. * In this mission, the Attacker scores 2 Victory Points for Linebreaker, rather than just 1. Mysterious Objectives, Night Fighting, Reserves. 2
SIEGE WAR
:
Bunker AssaultOne side has withdrawn behind the shelter of unyielding bunkers, holding the advancing foe at arm’s reach whilst
calling down a withering salvo of pinpoint artillery strikes. The attacker must destroy or overwhelm the bunkers as quickly as possible, before the barrages pound them into oblivion. 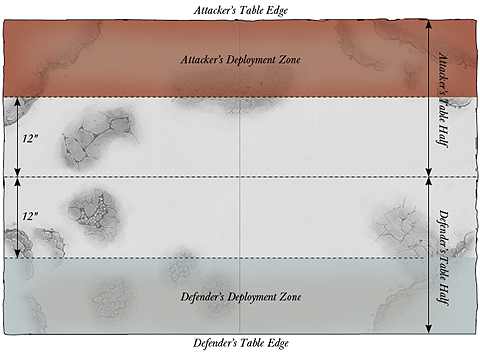 Agree which player will be the Attacker, and which will be the Defender. Both players then choose armies as described in Warhammer 40,000: The Rules. The Defender must take at least one fortification in their army. THE BATTLEFIELD Use the deployment map included with this mission. The Defender first places their fortification(s) on the board, anywhere in their deployment zone. All buildings start the game claimed by the Defender. Once all fortifications have been placed, the Defender can set up any other terrain on the table in a manner of their choosing. Once all terrain is set up, the Defender must nominate a single fortification to have a Targeting Auger. If the nominated fortification is a non-impassable building/battlement, simply declare to your opponent that it has the Targeting Auger. If the nominated fortification is an impassable building or a piece of battlefield debris, place an Objective Marker within 3" of the building/battlefield debris to represent the Targeting Auger. DEPLOYMENT The players must first determine their Warlord Traits. The Defender deploys their forces first anywhere in their deployment zone. The Attacker then deploys all of their forces anywhere in their deployment zone. FIRST TURN The Defender goes first unless the Attacker can Seize the Initiative. GAME LENGTH The mission uses Variable Game Length. VICTORY CONDITIONS At the end of the game, the player who has scored the most Victory Points is the winner. If both players have the same number of Victory Points, the game is a draw. Primary Objective At the end of the game, each player scores 1 Victory Point for each enemy unit that has been completely destroyed. The Attacker scores 1 Victory Point for each Hull Point inflicted upon the Defender’s fortifications. Units that are Falling Back at the end of the game, and units that are not on the board at the end of the game, count as destroyed for the purposes of this mission. Remember that Independent Characters and Dedicated Transports are individual units and award Victory Points if they are destroyed. At the end of the game, the Attacker scores 3 Victory Points if one or more of the following conditions are met:
Secondary Objectives First Blood, Linebreaker, Slay the Warlord. Night Fighting, Reserves.
An Artillery Strike is resolved separately from other weapons fired by the same unit in the same Shooting phase, and can be used to fire at a different target. If a hit is rolled on the scatter dice, the template scatters 2D6" in the direction shown by the arrow on the ‘Hit’ symbol. If an arrow is rolled, the template scatters an additional D6" (for a total scatter of 3D6"). In either case, the firing model cannot reduce the total distance scattered by their Ballistic Skill. The Targeting Auger can only be used once per turn. The Attacker cannot make use of the Targeting Auger. 3
SIEGE WAR
:
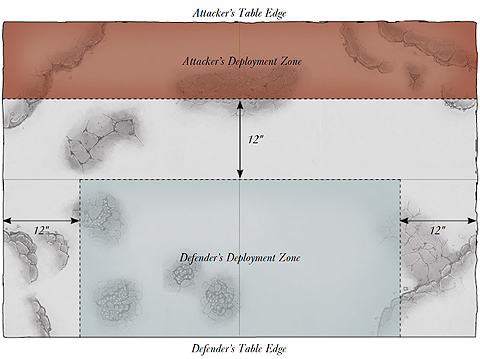
All-out AttackDriven back from their bunkers, the defender has withdrawn to a more heavily fortified position. For the attacking forces to push further, these strongholds must be overcome. Despite the heavy losses that such a headlong assault will inevitably suffer, the attacker is willing to deploy every warrior at their disposal to ensure success.
 Agree which player will be the Attacker, and which will be the Defender. Both players then choose armies as described in Warhammer 40,000: The Rules. The Defender must take at least one fortification in their army. THE BATTLEFIELD Use the deployment map included with this mission. The Defender first places their fortification(s) on the board, anywhere in their deployment zone. All buildings start the game claimed by the Defender. Once all fortifications have been placed, the Defender can set up any other terrain on the table in a manner of their choosing. Objective Markers After terrain has been set up, the Defender must place 3 Objective Markers anywhere in their deployment zone. No Objective Marker can be placed within 6" of any battlefield edge or 12" of another Objective Marker. DEPLOYMENT The players must first determine their Warlord Traits. The Defender deploys their forces first anywhere in their deployment zone. The Attacker then deploys all of their forces, anywhere in their deployment zone. FIRST TURN The Attacker goes first unless the Defender can Seize the Initiative. GAME LENGTH The mission uses Variable Game Length. VICTORY CONDITIONS At the end of the game, the player who has scored the most Victory Points wins the game. If players have the same number of Victory Points, the game is a draw. Primary Objective At the end of the game, each Objective Marker is worth 3 Victory Points to the player that controls it. Secondary Objectives First Blood, Slay the Warlord. Mysterious Objectives, Night Fighting, Reserves. At the end of each of the Attacking player’s Movement phases,roll a dice for each of their destroyed units (though do not roll for Unique units), adding 2 to the result if that unit has the Troops Battlefield Role. On a 4 or more that unit immediately arrives, moving onto the battlefield via the Attacker’s table edge (see map). The Attacker can also, at the end of any of their turns, remove any of their units from the battlefield that have a quarter or less of their starting number of models (or, in the case of single-model units, a quarter or less of their starting number of Wounds or Hull Points). This will allow them to roll a dice at the end of their next Movement phase to see if they can replace the unit with a full-strength unit as reinforcements next turn. 4
SIEGE WAR
:
CrossfireNetworks of interconnected fortifications guard a vital crossing, overlooking a narrow pass with overlapping fields of fire. In preparation for a major push the attacker is seeking to breach this cordon without suffering heavy casualties, but to do so they must overwhelm each fortified ‘island’ in turn or risk being slaughtered by lethal crossfire.
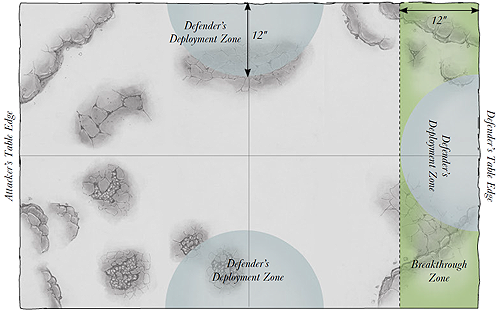 Agree which player will be the Attacker, and which will be the Defender. Both players then choose armies as described in Warhammer 40,000: The Rules. The Defender must take at least one fortification in their army. THE BATTLEFIELD Use the deployment map included with this mission. The Defender first places their fortification(s) on the board, anywhere in their three deployment zones. All buildings start the game claimed by the Defender. Once all fortifications have been placed, the Defender can set up any other terrain on the table in a manner of their choosing. Objective Markers After terrain has been set up, the Defender must place 1 Objective Marker anywhere within each of their three deployment zones (see map). No Objective Marker can be placed within 6" of any battlefield edge. DEPLOYMENT The players must first determine their Warlord Traits. The Defender deploys their units anywhere within their three deployment zones (see map). They must set up at least one unit within each of their deployment zones. The Attacker does not set up any units at this stage – they are all held in Reserve. At the start of the first turn, the Attacker can move any of their units onto the battlefield from the Attacker’s table edge (see map). Any unit that does not move onto the table during the first turn is instead placed into Ongoing Reserves. FIRST TURN The Attacker has the first turn. GAME LENGTH The mission lasts for eight game turns. VICTORY CONDITIONS At the end of the game, the player who has scored the most Victory Points wins the game. If players have the same number of Victory Points, the game is a draw. Primary Objective At the end of the game, the Defender scores 3 Victory Points for each Objective Marker they control. In addition, the Defender scores 1 Victory Point for each enemy unit that has been completely destroyed. Units that are Falling Back at the end of the game, and units that are not on the board (excluding those that have exited the Defender’s table edge using the Punch Through Their Defences rule, below) at the end of the game, count as destroyed for the purposes of this mission. Remember that Independent Characters and Dedicated Transports are individual units and award Victory Points if they are destroyed. At the end of the game, the Attacker scores 1 Victory Point for each of their units that is in the Defender’s Breakthrough Zone (see map), and D3 Victory Points for each non-Flyer unit that has exited the board via the Defender’s table edge (see the Punch Through Their Defences rule, below). Secondary Objectives First Blood, Linebreaker*, Slay the Warlord. * In this mission, the Attacker scores 2 Victory Points for Linebreaker, rather than just 1. Mysterious Objectives, Night Fighting, Reserves. 5
SIEGE WAR
:
The Big PushAfter days of constant bombardment, the attackers have gathered their forces to launch a glorious assault on the shattered remnants of the defenders’ fortress. Command has underestimated the tenacity of the foe, however, and as the attack begins the defenders are working to shore up their fortifications and bring their weapons back online.
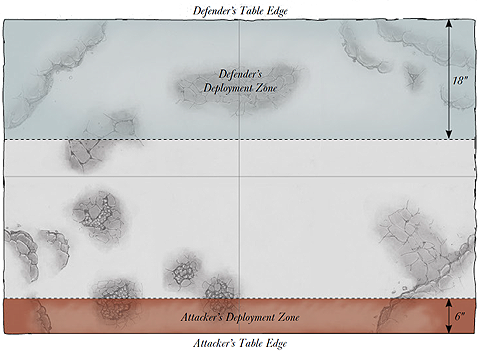 Agree which player will be the Attacker, and which will be the Defender. Both players then choose armies as described in Warhammer 40,000: The Rules. The Defender must take at least one fortification that is a building in their army. The Defender only pays half the usual points cost for buildings, as they start the game dilapidated (see Shattered Defences below). THE BATTLEFIELD Use the deployment map included with this mission. The Defender first places their fortification(s) on the board, anywhere in their deployment zone. All buildings start the game claimed by the Defender. Once all fortifications have been placed, the Defender can set up any other terrain on the table in a manner of their choosing. Objective Markers After setting up the terrain, the Defender places 2 Objective Markers. These are placed in the Defender’s deployment zone, and can be placed on top of battlements or on fortifications that are battlefield debris (such as defence lines), but cannot be placed inside buildings, within 6" of a battlefield edge, or within 12" of each other. DEPLOYMENT The players must first determine their Warlord Traits. The Defender deploys their forces first anywhere in their deployment zone. The Attacker then deploys all of their forces, anywhere in their deployment zone. FIRST TURN The Attacker has the first turn. GAME LENGTH The mission uses Variable Game Length. VICTORY CONDITIONS At the end of the game, the player who has scored the most Victory Points wins the game. If players have the same number of Victory Points, the game is a draw. Primary Objective At the end of the game, each Objective Marker is worth 3 Victory Points to the player that controls it. The Defender scores 1 Victory Point for each of their buildings that has been restored to full function (see below) and is not destroyed or claimed and under control of the Attacker at the end of the game. The Attacker scores 1 Victory Point for each of the Defender’s buildings they have destroyed or claimed and taken control of at the end of the game. Secondary Objectives First Blood, Slay the Warlord. Mysterious Objectives, Night Fighting, Reserves. 6
SIEGE WAR
:
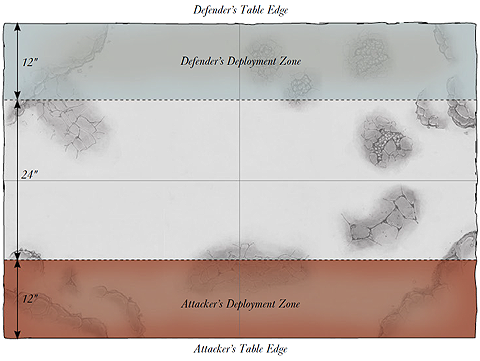
Last StandSurrounded and besieged, a handful of troops have held out against all the odds, an unmovable thorn in the attacking general’s side. But now, the enemy has amassed in overwhelming numbers for their final push, and the defender’s reinforcements have been delayed. Until they arrive, the last survivors of the garrison are on their own.
 Agree which player will be the Attacker, and which will be the Defender. Both players then choose armies as described in Warhammer 40,000: The Rules. The Defender must take at least one fortification in their army. THE BATTLEFIELD Use the deployment map included with this mission. The Defender first places their fortification(s) on the board, anywhere in their deployment zone. All buildings start the game claimed by the Defender. Once all fortifications have been placed, the Defender can set up any other terrain on the table in a manner of their choosing. DEPLOYMENT The players must first determine their Warlord Traits. The Attacker deploys their forces first anywhere in their deployment zone. The Defender then deploys up to 3 Infantry units anywhere in their deployment zone – these are the Last Survivors. The remainder of the Defender’s army starts the game in reserve. FIRST TURN The Attacker goes first unless the Defender can Seize the Initiative. GAME LENGTH The mission uses Variable Game Length. VICTORY CONDITIONS At the end of the game, the player who has scored the most Victory Points is the winner. If both players have the same number of Victory Points, the game is a draw. Primary Objective At the end of the game, each player scores 1 Victory Point for each enemy unit that has been completely destroyed. The Attacker scores 1 Victory Point for each Hull Point removed from the Defender’s fortifications. Units that are Falling Back at the end of the game, and units that are not on the board at the end of the game, count as destroyed for the purposes of this mission. Remember that Independent Characters and Dedicated Transports are individual units and award Victory Points if they are destroyed. At the end of the game, the Attacker gains D3 additional Victory Points for each of the Defender’s Last Survivor units (see below) they have completely destroyed. The Defender scores 2 Victory Points for each Last Survivor unit that has not been completely destroyed at the end of the game. Secondary Objectives First Blood, Linebreaker, Slay the Warlord. Night Fighting, Reserves.
* Flyers, Flying Monstrous Creature and any unit that is arriving by Deep Strike are counted as Fast Attack units for the purposes of the Delayed Reserves special rule, regardless of their actual Battlefield Role. | ||||||||||||||||||||||||||||||||||||||||||||||||||||||||||||||||||||||||||||||
Expansions > Planetary Onslaught >