This page includes four Warhammer 40,000 missions inspired by some of the pivotal battles that took place in the epic first instalment of Gathering Storm. These missions enable players to reenact the exciting events they have just read about and provide them with new ways to use their armies and a wealth of new tactical options to master. This section includes four Warhammer 40,000 missions inspired by some of the pivotal battles that took place in the epic first instalment of Gathering Storm: Fall of Cadia. These missions enable players to reenact the exciting events they have just read about and provide them with new ways to use their armies and a wealth of new tactical options to master. There are two main ways in which you can use the Echoes of War missions in Gathering Storm: Fall of Cadia – the most straightforward is simply to choose a mission you want to play. Alternatively, you can fight a campaign by playing the missions in order. If you do so, then players should stick to the same side for each mission. Keep a note of the players’ victories and defeats – the winner is the player that achieved the greatest number of victories once all of the missions have been played. In the case of a draw, the player that wins the final battle wins the campaign!There’s nothing to stop you from playing the missions using different armies from those in the story of Gathering Storm: Fall of Cadia. With a little imagination and some minor changes, you can easily fight similar battles with any combination of miniatures and terrain you have in your collection. №1
ECHOES OF WAR
:
The Scavenger WarEven as Belisarius Cawl’s Conclave Acquisitorius greedily delved through the ruins of Eriad VI in search of ancient artefacts, the greenskin hordes of Big Mek Gangrek descended upon them to scavenge some shiny loot. After many setbacks, Cawl was forced to draw the Orks to battle in a bid to defeat them once and for all.
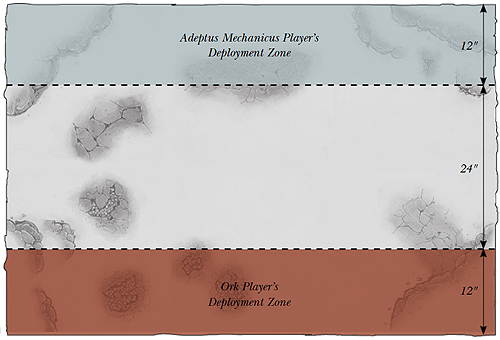 Choose armies as described in Warhammer 40,000: The Rules. One player is the Adeptus Mechanicus player, and each of their units must have either the Cult Mechanicus, Skitarii or Imperial Knights Faction. They must include Belisarius Cawl to be their army’s Warlord. Their opponent is the Ork player, and all of their units must have the Orks Faction. They must include a Big Mek (representing Gangrek) to be their army’s Warlord. THE BATTLEFIELD Set up terrain as described in Warhammer 40,000: The Rules, using the deployment map included in this mission. Objective Markers After terrain has been set up, the Adeptus Mechanicus player places 3 Objective Markers anywhere within their deployment zone. No objective can be placed within 6" of any battlefield edge or 12" of another objective. Designer’s Note: If you have a set of Munitorum Armoured Containers available, we recommend setting one up at each of the locations where an Objective Marker has been placed to represent the supply drop that Belisarius Cawl used to lure the Orks into his carefully laid trap. DEPLOYMENTThe Adeptus Mechanicus player sets up first, anywhere in their deployment zone (see map), but they do so by placing a set-up marker for each unit in their army that they intend to start the battle deployed on the battlefield. Each set-up marker needs to be distinct (for example by having a different number) so it can correspond to a specific unit. They must then write down which unit each set-up marker represents and keep this information secret. Once the Adeptus Mechanicus player has placed all their set-up markers, the Ork player deploys all their forces, anywhere in their deployment zone (see map). Once this has been done, the Adeptus Mechanicus player then reveals which marker corresponds to which unit, setting up the appropriate models as they do so. The first model in each unit must be placed exactly where the unit’s set-up marker was placed. FIRST TURN The Ork player has the first turn. GAME LENGTH The mission uses Variable Game Length. VICTORY CONDITIONS At the end of the game, the player who has scored the most Victory Points is the winner. If both players have the same number of Victory Points, the game is a draw. Primary Objective At the end of the game, each Objective Marker is worth three Victory Points to the player that controls it. Secondary Objectives First Blood, Slay the Warlord*. *In this mission, the Slay the Warlord Secondary Objective is worth D3 Victory Points instead of only 1. Mysterious Objectives*, Reserves. №2
ECHOES OF WAR
:
The Sword of DefianceFor too long, the wreckage of the Dark Angels vessel, Sword of Defiance, proved to be a thorn in the side of the Chaos assault upon Cadia Secundus. But as the invading forces mustered in strength to finally drive them from their improvised stronghold, the Sons of the Lion soon found themselves in a desperate fight for survival.
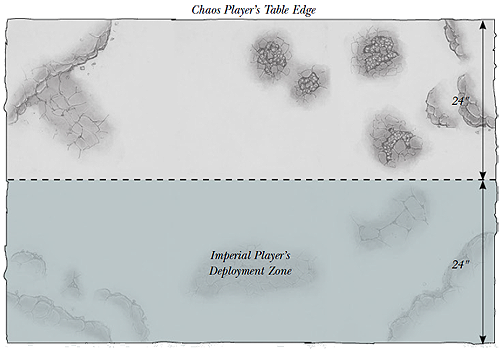 Choose armies as described in Warhammer 40,000: The Rules. One player is the Imperial player, and each of their units must have either the Dark Angels Faction or Astra Militarum Faction. They must include a Company Master (representing Master Korahael) to be their army’s Warlord. Their opponent is the Chaos player, and all of their units must have the Chaos Space Marines Faction. They must include at least one unit of Khorne Berzerkers in their army. THE BATTLEFIELD Use the deployment map included in this mission. The Imperial player can place any number of fortifications anywhere within their deployment zone. They do not pay any points for these fortifications, and none start the game dilapidated. All fortifications deployed in this manner start the game claimed by the Imperial player. Set up any remaining terrain as described in Warhammer 40,000: The Rules. DEPLOYMENT The Imperial player deploys all of their units anywhere within their deployment zone (see map). The Chaos player does not deploy any of their units yet; they all arrive during the first turn (see Mission Special Rules). FIRST TURN The Chaos player has the first turn. GAME LENGTH The mission lasts for eight game turns. VICTORY CONDITIONS At the end of the game, the player who has scored the most Victory Points is the winner. If both players have the same number of Victory Points, the game is a draw. Primary Objective At the end of the game, the Imperial player receives 1 Victory Point for each enemy unit that has been completely destroyed. Units that are Falling Back at the end of the game count as destroyed for the purposes of this mission. Remember that Independent Characters and Dedicated Transports are individual units and award Victory Points if they are destroyed. At the end of the game, the Chaos player receives 3 Victory Points for each of their units that is wholly within the Imperial player’s deployment zone (see map), or 1 Victory Point for each of their units that is partially within the Imperial player’s deployment zone. Secondary Objectives First Blood, Slay the Warlord. Empyric Storms, Night Fighting, Reserves. №3
ECHOES OF WAR
:
Fall of the Kriegan GatesThe Kriegan Gates, that mighty portal leading to Kasr Kraf’s interior, lay broken by the murderous onslaught of the Hounds of Abaddon and the Warmaster’s bloody right hand, the Daemon Urkanthos. Before them stood Creed’s Own, the Cadian 8th, ready to sell their lives alongside their allies to ensure one thing – Cadia stands!
 Choose armies as described in Warhammer 40,000: The Rules. One player is the Imperial player, and each of their units must have either the Space Marines Faction and use the Black Templars Chapter Tactics, or have the Adepta Sororitas, Militarum Tempestus or Astra Militarum Faction. They must include a Company Command Squad that includes Lord Castellan Creed (who must be their army’s Warlord) and Colour Sergeant Kell. Their opponent is the Chaos player, and each of their units must have either the Chaos Space Marines, Chaos Daemons or Astra Militarum Faction (representing the regiments that have turned traitor earlier in the war). They must include a Daemon Prince (representing Urkanthos) to be their army’s Warlord, as well as the Hounds of Abaddon Formation. Designer’s Note: If you are planning to play a suitably large game to represent the truly epic nature of this battle – and you have an appropriate model available – why not also include the traitor Baneblade Vicanthrus as part of the Chaos player’s army? THE BATTLEFIELDUse the deployment map included in this mission. The Imperial player can place any number of fortifications anywhere within their deployment zone. They do not pay any points for these fortifications, and none start the game dilapidated. All fortifications deployed in this manner start the game claimed by the Imperial player. Set up any remaining terrain as described in Warhammer 40,000: The Rules. Objective Markers After terrain has been set up, the Imperial player places 5 Objective Markers anywhere within their deployment zone. No objective can be placed within 6" of any battlefield edge or 12" of another objective. DEPLOYMENT The Imperial player deploys all of their units first, anywhere within their deployment zone (see map). The Chaos player then deploys their units anywhere within their deployment zone (see map). FIRST TURN The Chaos player has the first turn unless the Imperial player can Seize the Initiative. GAME LENGTH The mission lasts for ten game turns. VICTORY CONDITIONS At the end of the game, the player who has scored the most Victory Points is the winner. If both players have the same number of Victory Points, the game is a draw. Primary Objective At the end of the game, each Objective Marker is worth three Victory Points to the player that controls it. Secondary Objectives First Blood, Slay the Warlord*. *In this mission, the Slay the Warlord Secondary Objective is worth D3+1 Victory Points instead of only 1. Empyric Storms, Night Fighting, Reserves. №4
ECHOES OF WAR
:
The Emperor ProtectsIn the ancient catacombs beneath the Elysion Fields, Abaddon himself arrived to personally oversee the destruction of Cadia’s last bastion of resistance. Having slaughtered his way through all before him, the Despoiler’s ultimate victory was surely at hand – only a miracle could save Cadia’s valiant defenders…
 Choose armies as described in Warhammer 40,000: The Rules. Flyers cannot be included in this mission. One player is the Imperial player. Their army must include a Company Command Squad that includes Lord Castellan Creed, the Triumvirate of the Imperium Formation, and Trazyn the Infinite, although he costs no points. The rest of their units must have the Space Marines, Space Wolves, Dark Angels, Adepta Sororitas, Militarum Tempestus, Astra Militarum, Cult Mechanicus or Skitarii Factions. Saint Celestine must be their army’s Warlord. Their opponent is the Chaos player, and each of their units must have either the Chaos Space Marines, Chaos Daemons or Astra Militarum Faction (representing the regiments that have turned traitor earlier in the war). They must include the Bringers of Despair Formation. Abaddon must be their army’s Warlord. THE BATTLEFIELD Set up any terrain as described in Warhammer 40,000: The Rules, using the deployment map included in this mission. DEPLOYMENT The Imperial player deploys first, setting up their units anywhere within their deployment zone (see map). However, Celestine cannot be set up at this stage; she and her Geminae Superia arrive later in the battle (see Mission Special Rules). In addition, Inquisitor Greyfax and any units with the Militarum Tempestus Faction or Space Marines Faction (that use the Ultramarines Chapter Tactics) must be placed in Tesseract Reserve (see Mission Special Rules). Up to half of their non-vehicle units with the Astra Militarum Faction can also be placed in Tesseract Reserve. The Chaos player then sets up their units anywhere within their deployment zone (see map). FIRST TURN The Chaos player has the first turn. GAME LENGTH The mission lasts for eight game turns. VICTORY CONDITIONS At the end of the game, the player who has scored the most Victory Points is the winner. If both players have the same number of Victory Points, the game is a draw. Primary Objective At the end of the game, each player receives 1 Victory Point for each enemy unit that has been completely destroyed. Units that are Falling Back at the end of the game count as destroyed for the purposes of this mission. However, if Trazyn the Infinite is slain, no Victory Points are awarded for his destruction, nor are any awarded for any units still in Tesseract Reserve. Secondary Objectives First Blood, Slay the Warlord*. *In this mission, the Slay the Warlord Secondary Objective is worth 5 Victory Points instead of only 1. Empyric Storms, Reserves. This section includes four Warhammer 40,000 missions inspired by the pivotal battles that took place during the rise of the Ynnari. As well as enabling players to reenact the exciting events they have just read about, these missions provide players with new ways to use their armies and a wealth of new tactical options to master. There are two main ways in which you can use the Echoes of War missions in Gathering Storm: Fracture of Biel-Tan – the most straightforward is simply to choose a mission you want to play. Alternatively, you can fight a campaign by playing the missions in order. If you do so, then players should stick to the same side for each mission. Keep a note of the players’ victories and defeats – the winner is the player that achieved the greatest number of victories once all of the missions have been played. In the case of a draw, the player that wins the final battle wins the campaign!There’s nothing to stop you from playing the missions using different armies from those in the story of Gathering Storm: Fracture of Biel-Tan. With a little imagination and some minor changes, you can easily fight similar battles with any combination of miniatures and terrain you have in your collection. №1
ECHOES OF WAR
:
The Obsidian GateThe Obsidian Gate is an ancient webway portal that leads directly to Biel-Tan. It was sealed by the Eldar long ago to prevent any chance of daemonic incursion upon the craftworld, but the Masque of Slaanesh, having tricked Skarbrand into her service, now moves to shatter the gate’s wards and gain ingress upon Biel-Tan’s hallowed ground.
 Choose armies as described in Warhammer 40,000: The Rules. One player is the Eldar player, and all their units must have the Eldar Faction. They must include an Autarch (representing Meliniel) to be their army’s Warlord. Their opponent is the Chaos Daemons player, and all their units must have the Chaos Daemons Faction. They must include Skarbrand and the Masque of Slaanesh in their army. THE BATTLEFIELD Set up terrain as described in Warhammer 40,000: The Rules, using the deployment map included in this mission. THE OBSIDIAN GATE The players must place a suitable piece of terrain that is approximately 12" wide at the centre of one of the long edges of the battlefield to represent the Obsidian Gate (see map). DEPLOYMENT The Chaos Daemons player sets up all of their units not being held in Reserve anywhere within their deployment zone (see map). However, Skarbrand must begin the game in Deep Strike Reserve (see Mission Special Rules). The Eldar player does not deploy any of their units yet; they all arrive during the first turn (see Mission Special Rules). FIRST TURN The Eldar player takes the first turn. GAME LENGTH The mission uses Variable Game Length. However, if the Chaos Daemons player moves their last unit on the battlefield through the Obsidian Gate (see Mission Special Rules), the game ends immediately. VICTORY CONDITIONS At the end of the game, the player who has scored the most Victory Points is the winner. If both players have the same number of Victory Points, the game is a draw. Primary Objectives At the end of the game, the Eldar player receives 1 Victory Point for each enemy unit that has been completely destroyed. If the Chaos Daemons player successfully destroys the Obsidian Gate’s wards (see Mission Special Rules) they immediately receive 3 Victory Points. Once the Chaos Daemons player has destroyed the portal’s wards, they earn 2 Victory Points each time a Chaos Daemons unit voluntarily leaves play via the Obsidian Gate (see Mission Special Rules). Secondary Objectives First Blood, Slay the Warlord. Empyric Storms, Reserves. №2
ECHOES OF WAR
:
Architects of PainShortly after their arrival upon the cursed crone world of Belial IV, the Ynnari found themselves facing a coterie of their twisted Haemonculi kin sent to hunt them without mercy. The success of the Ynnari’s desperate mission relies on the survival of their leaders – without the Triumvirate of Ynnead, all will be lost.
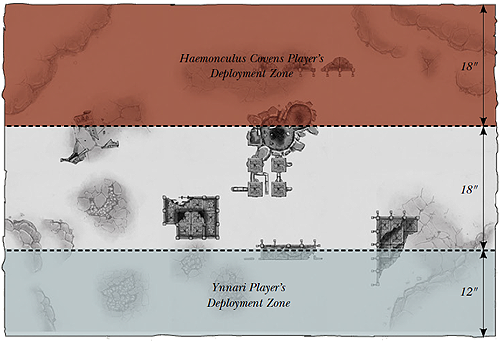 Choose armies as described in Warhammer 40,000: The Rules. One player is the Ynnari player, and all their units must have the Ynnari Faction. They must include the Triumvirate of Ynnead Formation in their army. Their opponent is the Haemonculus Covens player, and all their units must be chosen from the Haemonculus Covens codex supplement. THE BATTLEFIELD Set up terrain as described in Warhammer 40,000: The Rules, using the deployment map included in this mission. DEPLOYMENT The Haemonculus Covens player sets up first, but they do so by setting up a marker in their deployment zone for each unit in their army that they intend to start the battle deployed on the battlefield. Each marker needs to be distinct (by having a different number, for example) so it can correspond to a specific unit. They must then write down which unit each marker represents and keep this information secret. Once the Haemonculus Covens player has set up all their markers, the Ynnari player sets up all of their units not being held in Reserve anywhere within their deployment zone. Once this has been done, the Haemonculus Covens player then reveals which marker corresponds to which unit, setting up the appropriate models as they do so. The first model in each unit must be placed exactly where the unit’s setup marker was placed. FIRST TURN The Haemonculus Covens player takes the first turn unless the Ynnari player can Seize the Initiative. GAME LENGTH The mission uses Variable Game Length. However, if all three models from the Triumvirate of Ynnead are slain, the game ends immediately. VICTORY CONDITIONS If, at the end of the game, at least one model from the Triumvirate of Ynnead is still alive and on the battlefield, the Ynnari player wins. Any other result is a victory to the Haemonculus Covens player. Empyric Storms, Reserves.
№3
ECHOES OF WAR
:
Ancestral FoesNo sooner had the Ynnari driven off the murderous Haemonculi amid the sand-choked ruins of Belial IV than a chorus of ecstatic screams carried on the wind. She Who Thirsts had found them, and sent a host of Daemons to claim their souls. The Ynnari have to find the missing Cronesword soon, or all will be lost…
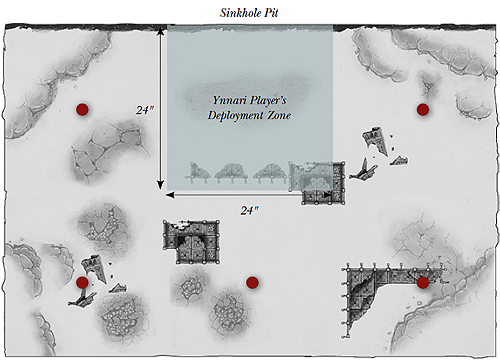 Choose armies as described in Warhammer 40,000: The Rules. One player is the Ynnari player, and all their units must have the Ynnari Faction. They must include the Triumvirate of Ynnead Formation in their army. Their opponent is the Slaanesh player, and all their units must have the Daemon of Slaanesh special rule. They must include the Masque of Slaanesh in their army. THE BATTLEFIELD Set up terrain as described in Warhammer 40,000: The Rules, using the deployment map included in this mission. POTENTIAL CRONESWORD LOCATIONS After setting up the terrain, place a total of 5 Objective Markers, one at the centre of each 2'x2' section of the battlefield with the exception of the Ynnari player’s deployment zone (see map). DEPLOYMENT The Ynnari player sets up all of their units with the exception of Flyers and Infiltrators anywhere within their deployment zone (see map). The Slaanesh player does not deploy any of their units yet; they all arrive during the first turn (see Mission Special Rules). FIRST TURN The Slaanesh player takes the first turn. GAME LENGTH The mission uses Variable Game Length. However, if all three models from the Triumvirate of Ynnead are slain, the game ends immediately. VICTORY CONDITIONS If, at the end of the game, all models from the Triumvirate of Ynnead have been slain, the Slaanesh player wins. If, at the end of the game, the Ynnari player has located the Cronesword (see Mission Special Rules) and at least one model from the Triumvirate of Ynnead is still on the battlefield, the Ynnari player wins. Any other result is a draw. Empyric Storms, Reserves.
№4
ECHOES OF WAR
:
War in the WebwayAhzek Ahriman, Arch-Sorcerer of the Thousand Sons, has masterminded an ambush of the Ynnari forces as they traverse the webway. Forced to fight on multiple fronts by the Thousand Sons and their daemonic allies as the fighting spreads throughout Psychedelta’s many capillaries, the Ynnari face a desperate battle for survival.
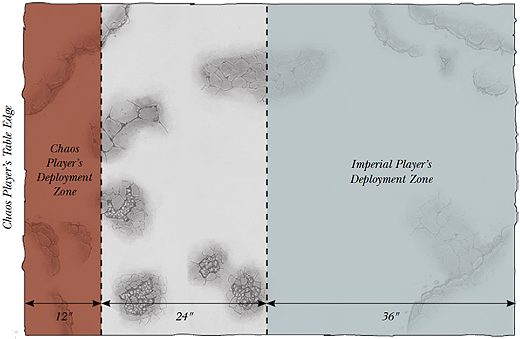
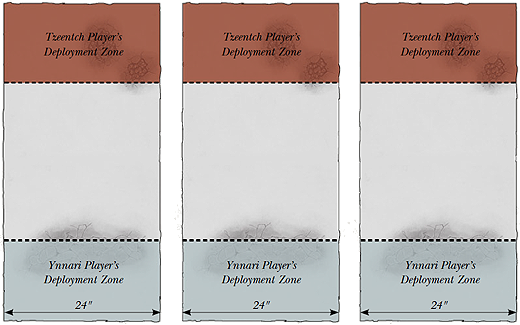 Choose armies as described in Warhammer 40,000: The Rules. One player is the Ynnari player, and all their units must have the Ynnari Faction. They must include the Triumvirate of Ynnead Formation in their army. Their opponent is the Tzeentch player, and all their units must have the Daemon of Tzeentch special rule or be part of a Thousand Sons Detachment. They must include Ahriman in their army. THE BATTLEFIELD Set up three 24"x 48" battlefields, then set up terrain on each as described in Warhammer 40,000: The Rules, using the deployment map included in this mission. DEPLOYMENT Players alternate setting up units, starting with the Ynnari player. The first Ynnari unit to be deployed can be set up in any one of their three deployment zones (see map). The Tzeentch player must then deploy a unit in the same battlefield within their deployment zone (see map). The second and third units belonging to the Ynnari and Tzeentch players must be set up in the same way, but each on a different battlefield. The players then take it in turns to set up their remaining units one at a time, but they can set them up on any battlefield or in Reserve as normal. FIRST TURN Roll a dice. On an odd roll, the Tzeentch player has the first turn. On an even roll, the Ynnari player goes first. GAME LENGTH The mission uses Variable Game Length. VICTORY CONDITIONS At the end of the game, players score 1 Victory Point for each battlefield that only has models belonging to their army remaining. The player with the most Victory Points at the end of the game is the winner. If both players have the same number of Victory Points, then the game is a draw. Reserves. These changes aside, turns are carried out as normal, with each player moving and fighting with their units on all three battlefields simultaneously.
This section includes five Warhammer 40,000 missions inspired by the pivotal battles that took place during Roboute Guilliman’s return. As well as enabling players to reenact the exciting events they have just read about, these missions provide players with new ways to use their armies and a wealth of new tactical options to master. There are two main ways in which you can use the Echoes of War missions in Gathering Storm: Rise of the Primarch – the most straightforward is simply to choose a mission you want to play. Alternatively, you can fight a campaign by playing the missions in order. If you do so, then players should stick to the same side for each mission. Keep a note of the players’ victories and defeats – the winner is the player that achieved the greatest number of victories once all of the missions have been played. In the case of a draw, the player that wins the final battle wins the campaign!There’s nothing to stop you from playing the missions using different armies from those in the story of Gathering Storm: Rise of the Primarch. With a little imagination and some minor changes, you can easily fight similar battles with any combination of miniatures and terrain you have in your collection. №1
ECHOES OF WAR
:
Through the FlamesThe Fortress of Hera is besieged by the forces of Chaos! As Macragge’s defenders battle against attack from land and air, a pair of Ultramarines Stormravens and their Stormhawk escorts brave the cauldron of fire and Heldrakes swarming over the fortress to fly down from orbit. Their mission is to transport the pilgrims to an armoured hangar in the flanks of the fortress, so that they can meet with the Lord of Ultramar.
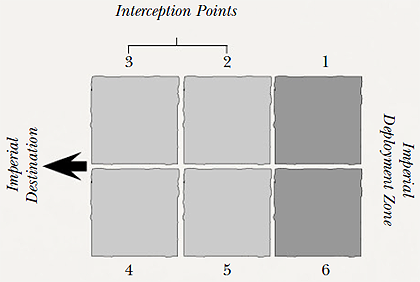 One player is the Imperial player. Their army consists of 2 Stormraven Gunships, and up to 4 Stormhawk Interceptors. Their opponent is the Chaos player. Their army consists of any number of the following units: Heldrakes, Hell Talon Chaos Fighters, Hell Blade Chaos Fighters. All Flyers are treated as individual models in this mission – they are not taken as Squadrons. THE BATTLEFIELD This battle takes place in the atmosphere above the Fortress of Hera upon Macragge, and as such no scenery should be used. The mission is designed to be played on a set of six 2' by 2' gameboards, for reasons that will become apparent when you read the Mission Special Rules. DEPLOYMENT The rules that normally require Flyers to start in Reserves do not apply in this mission. Instead, the Imperial player deploys first, setting up their Flyers anywhere within their deployment zone (see map). All Imperial Flyers must be set up upon the battlefield; none can be placed in Reserves. The Chaos player then sets up D3 Flyers, chosen freely from the available models in their army. The remaining Chaos Flyers may arrive later during the battle, as described in the Mission Special Rules below. Roll a dice before setting up each Chaos Flyer to determine its Interception Point; it must be set up touching the centre of the edge of the board section corresponding to the dice roll. It can face in any direction. Only one Flyer can be set up at each Interception Point at the same time; if an Interception Point is occupied, roll again until a free one is rolled. FIRST TURN The Imperial player has the first turn unless the Chaos player can Seize the Initiative. GAME LENGTH The mission lasts until all of the Imperial Flyers have been destroyed, or all remaining Stormraven Gunships reach the Fortress of Hera as described below. VICTORY CONDITIONS The Imperial player wins if both of the Stormraven Gunships reach the Fortress of Hera (see the Endless Skies special rule, below). The Chaos player wins if both Stormraven Gunships are destroyed. Any other result is a tie. TWO-GAME ULTIMATE CHALLENGE Instead of playing a single game, play the mission twice, with the players changing sides for the second game. Keep track of the number of turns each game lasts. If the Imperials win both of the two games, the player that won as the Imperials in the fewest number of turns is the winner. If Chaos won both games, then the player that won in the fewest number of turns is the winner. Chaos Reinforcements: The Chaos player must roll 2D6 at the start of each of their turns and refer to the table below:
The right-hand boards must be ‘rolled around’ if a Stormraven Gunship starts its turn within 6" of the lefthand side of the battfield. When this happens, any Flyers on the right-hand two board sections are removed from play. Imperial Flyers are considered to have been destroyed, and Chaos Flyers are returned to the pool of units that can be used to intercept. The two boards are then removed and placed at the left-hand side of battlefield as shown in the diagram below. The two new boards now form the left-hand side of the battlefield. 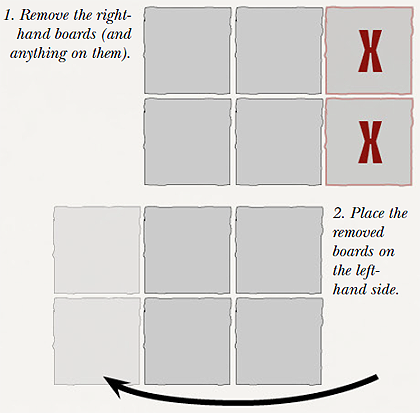 Over the course of the battle, the right-hand boards will be moved each time a Stormraven Gunship reaches the left-hand side of the battlefield. Keep track of the number of times that the right-hand board sections are moved – the fifth time it occurs, the game ends and any surviving Stormraven Gunships are assumed to have reached the Fortress of Hera. №2
ECHOES OF WAR
:
The Battle of Guilliman’s ShrineThe pilgrims have finally arrived at Guilliman’s shrine and reached the throne upon which the Primarch sits, preserved through eternity by a crackling stasis field. As Cawl activates his auto-reliquary, the Black Legion launches a desperate all-out assault in an effort to prevent the Primarch’s resurrection.
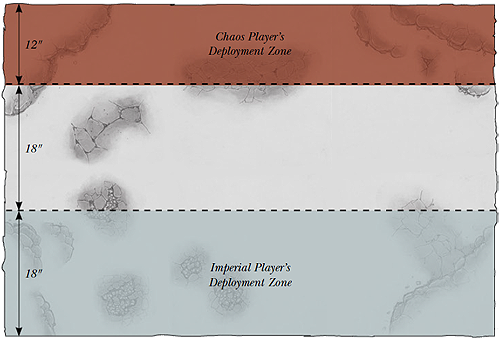
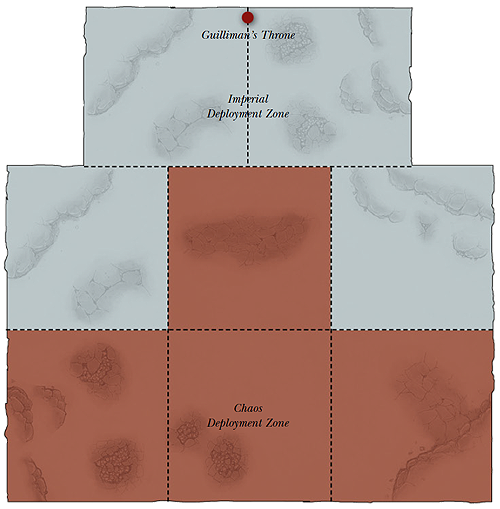 Choose armies as described in Warhammer 40,000: The Rules. One player is the Imperial player. Their army must include the following units: Roboute Guilliman, Grand Master Voldus, Belisarius Cawl, the Visarch and Yvraine. The remainder of the army must consist of an Ultramarines Detachment that includes Marneus Calgar and Chief Librarian Tigurius, but cannot include any vehicles. Marneus Calgar must be the army’s Warlord until Roboute Guilliman is Revived (as described in the Mission Special Rules). Once Roboute is Revived, he becomes the army’s Warlord for the rest of the battle. Their opponent is the Chaos player, and their army must consist solely of Black Legion Detachments and/or Formations. In addition, the army must include The Chosen of Abaddon Formation from the Traitor Legions Codex Supplement, but cannot include Abaddon the Despoiler, or any vehicles that cannot Deep Strike. THE BATTLEFIELD The Shrine of Guilliman is an enormous vaulted chamber, filled with marble pillars, statues representing the Primarch’s deeds and accomplishments, and rubble from the smashed ceiling of the chamber. At the far end is a massive throne upon which the Primarch sits, locked timelessly in place by a powerful stasis field. Set up any terrain as described in Warhammer 40,000: The Rules, using the deployment map included in this mission, and choosing scenery from your collection that best represents the shrine. Pick a suitable piece of scenery to represent Guilliman’s Throne, and place it as shown, within 6" of the edge of the battlefield and more than 18" away from the Chaos player’s deployment area. DEPLOYMENT The Imperial player deploys first, setting up their units anywhere within their deployment zone (see map). However, Roboute Guilliman cannot be set up at this stage; he arrives later in the battle (see Mission Special Rules). All other units must be set up on the battlefield; none can be placed in Reserves. In addition, Belisarius Cawl, the Visarch, Yvraine and Tigurius must be set up within 3" of Guilliman’s Throne; all other Independent Characters in the Imperial army must be set up more than 12" from Guilliman’s Throne. The Chaos player then sets up their units anywhere within their deployment zone (see map). Up to half of the units in the Chaos army can be set up in Reserves, but note that Reserves can only arrive by using Deep Strike (see below). FIRST TURN The Chaos player has the first turn unless the Imperial player can Seize the Initiative. GAME LENGTH The mission lasts for six game turns, or until Roboute Guilliman is slain. VICTORY CONDITIONS The Chaos player wins the game if Roboute Guilliman is slain before the end of the mission. Any other result is a victory for the Imperial player. Reserves (Chaos player only). №3
ECHOES OF WAR
:
Macragge’s HonourAs Guilliman’s crusading fleet attempted to reach Terra, it was ambushed by a combined force of Red Corsairs and Daemons of Tzeentch led by Kairos Fateweaver. The Chaos force launched a devastating attack, and was able to create a massive breach in the forward bulkhead of Guilliman’s flagship, Macragge’s Honour. Wave upon wave of Daemons and Red Corsairs poured onto the bridge, determined to capture Guilliman and end his crusade once and for all.
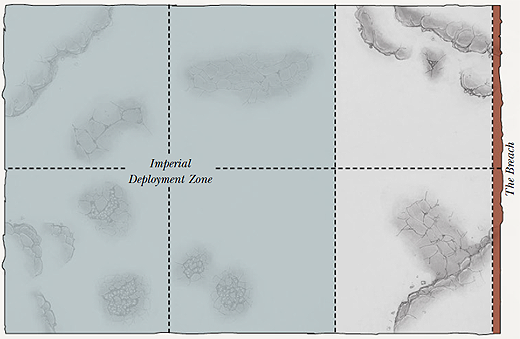 Choose armies as described in Warhammer 40,000: The Rules. One player is the Imperial player. Their army must include Roboute Guilliman and the Victrix Guard Formation. The remainder of the army must consist of an Ultramarines Detachment, but cannot include any vehicles apart from Dreadnoughts. Roboute Guilliman must be the army’s Warlord. Their opponent is the Chaos player, and all their units must have the Chaos Space Marines and/or Chaos Daemons Faction. In addition, the army must include Kairos Fateweaver and one or more Heralds of Tzeentch, and all other Daemons in the army must be Daemons of Tzeentch. The army may not include any vehicles, and Kairos Fateweaver must be the army’s Warlord. THE BATTLEFIELD This battle takes place on the bridge of the Macragge’s Honour. Chaos forces have breached the bridge at one end, as shown on the map opposite. The area in front of the breach is devoid of cover, but the rest of the bridge is designed to form a natural defensive bulwark. Gantries and walkways near the edge of the battlefield provide the Ultramarines with elevated positions from which to rain down attacks on the foe, while consoles filling the central area of the bridge are designed to act as defensive barricades in case of just such an attack as this one. Set up any terrain as described in Warhammer 40,000: The Rules, using the deployment map included in this mission, and choosing scenery from your collection that best represents the bridge of the Macragge’s Honour. DEPLOYMENT The Imperial player deploys first, setting up their units anywhere within their deployment zone (see map). The Chaos player then splits the units in their army into three waves. Each wave must include at least one unit, and no wave can include more than half of the units in the army. Kairos Fateweaver must be in the third wave. No units can be placed in Reserves. The first wave is set up with all models within 12" of the breach. The second wave arrives through the breach in the first Chaos turn, in the same manner as if the units were arriving from Reserves from that edge. The third wave arrives through the breach in the same manner in the second Chaos turn. When a wave arrives, it also includes any Chaos units that have been completely destroyed so far in the battle. If the Chaos player wishes, at the start of their turn they can destroy any models remaining in any of their Chaos units, in order to bring those units back into play at full strength with the next wave. FIRST TURN The Imperial player has the first turn. GAME LENGTH The mission lasts for six game turns, or until Kairos Fateweaver is slain. VICTORY CONDITIONS The Chaos player wins the game if Roboute Guilliman is bound by psychic chains of his own guilt, anger and disappointment (as described below). The Imperial player wins if Kairos Fateweaver is slain. Any other result is a draw. Kairos Fateweaver’s Incantations of Despair: In the Psychic phase, Kairos Fateweaver can chant Incantations of Despair instead of using any other psychic powers. Any Heralds of Tzeentch within 6" of Kairos can aid him by chanting too, but if they do so, they cannot use any psychic powers either. To chant the incantations, roll three dice for Kairos Fateweaver, and one extra dice for every 3 Heralds of Tzeentch who are supporting him. For example, if Kairos was supported by 6 Heralds, you would roll 5 dice in total. Each dice roll of 3 or more is a ‘success’. Keep track of the number of successes scored in total during the game; if the total ever reaches 6 or more, Guilliman is bound by psychic chains of his own guilt, anger and disappointment, and the Chaos player immediately wins the game. №4
ECHOES OF WAR
:
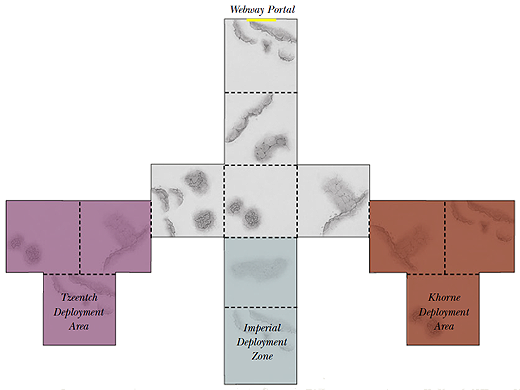
The Final BridgeFreed from captivity, the only way for Guilliman and his followers to escape is to reach the webway portal that lies at the heart of the Blackstone Fortress in which they were held. Battling their way through endless hordes of Daemons and Chaos Space Marines, the Imperial warriors finally reach one final bridge leading to their destination – freedom will be theirs if they can just reach the other side before the forces of Chaos block the way.
 Choose armies as described in Warhammer 40,000: The Rules. One player is the Imperial player. Their army must include Roboute Guilliman and can include any of the following units: Veilwalker (a Shadowseer), Cypher, Captain Sicarius and Grand Master Voldus. The remainder of the army can consist of any Detachments from the following Factions: Space Marines, Grey Knights, Legion of the Damned, Adeptus Mechanicus, Harlequins. The army may not include any Flyers. Roboute Guilliman must be the army’s Warlord. Their opponent is the Chaos player, and all their units must have the Chaos Space Marines and/or Chaos Daemons Faction. In addition, the army must include Skarbrand, and all other Daemons in the army must be Daemons of Tzeentch or Daemons of Khorne. Skarbrand must be the army’s Warlord. THE BATTLEFIELD This battle takes place in a vast chamber that is crisscrossed with bridges, stairways, platforms and gantries. Many of the bridges and platforms are extremely large, easily big enough to allow battle tanks to manoeuvre and move freely around them. The battle map represents the set of bridges that lead to the Webway Portal. The gaps between the battlefield sections represent the nearly bottomless pit over which the bridges and platforms are suspended (special rules apply to the void – see below). The bridges can be from 12" to 18" wide rather than 24", depending upon how much space is available for your game. The Webway Portal should be between 36" and 72" away from the Imperial deployment area, depending on the width of the bridges. Set up any terrain as described in Warhammer 40,000: The Rules, using the deployment map included in this mission, and choosing scenery from your collection that best represents the chamber described above. DEPLOYMENT The Imperial player deploys first, setting up their units anywhere within their deployment zone (see map). All units must be set up on the battlefield; none can be placed in Reserves. The Chaos player then sets up their units anywhere within their deployment areas (see map). Daemons of Tzeentch can only deploy in the Tzeentch deployment area, and Daemons of Khorne can only deploy in the Khorne deployment area. Chaos Space Marines can deploy in either deployment area. All units must be set up upon the battlefield; none can be placed in Reserves. FIRST TURN The Imperial player has the first turn unless the Chaos player can Seize the Initiative. GAME LENGTH The mission lasts for eight game turns. VICTORY CONDITIONS At the end of the battle the player with the most Victory Points is the winner. If both players have the same number of Victory Points, then the battle is a tie. Primary Objectives The Chaos player receives 3 Victory Points for each Imperial unit that is completely destroyed. The Imperial player receives 2 Victory Points for each Chaos unit that is completely destroyed, and 4 Victory Points for each Imperial unit that escapes through the webway (see Mission Special Rules, below). Skarbrand’s Rage: Imperial units within 36" of Skarbrand cannot end a move further away from Skarbrand than they were at the start of the move, and must attempt to charge if they are within 12" of the enemy in their Charge sub-phase and would normally be allowed to charge. This rule does not apply to Roboute Guilliman, or any units drawn from the Ultramarines that are within 12" of Roboute Guilliman. №5
ECHOES OF WAR
:
Amidst the Sea of StormsRoboute Guilliman and the survivors of his crusading army have managed to use the webway to reach the surface of Luna. They appear at the bottom of a crater in the Mare Tempestus, but as they reach the rim of the crater, Magnus the Red follows them through the portal at the head of a vast force of Thousand Sons Chaos Space Marines. The Imperial army has no choice but to turn at bay, and hold Magnus in place until reinforcements are able to arrive from Terra.
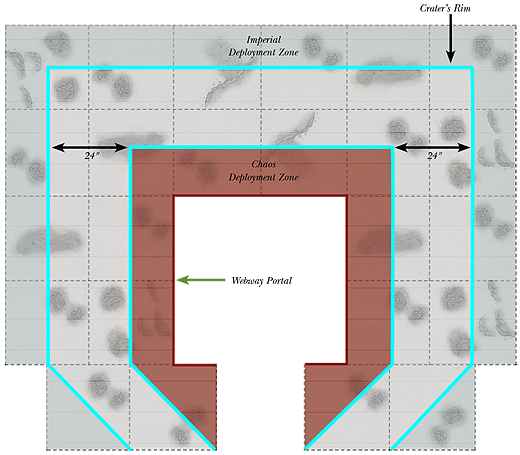 Choose armies as described in Warhammer 40,000: The Rules. One player is the Imperial player. The Imperial player’s army is split into two contingents. The first contingent must include Roboute Guilliman (who must be the army’s Warlord) and can include any of the following units: Veilwalker (a Shadowseer), Cypher, Captain Sicarius, Saint Celestine, Archmagos Dominus Belisarius Cawl, Inquisitor Greyfax and Grand Master Voldus. The remainder of the first contingent can consist of any Detachments from the following Factions: Space Marines with Ultramarines Chapter Tactics, Grey Knights, Adeptus Mechanicus, Harlequins. This contingent may not include any Flyers. The second contingent can consist of any Detachments from the following Factions: Sisters of Silence, Adeptus Custodes, or Space Marines with Imperial Fists Chapter Tactics. All units in this contingent must be able to Deep Strike or be transported in vehicles that can do so. The contingent can include Valkyries as Dedicated Transports for Sisters of Silence units, and Imperial Navy Flyers from the Forge World range. Their opponent is the Chaos player, and all of their units must either be from a Thousand Sons detachment or have the Chaos Daemons Faction. In addition, the army must include Magnus the Red, and all Daemons in the army must be Daemons of Tzeentch. Magnus must be the army’s Warlord. THE BATTLEFIELD This battle takes place in a huge crater located on the surface of Luna. The crater is studded with the battered hulks of decommissioned Imperial spacecraft that will provide cover for the warriors in the two armies. At the start of the battle, the Imperial army is located along the rim of the crater, while the Chaos army appears through the Webway Portal at the crater’s heart. Set up any terrain as described in Warhammer 40,000: The Rules, using the deployment map included in this mission, and choosing scenery from your collection that best represents the crater described above. DEPLOYMENT The Imperial player deploys first, setting up all of the units in the first contingent anywhere between the rim of the crater and the edge of the battlefield (see map). All units from the first contingent must be set up upon the battlefield; none can be placed in Reserves. All units in the second contingent must start in Reserves. The Chaos player sets up second, anywhere that is more than 24" from the rim of the crater, between the rim of the crater and the Webway Portal. Units from the Chaos army can start in Reserve if desired, but note that Chaos Space Marine units can only enter play through the Webway Portal (see the Mission Special Rules section below). FIRST TURN The Imperial player has the first turn unless the Chaos player can Seize the Initiative. GAME LENGTH The mission lasts for six game turns. VICTORY CONDITIONS At the end of the battle the player with the most Victory Points is the winner. If both players have the same number of Victory Points, then the battle is a tie. Primary Objectives The Chaos player receives 1 Victory Point for each Imperial unit that is completely destroyed, and 1 Victory Point for each wound inflicted by Magnus the Red upon Roboute Guilliman. The Imperial player receives 1 Victory Point for each Chaos unit that is completely destroyed, and 1 Victory Point for each wound inflicted by Roboute Guilliman upon Magnus the Red. The Imperial player also receives 3 Victory Points if they disable the Webway Portal (see Mission Special Rules, below). Disabling the Webway Portal: Veilwalker can shut down the Webway Portal if she is within 3" of the edge of the battlefield that leads to it at the start of her Shooting phase. Roll a dice; on a roll of 2 or more, the Webway Portal is shut down and Chaos Space Marine units can no longer use it to enter the battlefield. In addition, should Magnus the Red be slain in the same turn that the portal is shut down, then he automatically fails the Superhuman Resolve roll and is slain. |

