War Zone Fenris: Curse of the Wulfen CampaignThis section includes several Warhammer 40,000 missions inspired by the pivotal battles that took place in the narrative book. These missions provide players with new ways to use their armies and a wealth of new tactical options to master – you can even play them sequentially as part of a campaign using the rules at the end of the section.
There are two main ways in which you can use the Echoes of War missions in War Zone Fenris: Curse of the Wulfen – the most straightforward is simply to choose a mission you want to play. Alternatively, you can fight a campaign by playing the missions in order using the rules found at the end of this section. If you do so, then players should stick to the same side for each mission. Keep a note of the players’ victories and defeats – the winner is the player that achieved the greatest number of victories once all of the missions have been played. In the case of a draw, the player that wins the final battle wins the campaign!There’s nothing to stop you from playing the missions using different armies from those in the story of War Zone Fenris: Curse of the Wulfen. With a little imagination and some minor changes, you can easily fight similar battles with any combination of miniatures and terrain you have in your collection. Campaign ChartThe Echoes of War missions presented in War Zone Fenris: Curse of the Wulfen help you recreate the pivotal battles that took place over the course of the Space Wolves’ rediscovery of their long-lost kin, but they are far from the only battles that were waged during this gruelling campaign. There were countless other bloodsoaked conflicts within the wider war, and as a result, numerous other ways to play games of Warhammer 40,000 in this epic setting. You could recreate the Blackmanes’ landings on Dragos as they sought out the Wulfen packs in games of Planetstrike, and Cities of Death missions are ideal for replicating the advance of the Champions of Fenris on Vikurus as they fought their way towards the shrine city of Absolom. A game of Apocalypse is perfect if you wish to play even bigger games of Warhammer 40,000, perhaps fielding the combined forces of the Ironwolves, Champions of Fenris and surviving Midgardian militia in a battle to reclaim the Magma Gates. You might even want to expand on the campaign using Eternal War, Maelstrom of War and/or Altar of War missions – or by generating your own set of missions – to recreate the valiant efforts of the Space Wolves and their allies against the Chaos Daemons.№1
ECHOES OF WAR
:
Of Wolf and IronOn the trail of the Wulfen’s distinctive augur-trace, Egil Iron Wolf descended to the surface of Mydgal Alpha and tracked his quarry to the towering super-hive of Irkalla. Yet the Daemons had arrived there many days earlier; to reach their prize, the Ironwolves would first have some bloody work to do.
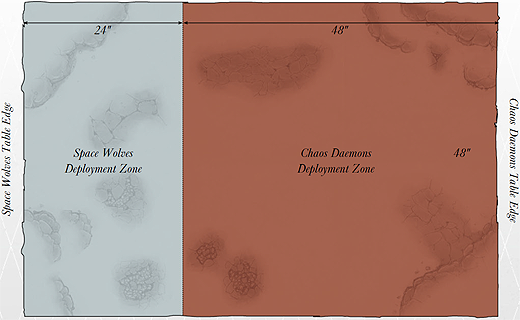 Choose armies as described in Warhammer 40,000: The Rules. One player is the Space Wolves player, and all his units must have the Space Wolves Faction. He must include at least one unit of Wulfen and the Ironwolves Formation with a Wolf Lord (representing Egil Iron Wolf) to be his army’s Warlord. His opponent is the Chaos Daemons player, and all his units must have the Chaos Daemons Faction. He must include a Daemon Prince with the Daemon of Nurgle special rule (representing Mordokh the Rotted) to be his army’s Warlord. THE BATTLEFIELD Set up terrain using the deployment map included in this mission. Objective Markers After terrain has been set up, the Chaos Daemons player places 6 Objective Markers anywhere in his deployment zone so that each is more than 6" from any battlefield edge and more than 12" from another Objective Marker. DEPLOYMENT Players deploy using the Standard Deployment Method as described in Warhammer 40,000: The Rules, using the deployment map included in this mission. However, the Space Wolves player does not deploy any of his Wulfen units (see Mission Special Rules). FIRST TURN The player that deployed first can choose to take the first or second turn. If they decide to take the first turn, their opponent can attempt to Seize the Initiative. GAME LENGTH The mission uses Variable Game Length. VICTORY CONDITIONS At the end of the game, the Chaos Daemons player wins if the Wulfen were not found, or if the Wulfen were found but all of them were subsequently slain (see Mission Special Rules). Any other result is a victory to the Space Wolves player. Reserves.
№2
ECHOES OF WAR
:
A Rivalry RekindledThe Firehowlers were closing fast upon a Wulfen pack, but they were not the only Space Marines on Tranquilitus; a strike force of Dark Angels were already on the hunt. When a host of Daemons threatened to rob them of their prize, the two Chapters had to work together to achieve their goal, despite the storied rivalry between them.
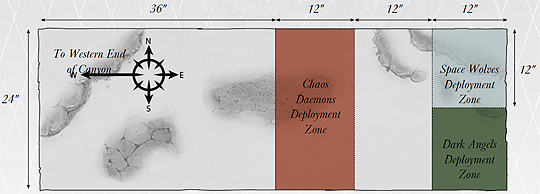 One player is the Space Marines player, and all his units must have the Space Wolves or Dark Angels Faction. His opponent is the Chaos Daemons player, and all his units must have the Chaos Daemons Faction. Points values are not used in this mission; each player can field as many units as they have in their collection. Designer’s Note: Given that the nature of this mission requires speed over brawn, we recommend that you focus on fielding units that can move at least 12" a turn or they will soon be left behind when the chase begins in earnest. THE BATTLEFIELDThis battle takes place in a narrow canyon. Set up the battlefield so that it is 24" wide and 72" long, then set up terrain as described in Warhammer 40,000: The Rules. DEPLOYMENT The Space Marines player deploys first, setting up all of his units with the Space Wolves Faction anywhere in the Space Wolves Deployment Zone (see the map included in this mission), and all of his units with the Dark Angels Faction anywhere in the Dark Angels Deployment Zone. The Chaos Daemons player then sets up all of his units anywhere in the Chaos Daemons Deployment Zone. FIRST TURN The Space Marines player has the first turn. GAME LENGTH The game ends immediately either when a player has no models left on the battlefield or when one player successfully moves one of his units off the far western end of the canyon (see Mission Special Rules). VICTORY CONDITIONS The first player to successfully move one of his units off the far western end of the canyon (see Mission Special Pules) wins. However, if all of one player’s models are completely destroyed, his opponent wins automatically. Haunted Planet, Reserves. Any models that are on a board section when it is removed are placed into Ongoing Reserve, and they may re-enter play from the eastern table edge in their following turn. If this causes a player to no longer have any models remaining on the battlefield, then he automatically loses the game. Vehicles that have suffered an Immobilised result and are on a board section that is being removed count as destroyed. The far western end of the canyon will only be revealed at the end of the eighth game turn, so in order to achieve a victory in this mission each player must ensure that at least one of his units survives until the ninth turn so that he can move it off the far western end of the canyon (as described in Victory Conditions).
№3
ECHOES OF WAR
:
An Arena of BloodThe Champions of Fenris forced a path through the daemonic hordes to find their lost kin in the Dome of Penitents at the heart of Absolom. The Great Wolf knew that whilst the dread Bloodthirster commanding the Daemons lived, the Wulfen would not be safe, yet he faced competition for the kill from an unexpected quarter...
 This is a mission for three players. All players must choose armies as described in Warhammer 40,000: The Rules. One player is the Space Wolves player, and all his units must have the Space Wolves Faction. If the models are available, he must include the Champions of Fenris Formation, and Logan Grimnar to be his army’s Warlord. The second player is the Grey Knights player, and all his units must have the Grey Knights Faction. If the model is available, he must include Brother-Captain Stern to be his army’s Warlord. The third player is the Chaos Daemons player, and all his units must have the Chaos Daemons Faction. If the model is available, he must include a Bloodthirster of Unfettered Fury to be his army’s Warlord. THE BATTLEFIELD This battle takes place within the huge Dome of the Penitents. Set up a square battlefield (any size), then set up terrain as described in Warhammer 40,000: The Rules. DEPLOYMENT The Space Wolves player deploys first, setting up all of his units anywhere in the Space Wolves Deployment Zone (see the map included in this mission). The Chaos Daemons player then sets up all of his units anywhere in the Chaos Daemons Deployment Zone. All of the Grey Knights player’s units must be held in Reserve or Deep Strike Reserve (though in this mission, the Grey Knights player cannot automatically lose the game for having no models on the battlefield). FIRST TURN The Space Wolves player has the first turn. The Chaos Daemons player goes second, followed by the Grey Knights player. Note that this means that each game turn comprises three player turns instead of two. GAME LENGTH The game lasts until either the Chaos Daemons Warlord has been slain, or both the Space Wolves and Grey Knights Warlords have been slain, after which the game ends immediately. VICTORY CONDITIONS If a Character belonging to either the Space Wolves or the Grey Knights player causes the Chaos Daemons Warlord to be removed as a casualty, that Character’s controlling player wins. Any other result is a victory to the Chaos Daemons player. Ministorum Shrine World, Reserves. №4
ECHOES OF WAR
:
Scattered DropFrostheim’s defence network had been taken over by Alpha Legion, and the Deathwolves’ strike force found itself scattered by the resulting storm of flak. Landing in small, separated groups, the isolated Space Wolves were soon under attack from all sides by Alpha Legion Chaos Space Marines supported by hordes of Chaos Cultists.
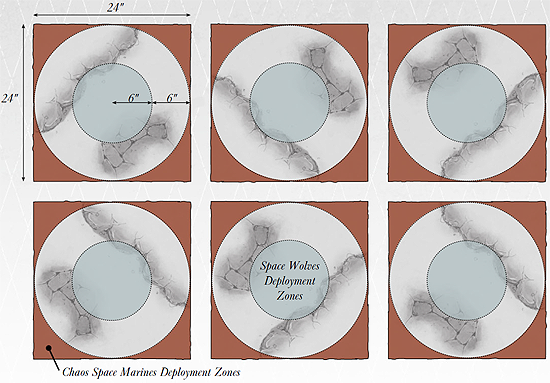 Choose armies as described in Warhammer 40,000: The Rules. Each army must include at least six units. One player is the Space Wolves player, and all his units must have the Space Wolves Faction. His opponent is the Chaos Space Marines player, and all his units must have the Chaos Space Marines Faction. THE BATTLEFIELD Set up six 24"x24" battlefields, then set up terrain on each as described in Warhammer 40,000: The Rules, using the deployment map included in this mission. DEPLOYMENT Players alternate setting up units, starting with the Space Wolves player. The first Space Wolves unit to be deployed can be set up in any one of the six areas. All of the models in the unit must be set up wholly within 6" of the centre of the battlefield that has been chosen. The Chaos Space Marines player must then deploy a unit in the same battlefield, more than 6" from any Space Wolves units. The second Space Wolves and Chaos Space Marines units must be set up in the same way, but on a different battlefield. Carry on like this until all six areas have one unit from each army. Players then take it in turns to set up their remaining units one at a time, but they can set them up on any battlefield, provided they are not placed within 6" of an enemy unit that has already been set up. Both players must deploy at least one unit on each of the six battlefields. Any further units can be placed in Reserves afterwards, if desired. FIRST TURN Roll a dice. On an odd roll, the Chaos Space Marines player has the first turn. On an even roll, the Space Wolves player goes first. GAME LENGTH The mission uses Variable Game Length. VICTORY CONDITIONS At the end of the game, players score 1 Victory Point for each battlefield that only has models belonging to their army remaining. The player with the most Victory Points at the end of the game is the winner. If both players have the same number of Victory Points, then the game is a draw. Ice World, Reserves. These changes aside, turns are carried out as normal, with each player moving and fighting with his units on all six battlefields simultaneously.
№5
ECHOES OF WAR
:
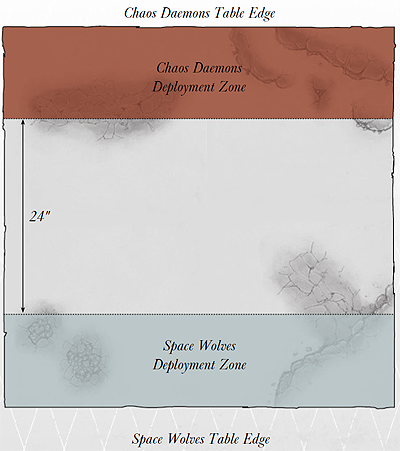
As Above, so BelowHaving reclaimed Midgardia’s Magma Gates from the invading Daemons, Grimnar enacted an audacious plan to simultaneously drive forth the remaining hellspawn from both above and below ground. Dividing his forces between armoured might and boots on the ground, the Great Wolf gave the signal for both armies to advance.
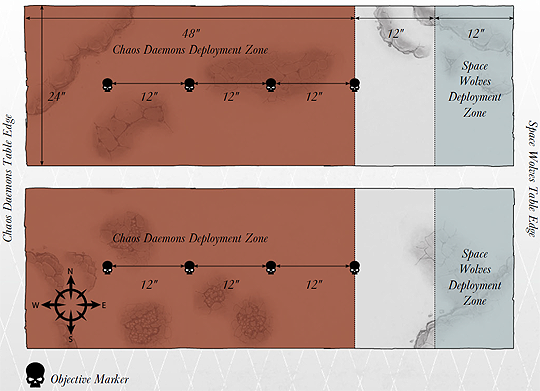 One player is the Space Wolves player, and all his units must have the Space Wolves Faction. His opponent is the Chaos Daemons player, and all his units must have the Chaos Daemons Faction. Each player must choose two Warlords – one to lead his army on each battlefield (see The Battlefield, below) – and generate a separate Warlord Trait for each one. Points values are not used in this mission; each player can field as many units as they have in their collection. THE BATTLEFIELD This battle consists of two separate conflicts taking place simultaneously on different battlefields – the Surface and the Underground. Set up two separate battlefields that are 24" wide and 72" long, then set up terrain as described in Warhammer 40,000: The Rules. Objective Markers The Chaos Daemons player places a total of 4 Objective Markers on each battlefield as shown on the deployment map included with this mission. DEPLOYMENT The Chaos Daemons player deploys first, dividing his units as evenly as possible between the two battlefields, setting up any of these units not held in Reserve in the Chaos Daemons Deployment Zone on each battlefield (see the map included with this mission). The Space Wolves player deploys second, dividing his units between the two battlefield as follows:
FIRST TURN The Space Wolves player has the first turn. GAME LENGTH The mission uses Variable Game Length. However, if all of the Space Wolves player’s models on either of the two battlefields are completely destroyed, the game ends immediately. VICTORY CONDITIONS At the end of a turn in which the Space Wolves player simultaneously controls the easternmost Objective Marker on both battlefields, he scores 1 Victory Point. Each time this happens, remove the easternmost Objective Markers from each battlefield. Note that it is not possible to score more than 1 Victory Point in this manner each turn. At the end of the game, count up how many Victory Points the Space Wolves player has scored and consult the table below to see the outcome of the battle:
Reserves. №6
ECHOES OF WAR
:
Averting DisasterUpon the Wolf Moon, Valdrmani, a diabolical scheme was on the verge of fruition. Though the Space Wolves knew it not, their fate hung in the balance; should their enemies’ plan be allowed to succeed, the repercussions would likely damn their entire Chapter. Only Krom Dragongaze’s intervention could avert disaster…
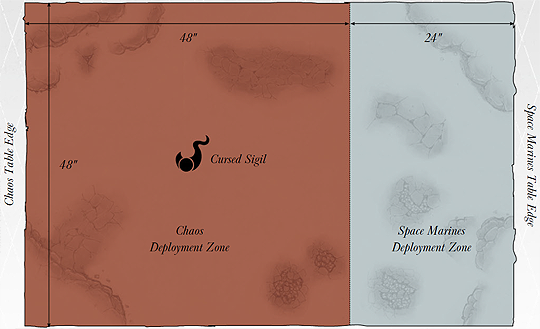 Choose armies as described in Warhammer 40,000: The Rules. One player is the Space Marines player, and all his units must have the Space Wolves or Grey Knights Faction. If the models are available, he must include Brother-Captain Stern and Krom Dragongaze, one of which must be his army’s Warlord. His opponent is the Chaos player, and all his units must have the Chaos Space Marines or Chaos Daemons Faction. If the model is available, he must include a Dark Apostle (representing Hekastis Nul) to be his army’s Warlord. THE BATTLEFIELD At the centre of the Chaos Deployment Zone stands a Cursed Sigil that crackles with the power of the Warp. The Cursed Sigil should be represented by a suitable model from your terrain collection. Set up the remaining terrain as described in Warhammer 40,000: The Rules, using the deployment map included in this mission. DEPLOYMENT Players deploy using the Standard Deployment Method as described in Warhammer 40,000: The Rules, using the deployment map included in this mission. FIRST TURN The player that set up first can choose to take the first or second turn. If they decide to take the first turn, their opponent can attempt to Seize the Initiative. GAME LENGTH The mission uses Variable Game Length. However, if the Cursed Sigil is destroyed (see Mission Special Rules), the game ends immediately. VICTORY CONDITIONS The Space Marines player wins if the Cursed Sigil is destroyed (see Mission Special Rules). If the game ends before this has been achieved, the Chaos player wins. Reserves.
|
Factions > Space Wolves >

