Air War missions are a set of six missions designed to challenge each player’s mastery of aerial warfare. Even though Flyers can play a pivotal role in just about any mission, the Air War missions both encourage and reward the use of armies with a preponderance of Flyers or Flyer Wings. There are two main ways in which you can use the Air War missions in Death from the Skies – the most straightforward is simply to choose a mission you want to play. Alternatively, you can ght a campaign by playing the missions in order using the rules found below. If you do so, then players should stick to the same side – playing as either the Invader or the Warden – for each mission. Keep a note of the players’ victories and defeats – the winner is the player that achieved the greatest number of victories once all of the missions have been played. In the case of a draw, the player that wins the final battle wins the campaign!
The Armies Each mission recommends which armies and units should be used (assuming the models are available) if you want to fight the battle. The Battlefield and Deployment The deployment map, zones and instructions for an Air War mission are included with the mission itself; don't use those in Warhammer 40,000: The Rules. Flyers can be deployed on the battlefield at the start of any Air War mission — they do not have to start in Reserve unless you wish for them to do so or the mission specifically states that they must do so. Flyers that are set up on the battlefield count as Zooming Flyers at the start of the game. Victory Conditions and Mission Special Rules Some mission special rules and victory conditions only apply to specific units. If the models for that unit aren't available, then the associated special rule or victory condition is simply ignored. Sudden Death Victory When playing an Air War mission, if one player has no models on the battlefield at the end of their turn, but still has one or more Flyer units in Reserve (including Ongoing Reserve), their opponent does not automatically win. The Air War missions presented below can be played sequentially to fight a thrilling campaign. If you do so, the victor of each mission will receive a bonus in the next mission of the campaign, as detailed on these pages. If a game is a draw, neither player receives a bonus in the next mission. 1
AIR WAR
:
Fighter SweepFor aerial supremacy to be achieved, the enemy’s strength in the air must be broken. Muster your fighters and sweep their aircraft from the sky in an overwhelming display of firepower and derring-do. In doing so, you can clear a path for your bombers to strike at your enemy’s hangars and landing zones to complete your victory.
 Points values are not used in this mission. Instead, each player can field as many Flyers as they have in their collection, and only Flyers can be used. The player that fields the most Flyers is the Invader, and the other player is the Warden. Roll-off to determine who is the Invader if both players have the same number of Flyers. THE BATTLEFIELD Set up a battlefield of any size — the larger the better! This battle takes place at very high altitude, so no scenery is needed for the game unless Clouds are being used (see below). DEPLOYMENT The players take it in turn to deploy one unit from their army (i.e. an individual Flyer or a Flyer Wing) anywhere in their deployment zone, beginning with the Invader. If the Warden finishes deploying all of their units, the Invader deploys all of their remaining units, and the battle is ready to begin. Neither player is allowed to place units in Reserve in this battle. FIRST TURN The Warden has the first turn unless the Invader is able to Seize the Initiative. GAME LENGTH The mission uses Variable Game Length. VICTORY CONDITIONS At the end of the game, the player who has scored the most Victory Points is the winner. If both players have the same number of Victory Points, the game is a draw. Primary Objective At the end of the game, each player receives 2 Victory Points for each enemy Fighter model that has been completely destroyed, and 1 Victory Point for each Attack Flyer or Bomber model that has been completely destroyed. Models that are not on the board at the end of the game count as destroyed for the purposes of this mission. Secondary Objectives First Blood, Slay the Warlord. Clouds: You can, if you wish, mark out areas of the battlefield as being covered in clouds. No more than a third of the battlefield can be covered in clouds. Models have the Shrouded special rule if the line of sight of an attack made against them passes through 3-12" of cloud. Line of sight is completely blocked if it passes through more than 12" of cloud. 2
AIR WAR
:
Tactical StrikeWith many of the enemy’s fighters swept from the skies, the way is now clear for your bombers and ground-attack craft to strategically target their landing sites. Success in this mission will further deplete your enemy’s strength in the air, securing you aerial supremacy and enabling your forces to initiate their ground campaign in earnest.
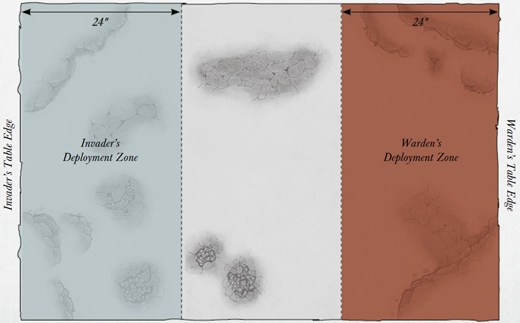
 Choose armies as described in Warhammer 40,000: The Rules. One player is the Invader, and their opponent is the Warden. The Invader must take at least one Flyer Wing. The Warden must include any five fortifications (in any combination) to represent strategic targets (see Victory Conditions), though they do not cost any points. If the Warden does not have enough fortifications, make up the difference with Underground Bunker Objective markers. Each marker can be targeted in the same way as a fortification. It is treated as having an Armour Value of 13 and 4 Hull Points. Units cannot embark into an Underground Bunker, and it does not have any weapons — it only serves as a target! THE BATTLEFIELD The Warden places their five strategic targets anywhere in their deployment zone, after which they set up any remaining terrain in any manner they choose. DEPLOYMENT The Warden deploys first, placing all of their units not being held in Reserve anywhere in their deployment zone (see map). The Invader deploys second, placing all of their units not being held in Reserve anywhere in their deployment zone (see map). FIRST TURN The Invader has the first turn unless the Warden can Seize the Initiative. GAME LENGTH The mission uses Variable Game Length. However, if all five strategic targets are destroyed (see Victory Conditions), the game ends immediately. VICTORY CONDITIONS At the end of the game, count up how many strategic targets have suffered a Total Collapse or Detonation! result on the Building Damage table and consult the table below to see the outcome of the battle:
Night Fighting, Reserves. 3
AIR WAR
:
Lightning AssaultFreed from having to face your enemy’s full aerial might, your flight wings can now better support an aggressive advance deep into enemy territory. Use your airborne assets to smash a hole in the enemy lines through which your land units can break through and continue to press onwards.
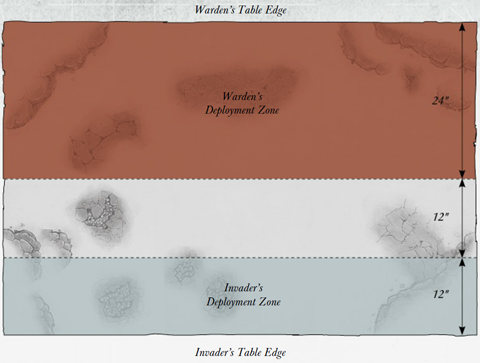
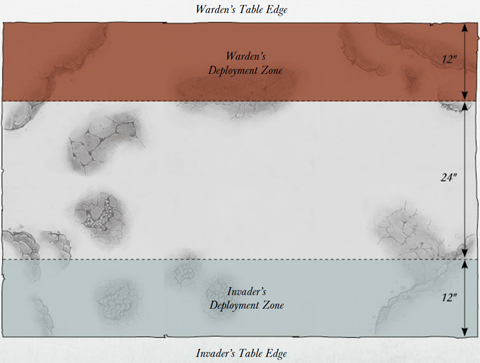
 Choose armies as described in Warhammer 40,000: The Rules. One player is the Invader, and their opponent is the Warden. The Invader must take at least one Flyer Wing and at least three non-Flyer units. THE BATTLEFIELD Set up terrain using the deployment map included in this mission. DEPLOYMENT The Warden deploys first, setting up all of their units not being held in Reserve anywhere in their deployment zone. The Invader sets up second. Only Flyers from the invading army can be deployed at the start of the battle — all of the Invader's remaining units must be held in Reserve. FIRST TURN The Invader has the first turn unless the Warden can Seize the Initiative. GAME LENGTH At the end of game turn 8, one of the players must roll a D6. On a roll of 3+, the game continues, otherwise the game is over. If another turn is played, another D6 must be rolled at the end of game turn 9, and this time, the game only continues on a roll of 4+. The battle automatically ends at the close of game turn 10. VICTORY CONDITIONS At the end of the game, the player with the most non-Flyer units within the Warden's deployment zone is the winner. If both players have the same number of non-Flyer units in the Warden's deployment zone, the game is a draw. Night Fighting, Reserves. 4
AIR WAR
:
Munitions DropSupported by punishing aerial assaults, your ground forces have pushed deep into enemy territory, but stubborn resistance has seen some of your advancing formations running desperately low on supplies and ammunition. It is imperative that you airdrop emergency supplies to your invading spearhead before it is overwhelmed.
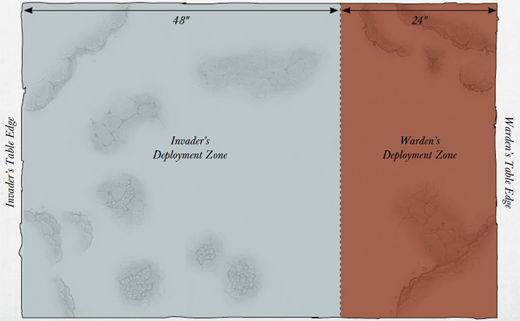
 Choose armies as described in Warhammer 40,000: The Rules. One player is the Invader, and their opponent is the Warden. The Invader must include five Flyers in their army to carry out the airdrop (see Mission Special Rules), though these do not cost any points. THE BATTLEFIELD First of all, the Invader places up to three pieces of terrain anywhere in their deployment zone (see map). Players then set up any remaining terrain as described in Warhammer 40,000: The Rules, using the deployment map included in this mission. Objective Markers No Objective Markers are placed at this stage; they are airdropped into battle later in the game (see Mission Special Rules). DEPLOYMENT The Invader deploys first, setting up all of their non-Flyer units anywhere in their deployment zone (see map). The Warden then sets up all of their units not being held in Reserve anywhere that is more that 18" away from the Invader's deployment zone (see map). Both players must set up all of their Flyers in Reserve. FIRST TURN The Warden has the first turn unless the Invader can Seize the Initiative. GAME LENGTH The mission uses Variable Game Length. VICTORY CONDITIONS At the end of the game, the player who has scored the most Victory Points is the winner. If both players have the same number of Victory Points, the game is a draw. Primary Objective At the end of the game, each Objective Marker is worth 3 Victory Points to the player that controls it. Secondary Objectives First Blood, Slay the Warlord. Night Fighting, Reserves. 5
AIR WAR
:
Aces HighAs your forces gradually close the noose on your enemy’s last stronghold, ultimate victory draws near. Yet before a final assault can begin, one last thorn in your side needs to be dealt with. A highly skilled fighter ace has emerged and, for a lone pilot, is causing astonishing damage to your flyer wings. The ace must be eliminated at all costs.
THE ARMIESOne player is the Interceptor, and their opponent is the Ace. Points values are not used in this mission. Instead, the Interceptor fields a Flyer Wing and the Ace controls a single Flyer. If you are playing this mission as part of the Air War campaign, the Ace should be an existing Ace from the player's army. If the player does not have any Aces in their army, they can use any Flyer, and roll once on the Ace Skills table to see which skill the Ace has. THE BATTLEFIELD As this mission exclusively uses the rules for the Dogfight phase, players need only prepare a flat surface about 36" apart. GAME LENGTH The mission lasts until either the Ace or all of the models in the Flyer Wing have been completely destroyed. VICTORY CONDITIONS At the end of the game, the player who still has any models remaining is the winner. Fortune Favours the Bold: If the Ace being used is from the player's army (rather than generated specifically for this mission), then they always make a lucky escape if they are shot down. This is a dangerous mission for the Ace, and we don't want to punish a player for daring to use their favourite pilot in the game!
6
AIR WAR
:
Crashing ThunderHaving waged a masterful campaign to reach the gates of your enemy’s capital stronghold, ultimate victory now lies within your grasp. To seize it, you must tear down their walls and smash asunder all resistance. Let nothing stand in your way — pound your enemy into submission or — should they continue to resist — into oblivion.
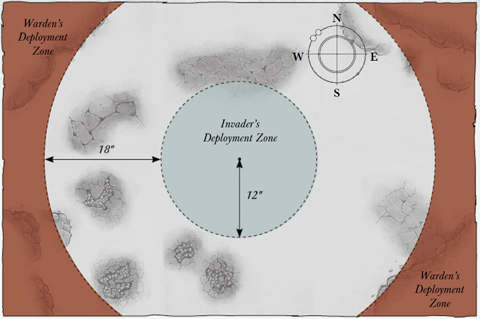
 Choose armies as described in Warhammer 40,000: The Rules. One player is the Invader, and their opponent is the Warden. The Invader must include at least one Flyer Wing. THE BATTLEFIELD The Warden sets up the terrain in any manner they choose. Any fortifications set up are part of the Warden's Defence Network (see Victory Conditions), and count as controlled by the Warden for the entire battle. Objective Markers After terrain has been set up, the Warden places a total of 3 Objective Markers anywhere in their deployment zone, but not within 6” of any battlefield edge or within 12" of another Objective Marker. DEPLOYMENT The Warden deploys first, setting up all of their units not being held in Reserve anywhere in their deployment zone (see map). The Invader then sets up all of their units not being held in Reserve anywhere in their deployment zone (see map). FIRST TURN The Invader has the first turn unless the Warden can Seize the Initiative. GAME LENGTH The mission uses Variable Game Length. VICTORY CONDITIONS At the end of the game, the player who has scored the most Victory Points is the winner. If both players have the same number of Victory Points, the game is a draw. Primary Objective At the end of the game, each Objective Marker is worth 3 Victory Points to the player that controls it. In addition, at the end of the game, the Invader scores 1 Victory Point for each fortification that is part of the Warden’s Defence Network that has suffered a Total Collapse or Detonation! result on the Building Damage table. The Warden scores 1 Victory Point for each of their fortifications that has not suffered a Total Collapse or Detonation! result. Secondary Objectives First Blood, Slay the Warlord. Mysterious Objectives, Night Fighting, Reserves. |
Expansions > Death from the Skies >

