The following missions illustrate the different sorts of strategies used by Orks, and they will provide new tests of your tactical ability as a commander.
Sanctus Reach: The Red Waaagh! CampaignThis section includes several Warhammer 40,000 missions inspired by the pivotal battles of the Red Waaagh! These missions will provide players with new ways to use their armies and a wealth of new tactical options to master.
There are several ways in which you can use the Red Waaagh! missions. The most straightforward is to select the mission for a battle you are excited about from the campaign guide, and use the mission to recreate the battle on your tabletop! The Armies section of each scenario provides guidance on the forces present, while the mission’s special rules will ensure that all of the most important elements of the original battle will be recreated.Another way to use these missions is to fight a campaign by playing through the scenarios sequentially. If you do so, then one player should command the forces of the Orks in all of the battles, while their opponent commands the opposing side. Keep a note of each player’s wins and losses, and the winner of the campaign is the player with the highest number of victories once all of the missions have been completed. In a campaign, the winner of a named mission is granted a bonus when playing the next mission, as noted below. In the case of a draw, neither side gains a bonus in the next game. Finally, it is worth noting that you can use the missions using different armies from those that took part in the actual battle. With a little imagination and some minor modifications on your part, you can easily use them to fight battles with any combination of forces and terrain you have in your collection. The Red Waaagh! Campaign ChartThis section includes several Warhammer 40,000 missions inspired by the pivotal battles of the Red Waaagh! You can play through these missions in sequence to fight a thrilling campaign. If you do so, the victor of each mission will receive a bonus in the next mission of the campaign, as detailed on these pages. If a game is a draw, neither player receives a bonus in the next mission.№1
ECHOES OF WAR
:
The Red Waaagh! DescendsThe Red Waaagh! has come to Alaric Prime as rust-ships filled with battle-hungry Orks descend from orbit on trails of fire, the greenskins eager to make planetfall and get stuck into the fight. Across the planet a network of fortified strongholds have been reinforced and garrisoned by the brave Imperial Guardsmen of Cadia. They stand as Alaric Prime’s first line of defence, ready to greet the Ork invaders with simple heroism and a deadly storm of firepower.
THE ARMIESChoose armies as described in Warhammer 40,000: The Rules. The Ork player’s army may only include units with the Orks Faction. They are the Attacker in this mission. The Imperial player’s Warlord must have the Astra Militarum Faction, and their army may only include units with the Astra Militarum, Imperial Knights and Militarum Tempestus Factions and fortifications. They are the Defender in this mission.
THE BATTLEFIELD The Imperial player can place up to eight fortifications anywhere on the table that is more than 6" from the centre of the table. They do not pay any points for these fortifications, and none start the game dilapidated. All buildings start the game claimed by the Imperial player. Once all fortifications have been placed, the Imperial player can then set up any other terrain on the table in a manner of his choosing, but may not place any terrain within 6" of the centre of the table. Objective Markers After terrain has been set up, the Imperial player must place an Objective Marker on the centre of the table. DEPLOYMENT The players must first determine their Warlord Traits and stratagems. Each player has 4 Stratagem Points. The Ork player selects any one table edge to be his. The Imperial player’s table edge is the one opposite the Ork player’s. The Imperial player deploys his force anywhere on the battlefield. All of the Ork player’s units start the game in Reserve (see the Mission Reserves rule, below).
FIRST TURN The Ork player has the first turn. GAME LENGTH This mission uses Variable Game Length. VICTORY CONDITIONS At the end of the game, the player who has scored the most Victory Points is the winner. If both players have the same number of Victory Points, the game is a draw. Primary Objective At the end of the game, the player who controls the Objective Marker scores 5 Victory Points. Secondary Objectives Slay the Warlord, First Blood. Firestorm*, Mysterious Objectives, Night Fighting, Planetary Assault, Scramble!, Shock Tactics.
* The Ork player rolls a D3 and adds the number of buildings that are on the table to the result. Each section of a multiple-part building counts as a separate building. The total is the number of Firestorm Attacks that the Ork player makes. №2
ECHOES OF WAR
:
The Knights Strike BackThe Red Waaagh! has smashed into Alaric Prime and dealt the Imperial Guard defenders a reeling blow. The Knights of three noble houses, keen to begin the hunt, launch a devastating counter-attack against the greenskin horde. The Knights hope to drive the Orks from their world in a single glorious charge, but if their momentum falters, they could find themselves cut off and surrounded.
THE ARMIESChoose armies as described in Warhammer 40,000: The Rules. The Ork player’s army may only include units with the Orks Faction and fortifications. The Imperial player’s Warlord must have the Astra Militarum Faction, and his army may only include units with the Astra Militarum, Imperial Knights and Militarum Tempestus Factions and fortifications.
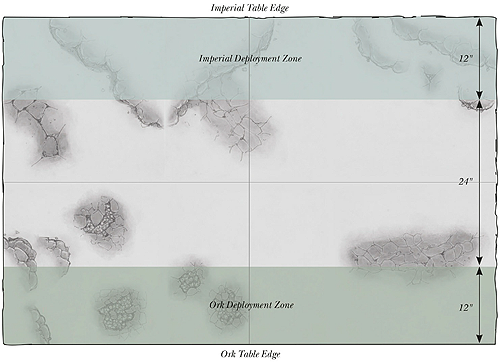
THE BATTLEFIELD Use the deployment map included with this mission. Set up terrain as described in Warhammer 40,000: The Rules. DEPLOYMENT The players must first determine their Warlord Traits. The Imperial player deploys first, using the rules from Warhammer 40,000: The Rules and the deployment map opposite. Any unit that cannot be deployed on the table starts the game in Reserve. The Ork player then splits his force into two groups, with as close to half the total number of units in each group as possible. He then selects one of the groups; all units in this group are deployed using the rules from Warhammer 40,000: The Rules and the deployment map opposite (any unit that cannot be deployed starts the game in Reserve). All units in the other group are placed in Reserve (see the Mission Reserves rule, below). FIRST TURN The Imperial player goes first unless the Ork player can Seize the Initiative. GAME LENGTH This mission uses Variable Game Length. VICTORY CONDITIONS At the end of the game, the player who has scored the most Victory Points is the winner. If both players have the same number of Victory Points, the game is a draw. Primary Objectives At the end of the game, the Imperial player scores 1 Victory Point for each of his units that is in the Ork player’s deployment zone, and 6 Victory Points if at least 3 of his units have exited the table (see the Break Through special rule, below). The Imperial player does not score Victory Points for units that are Immobilised or Falling Back. At the end of the game, the Ork player scores 1 Victory Point for each enemy unit that has been completely destroyed. Units that are Immobilised or Falling Back at the end of the game, and units that are not on the board at the end of the game (excluding those that have exited the table using the Break Through special rule, below), count as destroyed for the purposes of this mission. Remember that Independent Characters and Dedicated Transports are individual units and will award Victory Points if they are destroyed. Secondary Objectives Slay the Warlord, First Blood, Linebreaker. Night Fighting, Reserves.
№3
ECHOES OF WAR
:
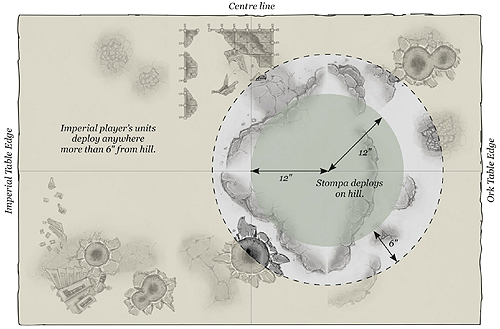
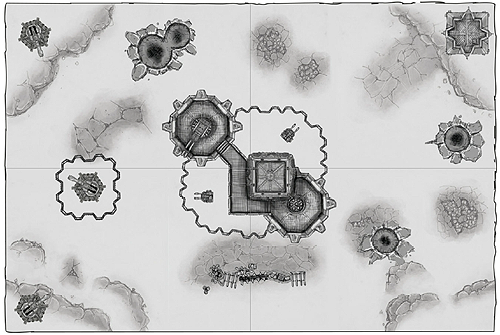
The Fall of House KestrenThough many noble warriors fell, a handful of Knights tore through the greenskin lines to threaten the Ork flagship, Wrath of Gork. As the Knights approach, the rust-ship’s cargo ramp slams down and Warboss Grukk, commanding his personal Stompa, clanks down to meet the would-be heroes. With an enemy war machine to their fore and a pursuing mob of Orks to their rear, the last surviving Knights prepare to fight for their very lives.
THE ARMIESChoose armies as described in Warhammer 40,000: The Rules. The Imperial player’s Warlord must have the Imperial Knights Faction, and his army may only include units with the Astra Militarum, Imperial Knights and Militarum Tempestus Factions and fortifications. The Ork player’s army may only include units with the Orks Faction and fortifications, and must include the following units: Grukk Face-rippa. Grukk must be the Ork player’s Warlord. Stompa (Grukk’s Stompa). THE BATTLEFIELD Use the deployment map included with this mission. Do not set up fortifications in the Ork player’s deployment zone, but otherwise set up terrain as described in Warhammer 40,000: The Rules.
DEPLOYMENT The Imperial player deploys first, using the rules from Warhammer 40,000: The Rules and the deployment map, opposite. The Ork player then deploys his Stompa using the deployment map on the following page. All of the Ork player’s other units are placed in Reserve (see the Mission Reserves rule, below). FIRST TURN The Ork player has the first turn. GAME LENGTH This mission uses Variable Game Length. VICTORY CONDITIONS At the end of the game, the player who has scored the most Victory Points is the winner. If both players have the same number of Victory Points, the game is a draw. Primary Objectives At the end of each game turn, the Ork player scores 1 Victory Point if his Stompa has not been destroyed. At the end of the game, each player scores 1 Victory Point for each enemy unit that has been completely destroyed. Units that are not on the board at the end of the game (excluding the Ork player’s Warlord – see the Warlord Unleashed special rule below) count as destroyed for the purposes of this mission. Remember that Independent Characters and Dedicated Transports are individual units and award Victory Points if they are destroyed. At the end of the game, the Imperial player scores 3 additional Victory Points if the Stompa has been destroyed. Secondary Objectives Slay the Warlord, First Blood. Night Fighting.
№4
ECHOES OF WAR
:
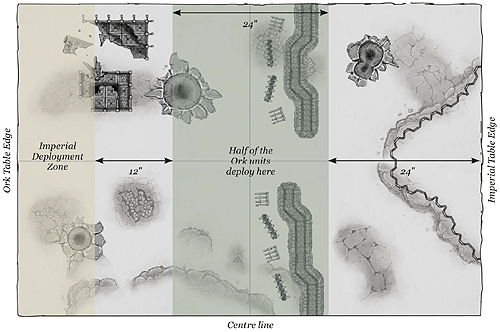
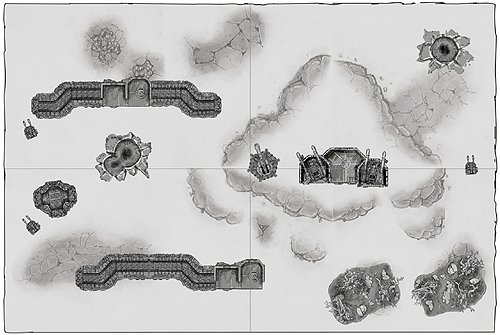
Enter the Steel HostGrukk’s Stompa has been vanquished, but only at a horrendous cost in Imperial war machines and lives. Now a trio of surviving Knights must attempt to reach friendly lines, but their escape route is blocked by a tide of angry Orks. Things look desperate indeed until help arrives in the form of the Steel Host, a Cadian armoured company bristling with firepower and ready for battle.
THE ARMIESChoose armies as described in Warhammer 40,000: The Rules. The Ork player’s army may only include units with the Orks Faction and fortifications. The Imperial player’s Warlord must have the Astra Militarum Faction. The Imperial player’s army may only include units with the Astra Militarum, Imperial Knights and Militarum Tempestus Factions and fortifications, and must include the following:
THE BATTLEFIELD Use the deployment map included with this mission. Set up terrain as described in Warhammer 40,000: The Rules. DEPLOYMENT The players must first determine their Warlord Traits. Then the Imperial player deploys his Knight Survivors in their deployment zone. The Imperial player’s remaining units are placed in Reserve (see the Mission Reserves rule, below). The Ork player must then split his force into two groups, with as close to half the total number of units in each group as possible. He then selects one of the groups; all units from this group are deployed using the rules from Warhammer 40,000: The Rules and the deployment map opposite (any units in this group that cannot be deployed on the table are placed in Reserve). All units in the Ork player’s other group are placed in Reserve (see the Mission Reserves rule, below). FIRST TURN The Imperial player has the first turn. GAME LENGTH This mission uses Variable Game Length. VICTORY CONDITIONS At the end of the game, the player who has scored the most Victory Points is the winner. If both players have the same number of Victory Points, the game is a draw. Primary Objectives At the end of the game, the Imperial player scores 1 Victory Point for each of his Knight Survivors that is within 12" of his table edge, and D3 Victory Points for each of his Knight Survivors that has exited the table via his table edge (see the Flight to Sanctuary special rule, below). At the end of the game, the Ork player scores 1 Victory Point for each Knight Survivor that has not exited the table and is not within 12" of the Imperial player’s table edge, and D3 Victory points for each Knight Survivor that is completely destroyed. Knight Survivors that are not on the board (excluding those that have exited the table – see the Flight to Sanctuary special rule, below) at the end of the game count as destroyed for the purposes of this mission. Secondary Objectives Slay the Warlord, First Blood. Night Fighting.
№5
ECHOES OF WAR
:
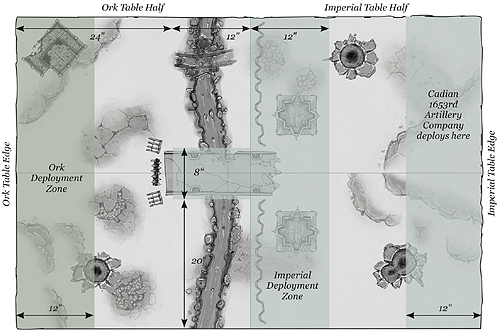
The River Runs RedThe onslaught continues and the Imperial Guard have fallen back to the fortifications guarding Boiling River’s main bridge-crossing. If they can hold the Orks here – a bottleneck where the xenos cannot bring their numbers to bear and where artillery can rain fire upon their close-packed ranks – they may yet buy time to organise an ordered withdrawal. However, the Orks have plenty of Weirdboyz and don’t plan to cross the bridge by conventional means…
THE ARMIES
THE BATTLEFIELD Use the deployment map included with this mission. The Imperial player places up to four fortifications anywhere in his table half. He does not pay any points for these fortifications, and none start the game dilapidated. All buildings start the game claimed by the Imperial player. He then sets up terrain in any manner he chooses, but access to the bridge must not be blocked. DEPLOYMENT The players must first determine their Warlord Traits and stratagems. Each player has 2 Stratagem Points. Then, the Ork player splits his force into two groups, with as close to half the total number of units in each group as possible. The Ork player deploys all units in the group containing his Warlord using the deployment map opposite. All units in the Ork player’s other group are placed in Reserve (see the Mission Reserves rule). The Imperial player then deploys his force using the deployment map opposite.
The Ork player has the first turn. GAME LENGTH This mission uses Variable Game Length. VICTORY CONDITIONS At the end of the game, the player who has scored the most Victory Points is the winner. If both players have the same number of Victory Points, the game is a draw. Primary Objective At the end of the game, each player scores 1 Victory Point for each of their scoring units that is in the Imperial player’s table half. Secondary Objectives Slay the Warlord, First Blood. Firestorm*, Night Fighting, Shock Tactics * The Ork player rolls a D3 and adds the number of buildings that are on the table to the result. Multiple-part buildings count as several separate buildings. The total is the number of Firestorm Attacks that the Ork player makes.
№6
ECHOES OF WAR
:
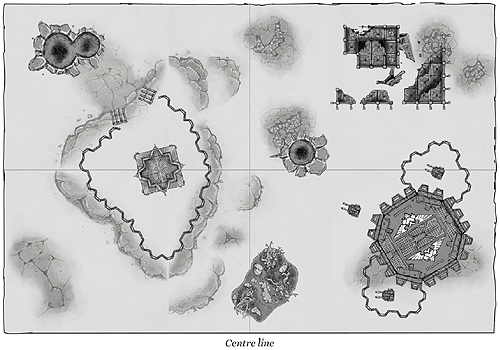
The Clockwork MassacreHaving regrouped, Castellan Stein and the knightly houses of Alaric Prime have constructed a plan to draw Warboss Grukk into the open. Grukk – bullheaded as ever – has taken the bait and charged headlong into the jaws of a fiendish trap. Aided by the mysterious Knight Gerantius, Castellan Stein hopes to slay Grukk once and for all, but Ork Warlords are notoriously hard to kill, and they never go down without a fight.
THE ARMIESChoose armies as described in Warhammer 40,000: The Rules. The Ork player’s army may only include units with the Orks Faction and fortifications, and must include Grukk Face-rippa as its Warlord. The Imperial player’s Warlord must have the Astra Militarum Faction. The Imperial player’s army may only include units with the Astra Militarum, Imperial Knights and Militarum Tempestus Factions and fortifications, and must include the following units:
THE BATTLEFIELD Use the deployment map included with this mission. Set up terrain as described in Warhammer 40,000: The Rules. Objective Markers After setting up the terrain, starting with the Imperial player, the players take it in turns to place 3 Objective Markers in the Imperial player’s table half. DEPLOYMENT The players must first determine their Warlord Traits. The Imperial player deploys first, and the Ork player second, using the rules from Warhammer 40,000: The Rules and the deployment map opposite. Any unit that cannot be deployed on the table starts the game in Reserve. FIRST TURN The Defender goes first unless the Ork player can Seize the Initiative. GAME LENGTH This mission uses Variable Game Length. VICTORY CONDITIONS At the end of the game, the player who has scored the most Victory Points is the winner. If both players have the same number of Victory Points, the game is a draw. Primary Objectives At the end of the game, the Imperial player scores 1 Victory Point for each Objective Marker he controls. At the end of the game, the Ork player scores D3 Victory Point for each Objective Marker he controls (roll separately for each Objective Marker). Secondary Objectives Linebreaker, Slay the Warlord*, First Blood. * In this mission, the Imperial player scores D3+3 Victory Points for the Slay the Warlord secondary objective, instead of just 1 Victory Point. Mysterious Objectives, Night Fighting, Reserves. №7
ECHOES OF WAR
:
Flight of the MorkanautsMogrok’s ascension to power marks the start of the War of Kunnin’, and one of his opening ploys is a surprise assault on the Cadians’ rear echelons. Having been inspired during the Obstirian War by the Space Marines’ rapid orbital descent, Mogrok has cobbled together a number of sacrificial dropcraft to deploy his killiest war machines – his Morkanauts – right into the unsuspecting humies’ lines.
THE ARMIESChoose armies as described in Warhammer 40,000: The Rules. The Ork player is the Attacker in this mission. Their army may only include units with the Orks Faction, and must include 3 Morkanauts (Mogrok’s Surprise). The Imperial player is the Defender in this mission. Their Warlord must have the Astra Militarum Faction, and their army may only include units with the Astra Militarum, Imperial Knights and Militarum Tempestus Factions and fortifications.
THE BATTLEFIELD The Imperial player must place one building on the centre of the table. They then place up to four additional fortifications anywhere on the table. The Imperial player does not pay any points for these fortifications, and none start the game dilapidated. All buildings start the game claimed by the Imperial player. Once all fortifications have been placed, the Imperial player sets up any remaining terrain in any manner he chooses. Objective Markers The Imperial player must place one Objective Marker within 1" of each fortification that is either a gun emplacement or a building (Objective Markers can be placed on battlements). The Objective Marker closest to the centre of the board is the Vital Objective (see Primary Objectives). DEPLOYMENT The players must first determine their Warlord Traits and stratagems. Each player has 4 Stratagem Points. The Ork player selects any one table edge to be his. The Imperial player’s table edge is the one opposite. The Imperial player deploys his force anywhere on the battlefield. All of the Ork player’s units start the game in reserve (see the Mission Reserves rule, below).
FIRST TURN The Ork player has the first turn. GAME LENGTH This mission uses Variable Game Length. VICTORY CONDITIONS At the end of the game, the player who has scored the most Victory Points is the winner. If both players have the same number of Victory Points, the game is a draw. Primary Objectives At the end of the game, each player scores 1 Victory Point for each Objective Marker they control. The player that controls the Vital Objective scores an additional D3 Victory Points. Secondary Objectives Slay the Warlord, First Blood. Firestorm*, Mysterious Objectives, Night Fighting, Planetary Assault, Scramble!, Shock Tactics.
* The Ork player makes D3+4 Firestorm Attacks. №8
ECHOES OF WAR
:
Attack of the Wreckin’ KrewThe defenders of Alaric Prime come under assault from above once more as Skyboss Wingnutz and his Orky aircraft drop huge wrecking balls, each a bouncing hunk of metal ploughing bloody furrows through the Imperium’s ranks. As the Ork jets circle around to get stuck in with their more conventional bombs and guns, the beleaguered forces below must scramble to activate every air-defence weapon they can.
THE ARMIESChoose armies as described in Warhammer 40,000: The Rules. The Ork player is the Attacker in this mission. Their army may only include units with the Orks Faciton, and they must choose a Primary Detachment that includes three Flyers (Skyboss Wingnutz and Da Wreckin’ Krew).
The Imperial player is the Defender in this mission. Their Warlord must have the Astra Militarum Faction, and their army may only include units with the Astra Militarum, Imperial Knights and Militarum Tempestus Factions and fortifications. THE BATTLEFIELD The Imperial player places up to eight fortifications anywhere on the table. They do not pay any points for these fortifications, and none start the game dilapidated. All buildings start the game claimed by the Imperial player. Once all fortifications have been placed, the Imperial player sets up any remaining terrain as he chooses. DEPLOYMENT The players must first determine their Warlord Traits and stratagems. Each player has 3 Stratagem Points. The Ork player selects any one table edge to be his. The Imperial player’s table edge is the one opposite. The Imperial player deploys his force anywhere on the battlefield. All of the Attacker’s units start the game in Reserve (see the Mission Reserves rule, below).
FIRST TURN The Ork player has the first turn. GAME LENGTH This mission uses Variable Game Length. VICTORY CONDITIONS At the end of the game, the player who has scored the most Victory Points is the winner. If both players have the same number of Victory Points, the game is a draw. Primary Objectives At the end of the game, both players score 1 Victory Point for each enemy unit that has been completely destroyed. The Imperial player also scores 1 additional Victory Point for each enemy Flyer that has been completely destroyed. Units that are Immobilised or Falling Back at the end of the game, and units that are not on the board at the end of the game, count as destroyed for the purposes of this mission. Remember Independent Characters and Dedicated Transports are individual units and award Victory Points if they are destroyed. Secondary Objectives Slay the Warlord, First Blood. Firestorm*, Night Fighting, Planetary Assault, Scramble!, Shock Tactics * The Ork player rolls a D3 and adds the number of Flyers in his force to the result. The total is the number of Firestorm Attacks he makes (see Wreckin’ Balls).
№9
ECHOES OF WAR
:
Battle for the OasisBaddfrag’s Kommandos have infiltrated the Cadians’ oasis base by hanging onto the undersides of returning tanks. Waiting for nightfall, the sneaky gits have placed bombs all over the base and Ork reserves are waiting for the first explosions to join the attack. The Orks expect nothing less than a quick and brutal victory, but so long as even a single Guardsman draws breath, the greenskin onslaught will be defied.
THE ARMIESChoose armies as described in Warhammer 40,000: The Rules. The Ork player is the Attacker in this mission. Their army may only include units with the Orks Faction, and they must choose a Primary Detachment that includes a unit of Kommandos (Baddfrag’s Kommandos).
The Imperial player is the Defender in this mission. Their army may only include units with the Astra Militarum Faction and fortifications. THE BATTLEFIELD The Imperial player places between one and six fortifications anywhere on the table apart from in the Sneaky Gits deployment zone (see map). The Imperial player does not pay any points for these fortifications, and none start the game dilapidated. All buildings start the game claimed by the Imperial player. Once all fortifications have been placed, the Imperial player sets up any remaining terrain in any manner he chooses, but cannot place any impassible terrain in the Sneaky Gits deployment zone. DEPLOYMENT The players must first determine their Warlord Traits and stratagems. Each player has 2 Stratagem Points. The Ork player selects any one table edge to be his. The Imperial player’s table edge is the one opposite. The Ork player then deploys the Sneaky Gits using the deployment map opposite. All of the Ork player’s other units start the game in Reserve (see the Mission Reserves rule, below). The Imperial player then deploys his entire force anywhere that is more than 3" from the Sneaky Gits deployment zone.
FIRST TURN The Ork player has the first turn. GAME LENGTH This mission uses Variable Game Length. VICTORY CONDITIONS At the end of the game, the player who has scored the most Victory Points is the winner. If both players have the same number of Victory Points, the game is a draw. Primary Objectives At the end of each game turn, the Imperial player scores D3 Victory Points (roll at the end of each game turn). At the end of the game, the Ork player scores 1 Victory Point for each enemy unit that has been completely destroyed. Units that are falling back at the end of the game, and units that are not on the board at the end of the game, count as destroyed for the purposes of this mission. Remember that Independent Characters and Dedicated Transports are individual units and award Victory Points if they are destroyed. Secondary Objectives Slay the Warlord, First Blood. Firestorm*, Night Fighting, Planetary Assault, Scramble!, Shock Tactics * The Ork player makes 3 Firestorm Attacks.
№10
ECHOES OF WAR
:
The Klaw of MorkThe Orks have deployed a new super-weapon – the Klaw of Mork – to pull a passing comet out of orbit and bring it smashing down on Sacred Mountain. The Imperium is mounting a full assault against the super-weapon, but unless Tempestor Prime Whitlock’s Tempestus Scions can disable the power field protecting it, the attack will be doomed to fail, and the fate of Alaric Prime will be sealed.
THE ARMIESChoose armies as described in Warhammer 40,000: The Rules. The Imperial player is the Attacker in this mission. Their army may only include units with the Astra Militarum and Militarum Tempestus Factions. They must choose a Primary Detachment that includes a Militarum Tempestus Platoon (Whitlock’s Brigade) and a Valkyrie (Whitlock’s Brigade). The Ork player is the Defender in this mission. Their army may only include units with the Orks Faction and fortifications.
THE BATTLEFIELD The Imperial player selects any one table edge to be his. The Ork player’s table edge is the one opposite. The Ork player must place one fortification in the Imperial player’s table half – this is the Sentry Fortification. The Ork player then places between one and three fortifications anywhere in his table half and selects one to be the Generator Control. They do not pay any points for these fortifications, and none start the game dilapidated. All buildings start the game claimed by the Ork player. Once all fortifications have been placed, the Ork player sets up any remaining terrain as he chooses. Objective Markers The Ork player must place one Objective Marker within 1" of the Sentry Fortification and one within 1" of the Generator Control (they may be placed on battlements). DEPLOYMENT The players must first determine their Warlord Traits and stratagems. Each player has 2 Stratagem Points. The Ork player then deploys his force anywhere on the battlefield. All of the Imperial player’s units start the game in Reserve (see the Mission Reserves rule, below).
The Imperial player has the first turn. GAME LENGTH This mission uses Variable Game Length. VICTORY CONDITIONS At the end of the game, the player who has scored the most Victory Points is the winner. If both players have the same number of Victory Points, the game is a draw. Primary Objectives At the end of each game turn, the Ork player scores 1 Victory Point if he controls the Generator Control Objective Marker. At the end of the game, the Imperial player scores 3 Victory Points if he controls the Generator Control Objective Marker. Secondary Objectives Slay the Warlord, First Blood. Firestorm*, Mysterious Objectives, Night Fighting, Planetary Assault, Scramble!, Shock Tactics.
№11
ECHOES OF WAR
:
The Imperium Sallies ForthThe Ork comet has been thrown off its collision course with the Sacred Mountain, but Mogrok has besieged Fortress Alaric nonetheless. Advancing under the protection of kustom bubble fields, the greenskins mean to stomp out the Imperium’s final fortress. The defenders, spearheaded by the knightly houses of Alaric Prime, surge forth to meet them, intent on bringing the fight to the enemy. But even as they sally forth, an Ork rust-ship launches after the wayward comet with a plan to veer it back on target.
THE ARMIESChoose armies as described in Warhammer 40,000: The Rules. The Ork player’s army may only include units with the Orks Faction and fortifications, and must include the Mogrok’s Bossboyz formation.
The Imperial player’s Warlord must have the Astra Militarum Faction, and their army may only include units with the Astra Militarum, Imperial Knights and Militarum Tempestus Factions and fortifications. Their army must include at least one of the following formations: THE BATTLEFIELD The Imperial player must place a Wall of Martyrs Imperial Defence Network anywhere in his half of the table. He then places up to four additional fortifications anywhere on the table. The Imperial player does not pay any points for these fortifications, and none start the game dilapidated. All buildings start the game claimed by the Imperial player. Once all fortifications have been placed, the players set any remaining terrain as described in Warhammer 40,000: The Rules. Objective Markers After setting up the terrain, starting with the Imperial player, the players take it in turns to place D3+2 Objective Markers. DEPLOYMENT The players must first determine their Warlord Traits. The Imperial player deploys first, and the Ork player second, using the deployment map opposite. Any unit that cannot be deployed on the table starts the game in Reserve. FIRST TURN The Imperial player goes first unless the Ork player can Seize the Initiative. GAME LENGTH This mission uses Variable Game Length. VICTORY CONDITIONS At the end of the game, the player who has scored the most Victory Points is the winner. If both players have the same number of Victory Points, the game is a draw. Primary Objectives At the end of the game, the Imperial player scores 1 Victory Point for each Objective Marker he controls. At the end of the game, the Ork player scores D3 Victory Point for each Objective Marker he controls (roll separately for each Objective Marker). Secondary Objectives Linebreaker*, Slay the Warlord, First Blood. * In this mission, the Imperial player scores D3 Victory Points for the Linebreaker secondary objective, instead of just 1 Victory Point. Mysterious Objectives, Night Fighting, Reserves.
Sanctus Reach: Stormclaw MissionsThis page includes several Warhammer 40,000 missions inspired by the pivotal battles of the Stormclaw campaign. All of the missions can be fought using just the miniatures provided with Sanctus Reach: Stormclaw, or can be expanded to use additional Citadel miniatures from your collection if you wish.There are several ways in which you can use the missions. The first is simply to select a particular mission you are excited about and fight it out using the Citadel miniatures provided with Sanctus Reach: Stormclaw. Another way to use these missions is to play a campaign. You can do this by simply playing through the missions sequentially. If you do so, keep a note of your cumulative Victory points, and the winner of the campaign is the player with the highest score. If you are playing a campaign, we suggest you maintain the same side (the Orks or the Space Wolves) throughout the course of the campaign, but upon its completion swap roles and see how much better (or worse) you fare when fighting for the other side. №1
ECHOES OF WAR
:
Green Tide, Grey FogThe Space Wolves Thunderhawk has been shot down and has crashed in the acid-woods on the eastern side of Blistered Isle. Krom has left some of his Grey Hunters to guard the crash site, while he takes most of his force off to hunt down the Orks. As night falls, a dense fog rolls in. Seizing his chance, Grukk, his most trusted Nobz, and a mob of Gretchin tellyport in to attack the crash site.
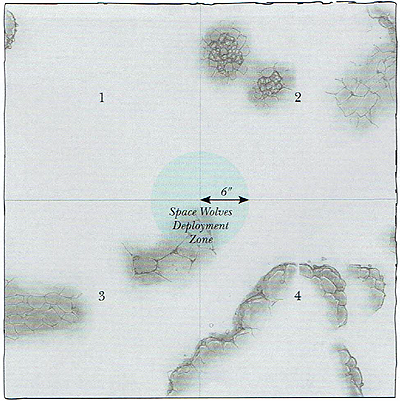 One player commands the Space Wolves, the other the Orks. Each player takes the following models: Space Wolves Army • Hengist Ironaxe’s Grey Hunters Ork Army • Grukk Face-rippa • Skrak’s Skull-Nobz • Rustgob’s Runts THE BATTLEFIELD Use the deployment map included with this mission. Set up terrain as described in the rulebook. DEPLOYMENT The Space Wolves player deploys first, in his deployment zone. All models in his army must deploy within 6" of the centre of the table. The Ork player deploys second. All Ork units must deploy using the rules for Deep Strike. Before deploying a unit, the Ork player must roll a D6. On a roll of 1-4, that unit must aim to Deep Strike within the quarter of the table that bears the same number as the dice roll (see the deployment map), before rolling to see if they scatter. On a roll of 5 or 6 they can aim to arrive anywhere on the table, before rolling to scatter. Neither side can place units in Reserve in this mission. FIRST TURN The Space Wolves player goes first unless the Ork player can Seize the Initiative. GAME LENGTH The game continues until either one army is completely destroyed, or a Space Wolves model exits the battlefield. VICTORY CONDITIONS At the end of the game, the Ork player wins if the Space Wolves army has been completely destroyed. Any other result is a Space Wolves victory. Units that are Falling Back at the end of the game, and units that are not on the board at the end of the game, do NOT count as destroyed for the purposes of these victory conditions. Fog & Gloom: The maximum range for any line of sight in this mission is 12". №2
ECHOES OF WAR
:
Fortress 26Still unaware of the fate of his Thunderhawk and its guards, Krom and his Blood Claws and Wolf Guard emerge from the Hollow Hills into the built up western side of Blistered Isle. They make their way to the ruins of Fortress 26, the Cadian fortification in the middle of the refiner)' district. Krom leads the Wolf Guard in a frontal assault against the greenskins defending the ruins of Fortress 26, while ordering his Blood Claws to launch a flank attack.
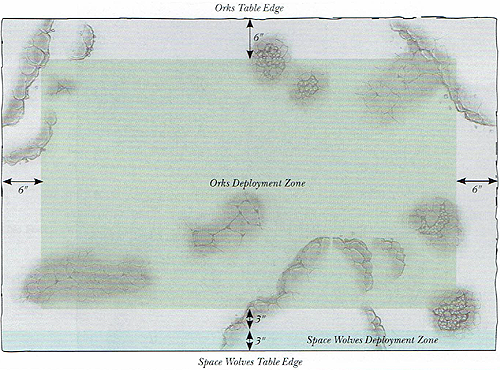 One player commands the Space Wolves, the other the Orks. The players take the following units: Space Wolves Army • Krom Dragongaze • The Fierce-Eye’s Wolf Guard • Egil Redfist’s Blood Claws Ork Army • Rustgob’s Runts • Krumpa’s Killa Kanz (The Ork army does not have a Warlord in this mission) THE BATTLEFIELD Use the deployment map included with this mission. Then, set up terrain as described in Warhammer 40,000: The Rules. DEPLOYMENT The Ork player deploys first. He deploys his units anywhere that is more than 6" away from a table edge. In this mission, the models in Krumpa’s Killa Kans unit are individual units. No Ork units start the battle in Reserve. The Space Wolves player deploys second. He must deploy Krom Dragongaze and the Fierce-Eye’s Wolf Guard in his deployment zone. Egil Redfist’s Blood Claws start the battle in Reserve. FIRST TURN The Space Wolves player goes first. GAME LENGTH This mission uses Variable Game Length. VICTORY CONDITIONS At the end of the game, each player receives 1 Victory Point for each opposing unit that has been completely destroyed. If the Space Wolves player beats the Ork player’s score by 4 or more Victory Points, then the Space Wolves w in the battle. Any other result is an Ork Victory. Units that are Falling Back at the end of the game count as destroyed for the purposes of this mission. Reserves. №3
ECHOES OF WAR
:
GofftownThe Space Wolves finally reach Gofftown, an Ork settlement on the narrow southern headland of the island. The crude buildings are built from the ruins of Blistered Isle’s generatorum complex, and centred around a massive tellyporta pad. As acidic ocean weaves crash below, a storm breaks overhead that is so powerful it is bombarding the battlefield with crackling bolts of lightning. The scene is set for a titanic final battle between the two armies.
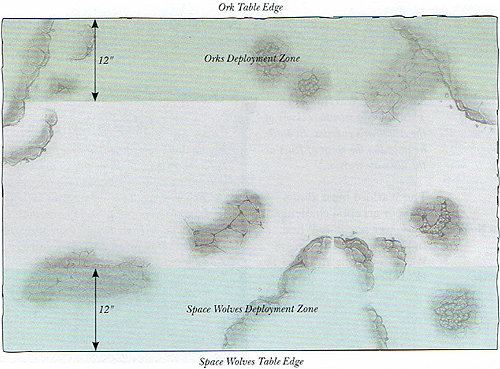 One player commands the Space Wolves, the other the Orks. Each player takes one of the following Formations: Space Wolves Army • The Fierce-Eye’s Finest Ork Army • Grukk’s Rippin’ Krew THE BATTLEFIELD Use the deployment map included with this mission. Then, set up terrain as described in Warhammer 40,000: The Rules. DEPLOYMENT The Space Wolves player deploys his army first, using the deployment zone shown on map. The Ork player deploys second, in his deployment zone. FIRST TURN The Space Wolves player goes first unless the Ork player can Seize the Initiative. GAME LENGTH This mission uses Variable Game Length. VICTORY CONDITIONS At the end of the game, each player receives 1 Victory Point for each opposing unit that has been completely destroyed. The player who has scored the most Victory Points is the winner. If both players have the same number of Victory Points, the game is a draw. Units that are Falling Back at the end of the game, and units that are not on the board at the end of the game, count as destroyed for the purposes of this mission. Night Fighting. Sanctus Reach: Hour of the Wolf CampaignThis section includes several Warhammer 40,000 missions inspired by the pivotal battles of the Hour of the Wolf. These missions will provide players with new ways to use their armies and a wealth of new tactical options to master.
There are several ways in which you can use the Hour of the Wolf missions. The moststraightforward is to select the mission for a battle you are excited about from the campaign guide, and use the mission to recreate the battle on your tabletop! The Armies section of each mission provides guidance on the forces present, while the mission’s special rules will ensure that all of the most important elements of the original battle will be recreated. Another way to use these missions is to fight a campaign by playing through the missions sequentially. If you do so, then one player should command the forces of the Orks in the first eight battles, while their opponent commands the Imperial side. Keep a note of each player’s wins and losses, and the winner of the campaign is the player with the highest number of victories once all of the missions have been completed. Alternatively, you could play through a campaign and the winner of the final Orks vs. Imperium mission, the Battle of Scrap Peak, takes all. In either case, in a campaign, the winner of a named mission is granted a bonus when playing the next mission, as noted below. In the case of a draw, neither side gains a bonus in the next game. If you also have the first volume of the Sanctus Reach saga, the Red Waaagh!, you can even link the missions featured in both books to create an epic narrative campaign that comprises more than twenty missions! Finally, it is worth noting that you can use the missions using different armies from those that took part in the actual battle. With a little imagination and some minor modifications on your part, you can easily use them to fight battles with any combination of forces and terrain you have in your collection. Hour of the Wolf Campaign ChartThis section includes several Warhammer 40,000 missions inspired by the pivotal battles of the Hour of the Wolf. You can play through these missions in sequence to fight a thrilling campaign. If you do so, then one player should command the forces of the Orks in the first eight battles, while their opponent commands the Imperial side. Keep a note of each player’s wins and losses, and the winner of the campaign is the player with the highest number of victories once all of the missions have been completed. Alternatively, you could play through a campaign and the winner of the final Orks vs. Imperium mission, the Battle of Scrap Peak, takes all. In either case, in a campaign, the winner of a named mission is granted a bonus when playing the next mission, as noted below. In the case of a draw, neither side gains a bonus in the next game. If you also have the first volume of the Sanctus Reach saga, the Red Waaagh!, you can even link the missions featured in both books to create an epic narrative campaign that comprises more than twenty missions!№1
ECHOES OF WAR
:
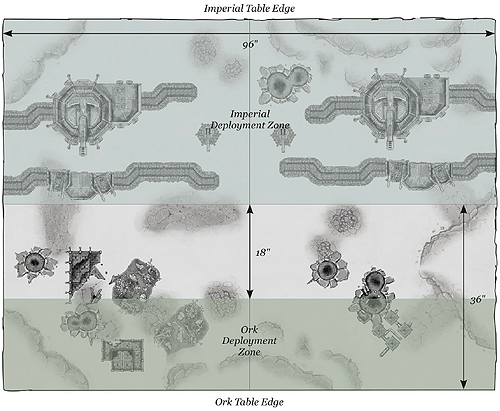
Saviours of Sacred MountainAll seems lost for the defenders of Alaric Prime. A vast Ork Waaagh! has smashed into the planet and drowned much of the Knight world beneath a tide of greenskins. The survivors make their last stand at Fortress Alaric, an ancient stronghold built into the sides of Sacred Mountain. Yet even here, in this seemingly impregnable haven, they are not safe. Ork ingenuity, combined with their lust for destruction, has seen them drag a vast meteor into a collision course with Sacred Mountain, resulting in cataclysmic damage and grievous casualties on both sides. As the dust from the impact begins to settle, the Orks mass for the final assault.
Yet all is not lost. Throughout the Imperium’s long history, Mankind’s darkest hour has become the Hour of the Wolf, where the Sons of Russ have descended upon trails of fire to bring death to those who would threaten the Allfather’s people. And so is the case on Alaric Prime as Drop Pods slam into the ruined flanks of Sacred Mountain, disgorging packs of howling Space Wolves itching to take the fight to the Ork hordes. 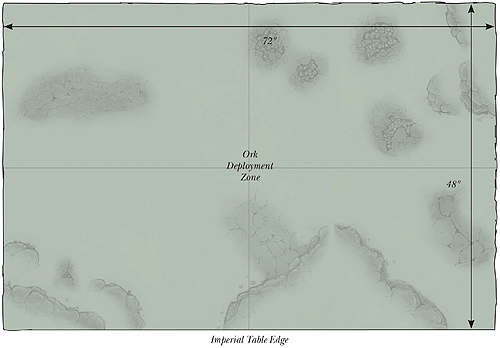 Choose armies as described in Warhammer 40,000: The Rules. The Imperial player is the Attacker in this mission, and must include Ragnar Blackmane in his army to be his Warlord. The Imperial player’s army may only include units with the Astra Militarum, Imperial Knights, Militarum Tempestus and Space Wolves Factions and fortifications. The Ork player is the Defender, and their army may only include units with the Orks Faction. THE BATTLEFIELD Use the deployment map included in this mission. Set up terrain as described in Warhammer 40,000: The Rules. Objective Markers After setting up the terrain, the Ork player must place three Objective Markers anywhere on the battlefield. DEPLOYMENT Before any models are deployed, the Ork player should roll to determine his Warlord Traits. Both players should then select their Planetstrike stratagems. Each player has 4 Stratagem Points. The Ork player deploys his force anywhere on the battlefield. He can, however, deploy any number of units in Reserve, but must, whenever possible, deploy at least one unit for each building or gun emplacement that he placed on the battlefield. Multiple-part buildings count as several separate buildings. All of the Imperial player’s units start the game in Reserve.
FIRST TURN The Imperial player has the first turn. GAME LENGTH This mission uses Variable Game Length. VICTORY CONDITIONS At the end of the game, the player who has scored the most Victory Points wins the game. If players have the same number of Victory Points, the game is a draw. Primary Objectives At the end of the game, each Objective Marker is worth 3 Victory Points to the player that controls it. Secondary Objectives Slay the Warlord, First Blood. Mysterious Objectives, Planetary Assault, Reserves, Scramble!, Shock Tactics №2
ECHOES OF WAR
:
Back from the BrinkBefore the sudden arrival of the Space Wolves, the Shadowsword Steel Cyclops had been positioned to defend the crucial drawbridge that led into the heart of Sacred Mountain. However, the earth-shattering impact of the comet badly damaged the bridge and left the giant war machine teetering on the precipice of the chasm below. Yet hope still remains for the Steel Cyclops – having smashed their way through the Orks to secure a foothold at the base of Sacred Mountain, the Space Wolves renew their attack without delay. Upon assessing the vital significance of the bridge – and the super-heavy asset imperiled atop its span – Logan Grimnar leads an elite force of Wolf Guard to reclaim it.
 Choose armies as described in Warhammer 40,000: The Rules. The Imperial player’s army must include Grimnar’s Kingsguard Formation. Logan Grimnar cannot be equipped with Stormrider, and must be the Warlord. The Imperial player’s army may only include units with the Space Wolves Faction. The Ork player’s army may only include units with the Orks Faction, and must include at least one unit of Meganobz. THE BATTLEFIELD Use the deployment map included in this mission. Set up terrain as described in Warhammer 40,000: The Rules, but ensure that no terrain is placed on the two areas representing the ‘Chasm’ (see map). You may find it convenient to mark the ‘Chasm’ itself with pieces of black paper. If either you or your opponent has a Shadowsword in your collection (failing that, any Baneblade variant will do), you should place it in the location shown on the deployment map. Objective Markers After setting up the terrain, place three Objective Markers in the locations shown on the deployment map. DEPLOYMENT Before any models are deployed, the Ork player should roll to determine his Warlord Traits. The Imperial player then deploys all units from Grimnar’s Kingsguard within the Imperial player’s Forward Deployment Zone (see map). His opponent then deploys his units within the Ork Deployment Zone (see map). Finally, the Imperial player deploys his remaining units within the Imperial player’s Rear Deployment Zone.
FIRST TURN The Ork player has the first turn unless the Imperial player can Seize the Initiative. GAME LENGTH This mission uses Variable Game Length. VICTORY CONDITIONS At the end of the game, the player who has scored the most Victory Points wins the game. If players have the same number of Victory Points, the game is a draw. Primary Objectives At the end of the game, each Objective Marker is worth 3 Victory Points to the player that controls it. If, at the end of the game, the Steel Cyclops has been completely destroyed, the Ork player receives 5 Victory Points. In any other situation, the Space Wolf player receives 5 Victory Points. Secondary Objectives First Blood, Linebreaker, Slay the Warlord. Mysterious Objectives, Reserves. The Steel Cyclops cannot move or fire any of its weapons. However, any Space Wolf models equipped with a power fist or chainfist that are in base contact with the Steel Cyclops at the start of the Imperial player’s Movement phase can attempt to haul the Shadowsword to safety. To do so, make a Strength test for each model attempting to move the Shadowsword. Each success enables the Imperial player to move the Steel Cyclops 1" in any direction (apart from towards the Chasm!), to a maximum of 6" each turn; move each model that made a Strength test along with the Steel Cyclops so that they remain in base contact with it (remember that you must also maintain Squad Coherency). These models count as having moved, but may Run, shoot or charge as normal. №3
ECHOES OF WAR
:
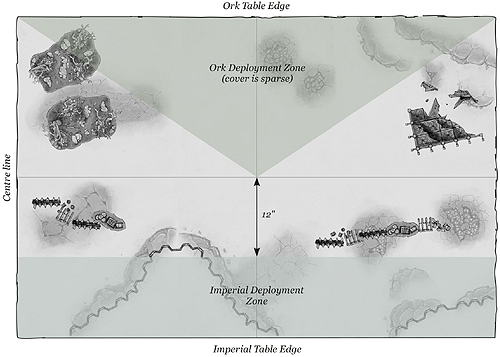
The Fall of Mordred’s RidgeAs the Space Wolves continued to drive the Orks back from Sacred Mountain, they routed a vast greenskin horde, dislodging their hold on Mordred’s Ridge. A large force of Cadians and Imperial Knights soon moved up to reinforce and fortify the gains made by the rampaging Sons of Russ. Yet despite the resurgent armies of the Imperium driving the invaders back on all fronts, the Orks are far from defeated. Against all the odds, Grukk Face-rippa makes an unexpected and unceremonious return. Usurping control of the vast horde formerly belonging to the (very) recently deceased Goffboss Drogg, Grukk gathers all of the retreating greenskins in the local area to him and immediately leads them on the offensive once more. Thrown on the defensive by the sheer numbers of Orks converging on their position, the Imperial forces at Mordred’s Ridge fight a desperate battle to hold back the green tide.
 Choose armies as described in Warhammer 40,000: The Rules. The Imperial player’s Warlord must have the Space Wolves Faction, and their army may only include units with the Astra Militarum, Imperial Knights, Militarum Tempestus and Space Wolves Factions and fortifications. The Ork player must include the Grukk’s Goff Killmob Formation as part of their army, and Grukk Face-rippa must be the Ork player’s Warlord. Their army may only include units with the Orks Faction and fortifications. THE BATTLEFIELD Use the deployment map included in this mission. The Imperial player can place any number of fortifications anywhere within his deployment zone. He does not pay any points for these fortifications, and none start the game dilapidated. All fortifications deployed in this manner start the game claimed by the Imperial player. Set up any remaining terrain as described in Warhammer 40,000: The Rules. Objective Markers After terrain has been set up, the Imperial player must place three Objective Markers anywhere in his deployment zone. No objective can be placed within 6" of any battlefield edge or 12" of another objective. DEPLOYMENT Before any models are deployed, both players should roll to determine their Warlord Traits. First, the Imperial player deploys his units anywhere within his deployment zone (see map). Then the Ork player deploys his units anywhere within his deployment zone (see map).
FIRST TURN The Ork player has the first turn unless the Imperial player can Seize the Initiative. GAME LENGTH This mission lasts for 10 game turns. VICTORY CONDITIONS At the end of the game, the player who has scored the most Victory Points wins the game. If players have the same number of Victory Points, the game is a draw. Primary Objectives At the end of the game, each Objective Marker is worth 3 Victory Points to the player that controls it. Secondary Objectives Slay the Warlord, First Blood. Mysterious Objectives, Night Fighting, Reserves. №4
ECHOES OF WAR
:
The Sky HuntAs the Orks continue to drive the Imperial defenders back towards the stronghold of Fortress Alaric, Mogrok turns to his Flyboyz to spearhead the assault on Sacred Mountain. At the head of this vast wave of rusty aircraft are Skyboss Wingnutz and his notorious fighter skwadrons. Though the Imperium responds with all the air power at their disposal, the ground forces are hard pressed to withstand the relentless bombardment of the Ork aircraft.
 Choose armies as described in Warhammer 40,000: The Rules. The Imperial player’s Warlord must have the Space Wolves Faction, and their army may only include units with the Astra Militarum, Imperial Knights, Militarum Tempestus and Space Wolves Factions and fortifications. In addition, the Imperial player must include at least three Flyers as part of their army. The Ork player’s army may only include units with the Orks Faction and fortifications. In addition, they must include the Skyboss Wingnutz’ Air Armada Formation as part of their army. THE BATTLEFIELD Use the deployment map included in this mission. Set up terrain as described in Warhammer 40,000: The Rules. Objective Markers After terrain has been set up, the Imperial player must place D3+2 Objective Markers anywhere in his deployment zone. No objective can be placed within 6" of any battlefield edge or 12" of another objective. DEPLOYMENT Before any models are deployed, both players should roll to determine their Warlord Traits. First, the Imperial player deploys his units anywhere within his deployment zone (see map). Then the Ork player deploys his units anywhere within his deployment zone (see map). FIRST TURN The Ork player has the first turn unless the Imperial player can Seize the Initiative. GAME LENGTH This mission uses Variable Game Length. VICTORY CONDITIONS At the end of the game, the player who has scored the most Victory Points wins the game. If players have the same number of Victory Points, the game is a draw. Primary Objectives At the end of the game, each Objective Marker is worth 3 Victory Points to the player that controls it. In addition, keep track of how many enemy Flyers each player has shot down. At the end of the game, each player receives 1 Victory Point for each enemy Flyer that has been completely destroyed. Flyers that are in Ongoing Reserve do not award additional Victory Points at the end of the game. Secondary Objectives Slay the Warlord, First Blood, Linebreaker. Mysterious Objectives, Reserves. №5
ECHOES OF WAR
:
Ragnar’s FollyFollowing the resounding success of his grand offensive, Warlord Mogrok himself arrives to oversee the final destruction of the Imperium’s forces. Standing at the centre of his army, surrounded by thousands of his Boyz in every direction, Morgrok justifiably believes there to be no threat to his personal safety. The Ork Warlord, however, has sorely underestimated the audacity and courage of a certain young Wolf Lord…
Without warning, an impetuous Ragnar Blackmane leaps over the hastily prepared defences and leads a charge of his most hotheaded warriors straight into the heart of the massive Ork horde. But can his reckless assault actually break the Ork lines, or will Ragnar’s folly be consigned to history as a brave, but ultimately foolish, act of bravado? 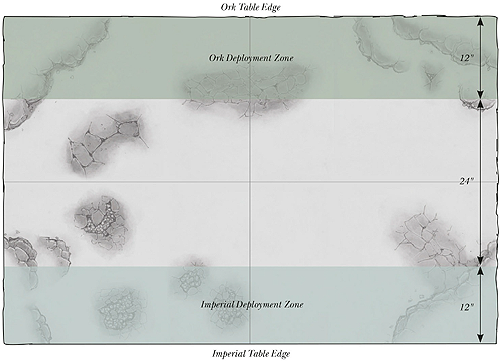 Choose armies as described in Warhammer 40,000: The Rules. The Imperial player must include the Ragnar’s Claws Formation as part of their army, and Ragnar Blackmane must be their Warlord. The Imperial player’s army may only include units with the Astra Militarum, Militarum Tempestus and Space Wolves Factions and fortifications. The Ork player must include a Big Mek as their Warlord to represent Mogrok, and may only include units with the Orks Faction and fortifications in their army. THE BATTLEFIELD Use the deployment map included in this mission. Set up terrain as described in Warhammer 40,000: The Rules. DEPLOYMENT Do not roll to determine Mogrok’s Warlord Trait – he automatically has the Kunnin’ but Brutal Warlord Trait. First, the Ork player deploys his units anywhere within his deployment zone (see map). Then the Imperial player deploys his units anywhere within his deployment zone (see map). FIRST TURN The Imperial player has the first turn unless the Ork player can Seize the Initiative. GAME LENGTH This mission uses Variable Game Length. VICTORY CONDITIONS At the end of the game, the player who has scored the most Victory Points wins the game. If players have the same number of Victory Points, the game is a draw. Primary Objectives At the end of the game, each player receives 1 Victory Point for each enemy unit that has been completely destroyed. Units that are Falling Back at the end of the game, and units that are not on the board at the end of the game count as destroyed for the purposes of this mission. Remember that Independent Characters and Dedicated Transports are individual units and award Victory Points if they are destroyed. Furthermore, the players can earn additional Victory Points as follows:
Secondary Objectives Slay the Warlord*, First Blood, Linebreaker. * Only the Ork player can achieve this Secondary Objective – the Imperial player earns Victory Points for slaying the Ork Warlord as described above. Reserves. №6
ECHOES OF WAR
:
Last Stand of the Young KingAfter his valiant charge leaves the Orks bereft of leadership – the Warlord, Mogrok, having fallen by his hand – Ragnar Blackmane now finds himself surrounded on all sides by a seemingly endless sea of greenskins. With only a handful of Blood Claws at his side, it seems that the reckless young Wolf Lord may, at last, have bitten off more than he can chew.
The Great Wolf, however, refuses to abandon his favoured son. Mustering a rapid-response strike force of indomitable Wolf Guard Terminators, Grimnar sends them forth by Stormwolf to buy Ragnar some time whilst he leads a more decisive counter-attack from Fortress Alaric. So do the sleek silhouettes of the twin assault carriers race towards their destination, but will the deadly cargo they bear arrive in time to save Ragnar? 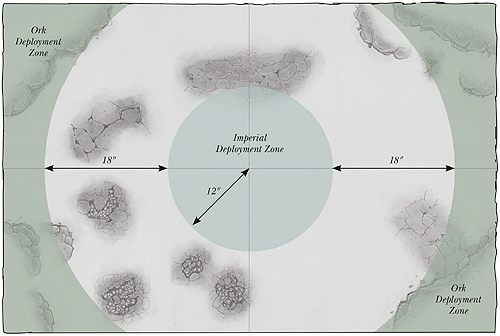 Choose armies as described in Warhammer 40,000: The Rules. The Imperial player’s army may only include units with the Space Wolves Faction and fortifications, and must include the Ragnar’s Claws and Wolf Guard Strike Force Formations. Ragnar Blackmane must be the Imperial player’s Warlord. The Ork player’s army may only include units with the Orks Faction and fortifications. THE BATTLEFIELD Use the deployment map included in this mission. Set up terrain as described in Warhammer 40,000: The Rules. DEPLOYMENT Before any models are deployed, the Ork player should roll to determine his Warlord Traits. Firstly, the Imperial player deploys his units anywhere within his deployment zone (see map). He cannot choose to keep any forces in Reserve, with the exception of the units from the Wolf Guard Strike Force Formation, which must be held back in Reserve. Then the Ork player deploys any of his units anywhere within either of his deployment zones (see map). FIRST TURN The Ork player has the first turn unless the Imperial player can Seize the Initiative. GAME LENGTH This mission uses Variable Game Length. VICTORY CONDITIONS At the end of the game, the Imperial player wins if he has any models remaining on the battlefield, including vehicles that have been Immobilised. Units that are not on the board at the end of the game count as destroyed for the purposes of this mission. If there are still some Imperial units on the battlefield at the end of the game, but Ragnar Blackmane has been slain, the result is a draw. If there are no Imperial units remaining, the Ork player wins. Reserves. №7
ECHOES OF WAR
:
The Great Wolf StrikesRagnar’s desperate predicament combined with his own desire to deal the Orks a blow from which they will not recover has galvanised the Great Wolf into action. As the ancient gates of Fortress Alaric swing open, Logan Grimnar surges forth upon Stormrider at the head of a host of Thunderwolf riders and an armoured spearhead of his kinsmen. With such a force at his disposal, Grimnar intends to smash the Ork host asunder and force a path towards Ragnar. By breaking the back of the main Ork horde, the Old Wolf also seeks to turn the tide of the war in favour of the Imperium once more.
 Choose armies as described in Warhammer 40,000: The Rules. The Imperial player’s army may only include units with the Astra Militarum, Imperial Knights, Militarum Tempestus and Space Wolves Factions and fortifications, and must include the Grimnar’s Kingsguard Formation. Logan Grimnar must be equipped with Stormrider and must be the Imperial player’s Warlord. Furthermore, all Infantry units with the Space Wolves Faction must be mounted in Dedicated Transports. The Ork player’s army may only include units with the Orks Faction and fortifications. THE BATTLEFIELD Use the deployment map included in this mission. Set up terrain as described in Warhammer 40,000: The Rules. DEPLOYMENT Before any models are deployed, the Ork player should roll to determine his Warlord Traits. First, the Ork player deploys his units anywhere within his deployment zone (see map). Then the Imperial player deploys his units anywhere within his deployment zone (see map). FIRST TURN The Imperial player has the first turn unless the Ork player can Seize the Initiative. GAME LENGTH This mission uses Variable Game Length. VICTORY CONDITIONS At the end of the game, the player who has scored the most Victory Points wins the game. If players have the same number of Victory Points, the game is a draw. Primary Objectives At the end of the game, each player receives 1 Victory Point for each enemy unit that has been completely destroyed. Units that are Falling Back at the end of the game count as destroyed for the purposes of this mission. Remember that Independent Characters and Dedicated Transports are individual units and award Victory Points if they are destroyed. In addition, each time a non-Flyer unit belonging to the Imperial player voluntarily moves off the enemy table edge (see the Breakthrough special rule below), the Imperial player earns 1 Victory Point. If Logan Grimnar voluntarily leaves play in this manner, the Imperial player earns 3 Victory Points. Secondary Objectives Slay the Warlord, First Blood. Reserves. №8
ECHOES OF WAR
:
The Battle of Scrap PeakAfter the apparent death of Mogrok, the Orks fell into disarray. Infighting and confusion within the greenskin clans left them easy prey for the vengeful forces of the Imperium across Alaric Prime. One by one, the remaining bastions of Ork resistance were ruthlessly exterminated. All save one.
Scrap Peak has, until now at least, remained undetected. Here, the Orks have gathered in great strength, but perhaps the greatest threat is that Mogrok yet lives – his severed head having been grafted onto a new body by his Painboy’s ingenuity. Mogrok has taken command of his Waaagh! once more, and gathered the scattered tribes to Scrap Peak. It is here that Logan Grimnar must strike if he is to defeat the Ork menace on Alaric Prime once and for all. The Great Wolf has mustered all of the military resources available to him, and the Imperium now converges upon the Orks’ final stronghold in great strength. The final battle for Alaric Prime is about to begin. Choose armies as described in Warhammer 40,000: The Rules. The Imperial player’s army may only include units with the Astra Militarum, Imperial Knights, Militarum Tempestus and Space Wolves Factions and fortifications. The Imperial player must include Logan Grimnar to be his army’s Warlord, and can also include Ragnar Blackmane and/or Krom Dragongaze, though he does not pay any points for any of these characters; they are free. The Ork player’s army may only include units with the Orks Faction and fortifications, and it must include a Big Mek (representing Mogrok) to be the Warlord, as well as Kaptin Badrukk’s Flash Gitz Formation. THE BATTLEFIELD Use the deployment map included in this mission. The Ork player can place any number of fortifications anywhere within his deployment zone. He does not pay any points for these fortifications, and none start the game dilapidated. All fortifications deployed in this manner start the game claimed by the Ork player. Set up any remaining terrain as described in Warhammer 40,000: The Rules. Objective Markers After terrain has been set up, the Ork player must place 3 Objective Markers anywhere in his deployment zone. No objective can be placed within 6" of any battlefield edge or 12" of another objective. DEPLOYMENT Do not roll to determine Mogrok’s Warlord Trait – he automatically has the Kunnin’ but Brutal Warlord Trait. First, the Ork player deploys his units anywhere within his deployment zone (see map). Then the Imperial player deploys his units anywhere within his deployment zone (see map). FIRST TURN The Imperial player has the first turn unless the Ork player can Seize the Initiative. GAME LENGTH This mission uses Variable Game Length. VICTORY CONDITIONS At the end of the game, the player who has scored the most Victory Points wins the game. If players have the same number of Victory Points, the game is a draw. Primary Objectives At the end of the game, each Objective Marker is worth 3 Victory Points to the player that controls it. Secondary Objectives Slay the Warlord, First Blood, Linebreaker. Mysterious Objectives, Night Fighting, Reserves. |