Welcome to Planetstrike, an alternative way of waging war in the 41st Millennium. This appendix is an expansion to the Preparing for Battle section in Warhammer 40,000: The Rules, allowing your collection of Citadel miniatures to battle to the death in a devastating planetary assault. In a game of Planetstrike, the players take specific roles – one player is the Attacker, attempting to wrest control of a planet, and the other is the Defender, who will do everything to defend it. Planetstrike introduces a whole new set of tactical challenges to the battlefields of the 41st Millennium, and whether you choose to tear the planet from your opponent’s grasp or annihilate the crazed invaders raining from the skies, your actions can determine the fate of an entire world.This expansion presents new rules that you can use to explore the kinds of missions that revolve around planetary assaults. These will illustrate the different sorts of tactics used to attack and defend a planet from orbital invasion, and they will provide new tests of your ability as a commander. Tried and trusted strategies will need to be re-thought in the face of new challenges, and you will need to think outside the box in order to secure victory. In addition to presenting all the rules and stratagems you will need to play a game of Planetstrike, you will also find in here six missions that exemplifies the cinematic style of a Planetstrike game.
To play a Planetstrike mission only requires a handful of modifications to the Preparing for Battle section of Warhammer 40,000: The Rules, which are described below. It is also worth arranging to play a Planetstrike mission in advance so you can both prepare your forces; the Attacker and Defender in Planetstrike can take different compositions of forces to reflect the warriors they will require to secure victory in their designated role. The Attacker will spearhead his invasion with his swiftest and most veteran forces whilst the Defender mans the defences with every warrior he can muster and prepares to engage inbound enemies with his biggest guns. Both forces will be marshalled into battle by their bravest commanders, either to lead the invading forces in a brutal planetary assault, or to stand defiantly against them. If you are playing a Planetstrike Mission, you can choose to use the Planetstrike Attacker or Defender Detachments (if you are the Attacker or Defender respectively), when selecting your armies. The Attacker and Defender stratagems can be found later in this section. Each stratagem can only be chosen once. 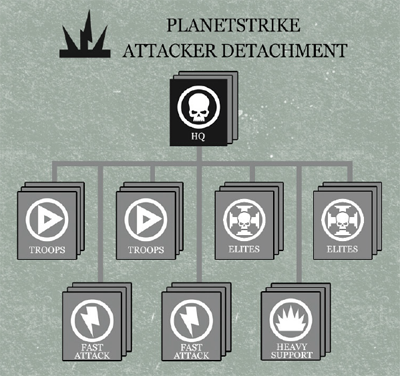 1 HQ Optional 2 HQ 6 Troops 6 Elites 6 Fast Attack 3 Heavy Support Restrictions All units chosen must have the same Faction (or have no Faction). Command Benefits Ideal Mission Commander: You can re-roll the result on the Planetstrike Attacker Warlord Trait table. Invading Battle Force: Once, in each of your turns, you can choose one unit before making any Reserve Rolls. You can choose to pass or fail the Reserve Roll for that unit automatically (it must still arrive on the fourth turn). Offensive Strategy: If this is your Primary Detachment, you have +1 Stratagem Point to spend when selecting Planetstrike stratagems. 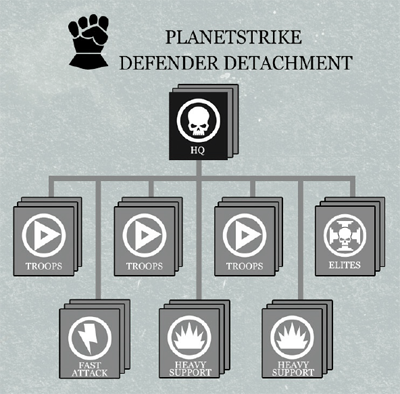 1 HQ Optional 2 HQ 9 Troops 3 Elites 3 Fast Attack 6 Heavy Support Restrictions All units chosen must have the same Faction (or have no Faction). Command Benefits Ideal Mission Commander: You can re-roll the result on the Planetstrike Defender Warlord Trait table. Defending Battle Force: Once, in each of your turns, you can choose one unit before making any Reserve Rolls. You can choose to pass or fail the Reserve Roll for that unit automatically (it must still arrive on the fourth turn). Defensive Strategy: If this is your Primary Detachment, you have +1 Stratagem Point to spend when selecting Planetstrike stratagems. A Planetstrike mission uses additional mission special rules as well as those found in Warhammer 40,000: The Rules.
If a mission has the Planetary Assault special rule, the Attacker uses the Reserves rules with the following modification. Instead of making Reserve Rolls from the start of his second turn, the Attacker makes Reserve Rolls from the start of his first turn. If a mission has the Shock Tactics special rule, all of the Attacker’s units that have the Deep Strike special rule and deploy via Deep Strike can charge in the same turn that they arrive from Reserves. All of the Attacker’s Infantry, Jetbikes and Skimmer units that do not already have the Deep Strike special rule gain the Deep Strike special rule. These units cannot charge in the same turn they arrive from Reserves. All the Attacker’s other units arrive from Reserves. These units cannot charge in the same turn they arrive from Reserves. Units that disembark from a Transport cannot charge in the same turn they arrived from Reserves, even if they or their Transport have the Deep Strike special rule. Units arriving by Outflank do so normally. If a mission has the Scramble! special rule, the Defender uses the Reserves rules with the following modifications:
Units that are arriving by Deep Strike or Outflank instead deploy using their special rules.
 This stratagem is used before you resolve your Firestorm Attacks. Your Firestorm Attacks are resolved at Strength 10 and AP2, rather than Strength 9 and AP3. This stratagem is used at the start of one of your Movement phases. All fortifications on the table that are buildings or gun emplacements immediately suffer a single Strength 10 AP- hit. In addition, all models (friend or foe) treat open ground as difficult terrain until the end of your next turn. This stratagem is used at the start of one of the Defender’s turns. All fortifications and gun emplacements on the table (no matter who is controlling them) can only fire Snap Shots until the start of the Defender’s next turn. This stratagem is used before you resolve your Firestorm Attacks. You make an additional D3 Firestorm Attacks. This stratagem is used at the start of one of your Shooting phases. Nominate one point anywhere on the battlefield, and a second within 8" of the first. Scatter both points D6", then draw a straight line (considered to be 1mm thick) between them. Each unit (friend or foe) under the line suffers a number of Strength 10 AP1 hits which are Randomly Allocated. The number of hits a unit suffers is equal to the number of models from that unit that are under the line. Vehicles are hit on their side armour. This stratagem is used before resolving your Firestorm Attacks. You can re-roll the scatter dice when making Firestorm Attacks. This stratagem is used before you make Reserve Rolls on your first turn. Select up to 3 vehicles and/or Monstrous Creatures (not including Flyers or Flying Monstrous Creatures) that do not have the Deep Strike special rule. The chosen units can deploy from Deep Strike, but cannot charge in the same turn that they arrive from Reserves. This stratagem is used before resolving your Firestorm Attacks. The Night Fighting rules are used until the start of the Attacker’s second turn. This stratagem is used at the end of Turn Six. If the mission uses Variable Game Length, you may choose to re-roll the D6 that determines if the game ends or continues.  This stratagem is used at the start of one of your turns, before any Reserve Rolls are made. Select up to 3 of your units that are still in Reserve. These units will automatically arrive from Reserves this turn. This stratagem is used at the start of one of the Attacker’s turns, before any Reserve Rolls are made. Roll a D6 each time an Attacking unit arrives from Reserves by Deep Strike this turn and has been placed on the table: on a 4+ that unit immediately suffers D6 Strength 6 AP4 hits. Vehicles are hit on their side armour. Wounds are allocated by the controlling player. This stratagem is used before the Attacker resolves his Firestorm Attacks. All of your non-vehicle, non-Monstrous Creature models gain a 5+ cover save until the start of the Attacker’s Movement phase. This stratagem is used at the start of one of the Attacker’s turns, before any Reserve Rolls are made. Until the end of that turn, the Attacker must roll an additional D6 for scatter distance each time one of his units arrives from Deep Strike Reserve (a unit that rolls a Hit still will not scatter). This stratagem is used at the start of one of your Shooting phases. Until the end of that phase, all emplaced weapons and gun emplacements on the table have the Twin-linked special rule. This stratagem is used before the Attacker resolves his Firestorm Attacks. All of your fortifications and gun emplacements gain a 4+ invulnerable save until the start of the Attacker’s Movement phase. This stratagem is used at the start of the Attacker’s first turn, before any Reserve Rolls are made. For the duration of the game, roll a D6 each time one of the Attacker’s units arrives from Reserves and is about to move onto the table from the Attacker’s table edge: on a 4+, the Defender may select a point on any table edge – that unit must move onto the table from that point instead. This stratagem is used before the Attacker resolves his Firestorm Attacks. Select a single building. That building’s Armour Value is increased by 1 on each facing (to a maximum of 15) for the remainder of the battle. This stratagem is used at the end of Turn Five. If the mission uses Variable Game Length, you may choose to re-roll the D6 that determines if the game ends or continues. 1
PLANETSTRIKE
:
PlanetfallInvading forces orbit above, raining fire upon the foe, their landing parties inbound to take any fortresses still standing for themselves. The defender must weather the storm and repel the enemy, no matter the cost.
THE ARMIESAgree which player will be the Attacker and which will be the Defender. Choose armies.
THE BATTLEFIELD The Defender can place any number of fortifications anywhere on the table. The Defender does not pay any points for these fortifications, and unless you and your opponent agree otherwise, none start the game dilapidated. All buildings start the game claimed by the Defender. Once all fortifications have been placed, the Defender can then set up any other terrain on the table in a manner of his choosing. Objective Markers After terrain has been set up, the Defender must place 6 Objective Markers. DEPLOYMENT The players must first determine their Warlord Traits and stratagems. Each player has 4 Stratagem Points. The Attacker selects any one table edge. The Defender’s table edge is the one opposite the Attacker’s. The Defender deploys his force anywhere on the battlefield. All of the Attacker’s units start the game in Reserve (see the Mission Reserves rule, below). FIRST TURN The Attacker has the first turn. GAME LENGTH The mission uses Variable Game Length. VICTORY CONDITIONS At the end of the game, the player who has scored the most Victory Points is the winner. If both players have the same number of Victory Points, the game is a draw. Primary Objective At the end of the game, each Objective Marker is worth 3 Victory Points to the player that controls it. Secondary Objectives Slay the Warlord, First Blood. Firestorm*, Mysterious Objectives, Night Fighting, Planetary Assault, Scramble!, Shock Tactics * The Attacker rolls a D3 and adds the number of buildings that are on the table to the result. Each section of a multiple-part building counts as a separate building. The total is the number of Firestorm Attacks that the Attacker makes.
2
PLANETSTRIKE
:
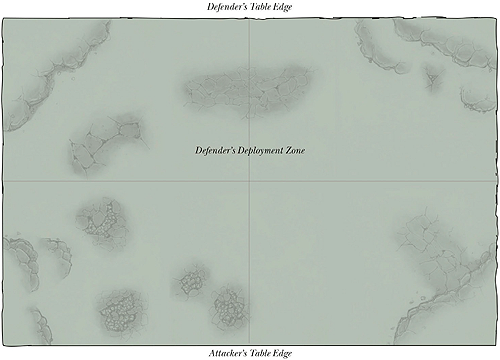
Desperate AssaultThe attacking forces have but a tenuous presence upon the planet’s surface. More and more invaders pour into the fray, desperately attempting to establish a permanent beachhead near their drop site.
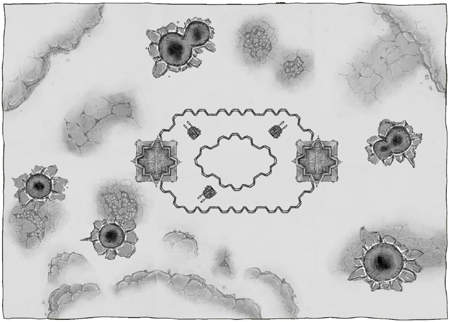
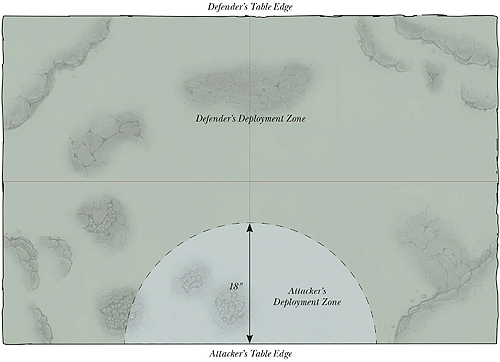 Agree which player will be the Attacker, and which will be the Defender. Choose armies as described in Warhammer 40,000: The Rules. THE BATTLEFIELD The Attacker selects any one table edge. The Defender’s table edge is the one opposite the Attacker’s. The Defender can place any number of fortifications anywhere within their deployment zone, as depicted on the map. The Attacker then places a single fortification anywhere within their deployment zone, as depicted on the map. Neither player has to pay any points for these fortifications and, unless you and your opponent agree otherwise, none start the game dilapidated. With the exception of the Attacker’s fortification, which starts the game claimed by the Attacker, all other buildings start the game claimed by the Defender. Once all fortifications have been placed, the Defender then sets up any other terrain on the table in a manner of their choosing. Objective Markers After terrain has been set up, the Defender must place a total of 5 Objective Markers anywhere within his deployment zone. The Attacker must then place 1 Objective Marker anywhere within his deployment zone. DEPLOYMENT Before any models are deployed, players must determine their Warlord Traits and stratagems. Each player has 4 Stratagem Points. The Defender deploys first, placing his units anywhere within his deployment zone, as depicted on the map. The Attacker then deploys his units anywhere within his deployment zone. FIRST TURN The Attacker has the first turn. GAME LENGTH The mission uses Variable Game Length. VICTORY CONDITIONS At the end of the game, the player who has scored the most Victory Points is the winner. If both players have the same number of Victory Points, the game is a draw. Primary Objectives At the end of the game, each Objective Marker is worth 3 Victory Points to the player that controls it. Secondary Objectives Slay the Warlord, First Blood. Firestorm*, Mysterious Objectives, Night Fighting, Planetary Assault, Scramble!, Shock Tactics * The Attacker rolls a D3 and adds the number of buildings that are on the table to the result. Multiple-part buildings count as several separate buildings for the purposes of determining this amount. The total is the number of Firestorm Attacks that the Attacker makes.
3
PLANETSTRIKE
:
Seize & DestroyFar from the bedlam of the front lines lies an emplacement of utmost importance – if the invaders capture it, their foes will find a coordinated defence almost impossible to achieve. The defender must keep the attacking forces at bay lest they gain control of this vital stronghold.
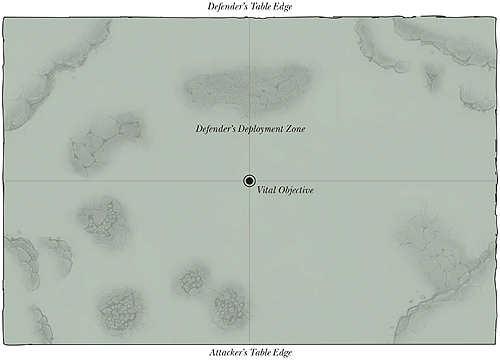 Agree which player will be the Attacker, and which will be the Defender. Choose armies as described in Warhammer 40,000: The Rules. THE BATTLEFIELD First, the Defender places a single fortification in the centre of the battlefield. This fortification must be a building, and is the Vital Objective (see the Mission Special Rules). The Defender can then place any number of other fortifications anywhere on the table. The Defender does not pay any points for these fortifications, and unless you and your opponent agree otherwise, none start the game dilapidated. All buildings start the game claimed by the Defender. Once all fortifications have been placed, the Defender can then set up any other terrain on the table in a manner of his choosing. Objective Markers After terrain has been set up, the Defender must place 1 Objective Marker either on or within the Vital Objective, and 3 other Objective Markers anywhere within his deployment zone as described in Warhammer 40,000: The Rules. DEPLOYMENT Before any models are deployed, players must first determine their Warlord Traits and stratagems. Each player has 4 Stratagem Points. The Attacker selects any one table edge to be his. The Defender’s table edge is the one opposite the Attacker’s. The Defender must split his army into two halves. The Attacker nominates which half will be deployed at the beginning of the game - this is the Defender’s Garrison (see Mission Special Rules); the other half is kept in Reserve. The Defender then deploys his Garrison, placing his units anywhere on the battlefield. All of the Attacker’s units start the game in Reserve (see the Mission Reserves rule, below). FIRST TURN The Attacker has the first turn. GAME LENGTH The mission uses Variable Game Length. VICTORY CONDITIONS At the end of the game, the player who has scored the most Victory Points is the winner. If both players have the same number of Victory Points, the game is a draw. Primary Objectives At the end of the game, the Vital Objective is worth D3+3 Victory Points to the player that controls it. Each other Objective Marker is worth 3 Victory Points to the player that controls it. Secondary Objectives Slay the Warlord, First Blood. Firestorm*, Mysterious Objectives, Night Fighting, Planetary Assault, Scramble!, Shock Tactics * The Attacker rolls a D3 and adds the number of buildings that are on the table to the result. Multiple-part buildings count as a several separate buildings for the purposes of determining this amount. The total is the number of Firestorm Attacks that the Attacker makes.
4
PLANETSTRIKE
:
StrangleholdThough the battle for the fate of the planet still rages fiercely, the attacker’s conquest is reaching its culmination in one quadrant vital to the war effort. Victory on this battlefield could well end the war in a single blow, so the defender must do whatever it takes to deny their enemy.
 Agree which player will be the Attacker, and which will be the Defender. Choose armies as described in Warhammer 40,000: The Rules. THE BATTLEFIELD The Defender can place any number of fortifications anywhere on the table. The Defender does not pay any points for these fortifications, and unless you and your opponent agree otherwise, none start the game dilapidated. All buildings start the game claimed by the Defender. Once all fortifications have been placed, the Defender can then set up any other terrain on the table in a manner of his choosing. Objective Markers After terrain has been set up, the Defender must place a total of 3 Objective Markers anywhere within his deployment zone. DEPLOYMENT Before any models are deployed, players must first determine their Warlord Traits and stratagems. The Attacker has 4 Stratagem Points; the Defender has no Stratagem Points. The Attacker selects any one table edge. The Defender’s table edge is the one opposite the Attacker’s. The Defender deploys their force anywhere on the battlefield. All of the Attacker’s units start the game in Reserve (see the Mission Reserves rule, below). FIRST TURN The Attacker has the first turn. GAME LENGTH The mission uses Variable Game Length. VICTORY CONDITIONS At the end of the game, the player who has scored the most Victory Points is the winner. If both players have the same number of Victory Points, the game is a draw. Primary Objective At the end of the game, each Objective Marker is worth 3 Victory Points to the player that controls it. Secondary Objectives Slay the Warlord, First Blood. Firestorm*, Mysterious Objectives, Night Fighting, Planetary Assault, Scramble!, Shock Tactics * The Attacker rolls a D3 and adds the number of buildings that are on the table to the result. Multiple-part buildings count as several separate buildings for the purposes of determining this amount. The total is the number of Firestorm Attacks that the Attacker makes.
5
PLANETSTRIKE
:
Forlorn HopeAs a sign of the importance of this great assault, the invader’s general will entrust his personal banner to his chosen warriors, ordering them to plant the standard atop the burning ruins of the enemy fortifications.
Agree which player will be the Attacker, and which will be the Defender. Choose armies as described in Warhammer 40,000: The Rules. THE BATTLEFIELD The Defender can place any number of fortifications anywhere on the table. The Defender does not pay any points for these fortifications, and unless you and your opponent agree otherwise, none start the game dilapidated. All buildings start the game claimed by the Defender. Once all fortifications have been placed, the Defender can then set up any other terrain on the table in a manner of his choosing. Objective Markers After terrain has been set up, the Defender must place a total of 3 Objective Markers anywhere within their deployment zone. DEPLOYMENT Before any models are deployed, players must first determine their Warlord Traits and stratagems. Each player has 4 Stratagem Points. The Attacker selects any one table edge. The Defender’s table edge is the one opposite the Attacker’s. The Defender deploys his force anywhere on the battlefield. All of the Attacker’s units start the game in Reserve (see the Mission Reserves rule, below). FIRST TURN The Attacker has the first turn. GAME LENGTH The mission uses Variable Game Length. VICTORY CONDITIONS At the end of the game, the player who has scored the most Victory Points is the winner. If both players have the same number of Victory Points, the game is a draw. Primary Objective At the end of the game, each Objective Marker is worth 3 Victory Points to the player that controls it. However, if the game ends and the Warlord’s banner is planted (see Mission Special Rules), then the Attacker wins automatically. Secondary Objectives Slay the Warlord, First Blood. Firestorm*, Mysterious Objectives, Night Fighting, Planetary Assault, Scramble!, Shock Tactics * The Attacker rolls a D3 and adds the number of buildings that are on the table to the result. Multiple-part buildings count as several separate buildings for the purposes of determining this amount. The total is the number of Firestorm Attacks that the Attacker makes.
If the bearer of the banner is killed or otherwise removed from play, the banner is dropped – leave the marker in place. It may subsequently be picked up by any non-vehicle model, friend or foe. If, at any point, a model in the Attacker’s army carrying the banner controls an Objective Marker, they can ‘plant’ the banner. Once planted, any non-vehicle model in the Defender’s army can ‘cast down’ the banner by moving into base contact with it, providing that no models from the Attacker’s army are also in base contact with the banner. Once cast down, the banner is no longer planted, and can be picked up and planted once more as normal. 6
PLANETSTRIKE
:
PlanetquakeThe skies glow like the firmament of hell as a punishing bombardment of fire rains down, and the shattered earth begins to crumble and break apart under the massive forces wreaked upon it. The world is utterly consumed by war. Can the defenders hold fast as their fortifications crumble around them?
Agree which player will be the Attacker, and which will be the Defender. Choose armies as described in Warhammer 40,000: The Rules. THE BATTLEFIELD The Defender can place any number of fortifications anywhere on the table. The Defender does not pay any points for these fortifications, and unless you and your opponent agree otherwise, none start the game dilapidated. All buildings start the game claimed by the Defender. Once all fortifications have been placed, the Defender can then set up any other terrain on the table in a manner of his choosing. Objective Markers After terrain has been set up, the Defender must place 6 Objective Markers as described in Warhammer 40,000: The Rules. DEPLOYMENT The players must first determine their Warlord Traits and stratagems. Each player has 4 Stratagem Points. The Attacker selects any one table edge. The Defender’s table edge is the one opposite the Attacker’s. The Defender deploys their force anywhere on the battlefield. All of the Attacker’s units start the game in Reserve (see the Mission Reserves rule, below). FIRST TURN The Attacker has the first turn. GAME LENGTH The mission uses Variable Game Length. VICTORY CONDITIONS At the end of the game, the player who has scored the most Victory Points is the winner. If both players have the same number of Victory Points, the game is a draw. Primary Objectives At the end of the game, each Objective Marker is worth 3 Victory Points to the player that controls it. Secondary Objectives Slay the Warlord, First Blood. Firestorm*, Mysterious Objectives, Night Fighting, Planetary Assault, Scramble!, Shock Tactics * The Attacker rolls a D3 and adds the number of buildings that are on the table to the result. Multiple-part buildings count as several separate buildings for the purposes of determining this amount. The total is the number of Firestorm Attacks that the Attacker makes.
|
Expansions > Planetary Onslaught >