From the labyrinthine darkness of Commorragh, the Haemonculus Covens emerge into realspace. Theirs is a world of sinister delight and depthless pain, for they feed on agony as a leech feeds on blood. When the monstrous armies created by these demented flesh-sculptors are released upon the galaxy, whole worlds are plunged screaming into madness.
How This Supplement WorksThis page details additional rules which allow you to arrange your collection of Dark Eldar miniatures into Formations or Detachments from the Haemonculus Covens, as well as the Relics and Warlord Traits available to the Haemonculi. You can add these to an existing army, or use them to field an army from the Haemonculus Covens themselves.
Altar of War: Haemonculus Covens Missions
Echoes of War: Haemonculus Covens Missions
Books
Haemonculus Covens Special RulesIf you use the Formations or the Covenite Coterie Detachment in this supplement, the following supplemental special rules apply to all of the units they contain.Combined UnitsSome Formations allow you to combine several units together into a single, combined unit. Where Victory Points are awarded for units that have been completely destroyed, a combined unit awards a number of Victory Points equal to its constituent number of units if it is completely destroyed. For example, if the combined unit from a Dark Artisan Formation, was completely destroyed, your opponent would count as having destroyed 3 units.Freakish SpectacleEnemy units within 12" of one or more models from any Covenite Coterie Detachments suffer a -1 penalty to their Leadership value.Power from Pain
Power from Pain Table
Warlord TraitsIf your Warlord is a Haemonculus, you may choose to roll on the table below instead of those found in Warhammer 40,000: The Rules or Codex: Dark Eldar.
DetachmentsCovenite Coterie DetachmentThis supplement details a unique Detachment – the Covenite Coterie Detachment – that reflects the fighting style of the twisted Haemonculi. This follows all the Detachment rules presented in Warhammer 40,000: The Rules.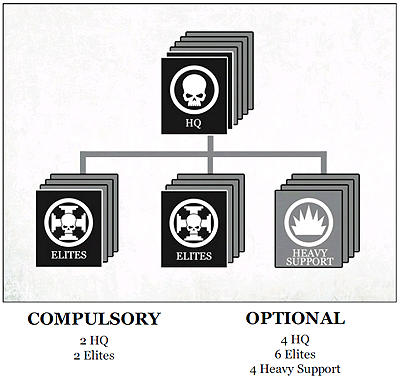 Only units from the following list may be selected as part of this Detachment: • Urien Rakarth • Haemonculus • Raider (must be taken as a Dedicated Transport) • Venom (must be taken as a Dedicated Transport) • Wracks • Grotesques • Talos • Cronos COMMAND BENEFITS • Freakish Spectacle FormationsCorpsethief Claw The unit of Talos must include 5 models, even though this is not normally allowed.  SPECIAL RULES
• Freakish Spectacle • Scout Covenite FleshcorpsEach unit of Wracks in the Formation must be given one of the Formation’s Raiders as a Dedicated Transport. SPECIAL RULES
• Freakish Spectacle Dark ArtisanSPECIAL RULES
• Freakish Spectacle Furthermore, if this Formation’s Haemonculus is your army’s Warlord, do not roll to determine his Warlord Trait; he automatically has the Master Artisan Warlord Trait. GrotesquerieSPECIAL RULES
• Freakish Spectacle
Scalpel SquadronEach unit of Wracks in the Formation must be given one of the Formation’s Venoms as a Dedicated Transport. SPECIAL RULES
• Freakish Spectacle Scarlet EpicureansSPECIAL RULES
• Freakish Spectacle Furthermore, if this Formation’s Haemonculus is your army’s Warlord, do not roll to determine his Warlord Trait; he automatically has the Master Epicurean Warlord Trait. Carnival of Pain• Scarlet Epicureans • Scalpel Squadron • Corpsethief Claw • Dark Artisan • Covenite Fleshcorps The units in this Formation must adhere to all of the restrictions detailed in each of the corresponding Formation datasheets. The units in this Formation retain all of the special rules specified in the corresponding Formation datasheets. In addition, the following special rules apply:
SPECIAL RULES Lord of Pain: As long as Urien Rakarth (or the Haemonculus from the Grotesquerie Formation) is alive, his Father of Pain/Master of Pain special rule affects all non-vehicle units in this Formation. Diabolical Playthings are unique and incredibly powerful artefacts of the Haemonculus Covens that have served the twisted masters of the Commorrite underworld for many millennia. Only one of each of the following relics can be chosen per army – there is only one of each these items in the entire galaxy! Any units from a Haemonculus Covens Detachment or Formation that can select Artefacts of Cruelty cannot select from those listed in Codex: Dark Eldar, but can instead select Diabolical Playthings, presented below, at the points costs shown.
Altar of War: Haemonculus Covens Missions
It is very straightforward to use an Altar of War mission — these can be selected at The Mission step described in Preparing for Battle in Warhammer 40,000: The Rules. Like the missions presented there, Altar of War missions are ‘pick up and play' missions - it is not necessary to know which of these missions you will be playing before selecting an army, only the agreed points value of the two armies. If you (or your opponent) have a Warlord that is a Haemonculus with the Dark Eldar Faction, you can select one of these missions just as you would any other, as explained in the Preparing for Battle section in Warhammer 40,000: The Rules. 1-2
ALTAR OF WAR
:
Fear the ReaperEvery Haemonculus Coven has an insatiable need for fresh materials to be used in experiments and to make their unholy constructions. Raiding parties are despatched from Commorragh with specific orders about what type of materials are needed; these are often quite general – a few dozen Ork Boyz, for example – but can often be arcanely specific – every individual born on a specific planet on a specific date. When an ingredient or material is especially important, then the lord of the Haemonculus Coven is not above leading the raid himself, carefully directing the operations of his minions to ensure that he gets exactly what is needed for his next vile experiment.
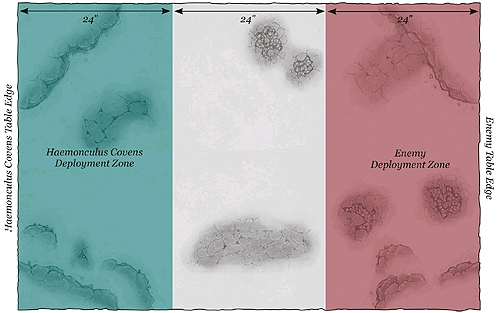
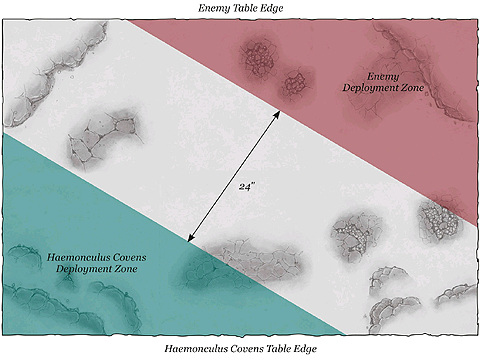 Choose armies. One player is the Haemonculus Covens player, and his opponent is the enemy player. The Haemonculus Covens player must choose a Warlord with the Dark Eldar Faction, and in addition the Warlord must be a Haemonculus model. There are no restrictions on what can be taken in the enemy player’s army. THE BATTLEFIELD Set up terrain. Use the Deployment Map included with this mission. Each player rolls a D6, re-rolling ties. Whoever scores higher decides which half of the table they wish to deploy in. The opposing player deploys in the opposite half. Objective Markers No Objective Markers are set up at the start of the battle. Instead they are placed when enemy units are destroyed (see Flesh Harvest special rule). DEPLOYMENT The enemy player deploys first, anywhere in his deployment zone. The Haemonculus Covens player deploys second, anywhere in his deployment zone. FIRST TURN The Haemonculus Covens player can choose to take the first or second turn. If they decide to take the first turn, their opponent can attempt to Seize the Initiative. GAME LENGTH The mission uses Variable Game Length. VICTORY CONDITIONS At the end of the game, the player who has scored the most Victory Points wins the game. If players have the same number of Victory Points, the game is a draw. Primary Objective At the end of the game, each Objective Marker is worth 3 Victory Points to the player that controls it. Secondary Objectives First Blood, Linebreaker, Slay the Warlord. Night Fighting, Reserves. 3-4
ALTAR OF WAR
:
Glorious SlaughterHaemonculus Covens are haughtily proud of their achievements, and are always searching for ways to prove their superiority over rival Covens. One of the most observable ways for them to do so is by showing their prowess in battle. A raiding party will be sent through the webway in search of a worthy foe. At the forefront of this force will be the Haemonculus Coven’s latest and most powerful creations. The resulting conflict will be carefully choreographed to show the qualities of these creations in the best possible light, and recordings of the battles will be flaunted in the faces of the Coven’s most hated rivals.
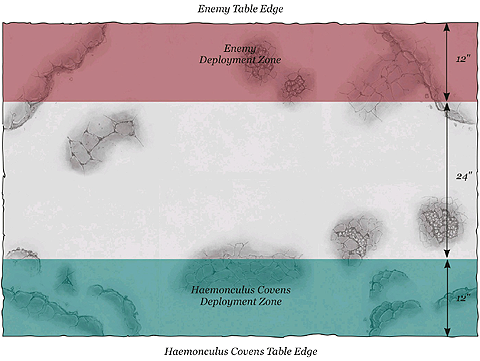
 Choose armies. One player is the Haemonculus Covens player, and his opponent is the enemy player. The Haemonculus Covens player must choose a Warlord with the Dark Eldar Faction, and in addition the Warlord must be a Haemonculus model. THE BATTLEFIELD Set up terrain. Use the Deployment Map included with this mission. Each player rolls a D6, re-rolling ties. Whoever scores higher decides which half of the table they wish to deploy in. The opposing player deploys in the opposite half. DEPLOYMENT The enemy player deploys first, anywhere in his deployment zone. The Haemonculus Covens player deploys second, anywhere in his deployment zone. FIRST TURN The Haemonculus Covens player can choose to take the first or second turn. If they decide to take the first turn, their opponent can attempt to Seize the Initiative. GAME LENGTH The mission uses Variable Game Length. VICTORY CONDITIONS At the end of the game, the player who has scored the most Victory Points wins the game. If players have the same number of Victory Points, the game is a draw. Primary Objective At the end of the game, each player receives 1 Victory Point for each enemy unit that has been completely destroyed. Units that are Falling Back at the end of the game, and units that are not on the board at the end of the game, count as destroyed for the purposes of this mission. Remember that Independent Characters and Dedicated Transports are individual units and award Victory Points if they are destroyed. Furthermore, both players have the chance to earn additional Victory Points (see the Exhibitionist Talent special rule). Secondary Objectives First Blood, Linebreaker, Slay the Warlord. Night Fighting, Reserves. 5-6
ALTAR OF WAR
:
Vanish in the GloomThe raids and exhibitions of violence carried out by the Dark Eldar are lightning fast, and usually completely unexpected. An enemy subject to such an attack will usually be caught completely by surprise, and at first can do little but fight for survival. However, once the initial shock of the attack starts to fade, the embattled prey will start to mobilise their forces and strike back against the invaders. When this happens, a Haemonculus Coven will quickly find itself heavily outnumbered, and will be forced to withdraw back to the webway.
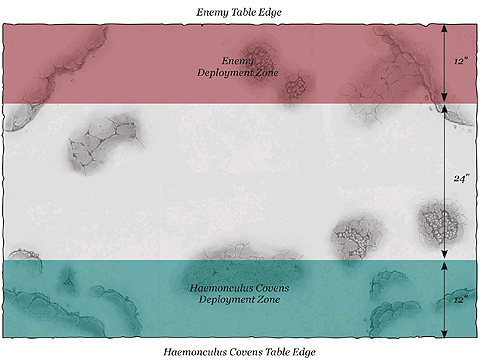
 Choose armies. One player is the Haemonculus Covens player, and his opponent is the enemy player. The Haemonculus Covens player must choose a Warlord with the Dark Eldar Faction, and in addition the Warlord must be a Haemonculus model. THE BATTLEFIELD Set up terrain. Use the Deployment Map included with this mission. Each player rolls a D6, re-rolling ties. Whoever scores higher decides which half of the table they wish to deploy in. The opposing player deploys in the opposite half. DEPLOYMENT The Haemonculus Covens player deploys first, anywhere in their deployment zone that is more than 12" away from their own table edge. The enemy player deploys second, anywhere in their deployment zone that is more than 12" from the centre line. FIRST TURN The Haemonculus Covens player can choose to take the first or second turn. If they decide to take the first turn, their opponent can attempt to Seize the Initiative. GAME LENGTH The mission uses Variable Game Length. VICTORY CONDITIONS At the end of the game, the player who has scored the most Victory Points wins the game. If players have the same number of Victory Points, the game is a draw. Primary Objective At the end of the game, each player receives 1 Victory Point for each enemy unit that has been completely destroyed. Units that are Falling Back at the end of the game, and units belonging to the enemy player that are not on the board at the end of the game, count as destroyed for the purposes of this mission. Remember that Independent Characters and Dedicated Transports are individual units and award Victory Points if they are destroyed. Furthermore, both players have the chance to earn additional Victory Points (see below). Secondary Objectives First Blood, Linebreaker, Slay the Warlord. In addition to the Secondary Objectives listed above, if any models from the Haemonculus Covens army are still on the battlefield when the game ends, then the enemy player receives 1 Victory Point. If no models from the Haemonculus Covens army are still on the battlefield when the game ends, then the Haemonculus Covens player receives 1 Victory Point. Night Fighting, Reserves. Echoes of War: Haemonculus Covens MissionsHere you will find a selection of Echoes of War missions, which represent key historical battles inspired by the battles fought by the Haemonculus Covens. The Armies section of each of these missions provides guidance on the forces present so that you can replay the pivotal events using the armies, characters and war machines described in this book. Similarly, each Echoes of War mission includes a map that depicts the battlefield on which these vital conflicts were fought.If you wish to fight an Echoes of War mission, you and your opponent must agree which mission you wish to fight, ensuring that you have the appropriate armies and models you will need. №1
ECHOES OF WAR
:
Refusal to DieThe fortress world of Refusal stands ready for war, and the joint realspace raid of the Prophets of Flesh and the Red Grief is poised to deliver it. However, the planet’s Cadian defenders – though ready for combat at a moment’s notice – are expecting to face the Eldar of Craftworld Saim-Hann, not the abominable Haemonculus Coven and their murderous Hekatarii allies. Will the Cadians stand before the merciless onslaught of the Dark Eldar, or will their regiment be consigned to history, butchered for the entertainment of the Commorrite masses?
 Choose armies. All units in the Haemonculus Covens player’s army must have the Dark Eldar Faction. He must include one Succubus (to represent Yctria the Flayer Queen) and one unit of Hekatrix Bloodbrides in his army. All units in the enemy player’s army must have the Astra Militarum Faction. THE BATTLEFIELD Set up terrain. Use the Deployment Map included with this mission. The enemy player can place any number of fortifications anywhere within his deployment zone. He does not pay any points for these fortifications, and none start the game dilapidated. All fortifications deployed in this manner start the game claimed by the enemy player. Set up any remaining terrain. Designer’s Note: When setting up the terrain, bear in mind that the Astra Militarum are defending the high ground along a fortified ridge, so try to ensure that the their side of the table has plenty of hills to represent this. DEPLOYMENT Players should first roll to determine their Warlord Traits and then deploy their armies. FIRST TURN The Haemonculus Covens player has the first turn unless his opponent can Seize the Initiative. GAME LENGTH The mission uses Variable Game Length. VICTORY CONDITIONS At the end of the game, the player who has scored the most Victory Points wins the game. If players have the same number of Victory Points, the game is a draw. Primary Objective At the end of the game, each player receives 1 Victory Point for each enemy unit that has been completely destroyed. Units that are Falling Back at the end of the game, and units that are not on the board at the end of the game, count as destroyed for the purposes of this mission. Remember that Independent Characters and Dedicated Transports are individual units and award Victory Points if they are destroyed. Secondary Objectives First Blood, Linebreaker, Slay the Warlord. Night Fighting, Reserves. №2
ECHOES OF WAR
:
Starving the SwarmThe maiden world of Lethidia lies at the mercy of a Tyranid hive fleet, though its hapless Exodite population does not stand alone. An unlikely coalition of Wild Riders from Craftworld Saim-Hann and the macabre forces of the Commorrite Haemonculus Covens have swiftly moved to counter the threat. Yet little do the unsuspecting ‘allies’ of the Haemonculus Covens realise that the intervention of the Commorrites is driven by a purpose that is far from benevolent. For now, the Covens have turned their attention to the Tyranid digestion pools in a bid to delay the hive fleet’s consumption of the planet before their secret plan reaches fruition.
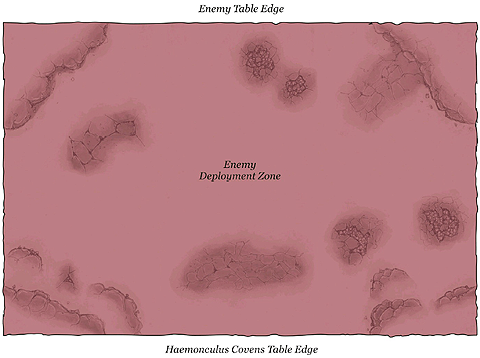 Choose armies. All units in the Haemonculus Covens player’s army must have the Dark Eldar or Eldar Faction. He must include at least 3 Razorwing Jetfighters or Voidraven Bombers (in any combination) in his army. All units in the enemy player’s army must have the Tyranids Faction. THE BATTLEFIELD Set up terrain using the Deployment Map included with this mission. Objective Markers After setting up the terrain, the enemy player places a total of 6 Objective Markers to represent the Tyranid Digestion Pools (see the Tyranid Digestion Pools mission special rule). No Objective Marker can be placed within 6" of any battlefield edge or 12" of another Objective Marker. DEPLOYMENT The players should first roll to determine their Warlord Traits. The enemy player selects any one table edge to be his. The Haemonculus Covens player’s table edge is the one opposite the enemy player’s table edge. The enemy player deploys his force anywhere on the battlefield. All of the Haemonculus Covens player’s units start the game in Reserve (see the Commencing the Attack mission special rule). FIRST TURN The Haemonculus Covens player has the first turn. GAME LENGTH The mission uses Variable Game Length. VICTORY CONDITIONS At the end of the game, the player who has scored the most Victory Points wins the game. If players have the same number of Victory Points, the game is a draw. Primary Objective At the end of the game, the Haemonculus Covens player receives 3 Victory Points for each Tyranid Digestion Pool that has been successfully rendered inert before the end of the game (see the Necrotoxin Missiles mission special rule). The enemy player receives 3 Victory Points for each Tyranid Digestion Pool that remains active at the end of the game (see the Necrotoxin Missiles mission special rule). Secondary Objectives First Blood, Slay the Warlord. Night Fighting, Reserves. №3
ECHOES OF WAR
:
To Steal a PlanetThe terrible truth behind the Haemonculus Covens’ actions on war-torn Lethidia is about to be revealed. But for Urien Rakarth’s diabolical scheme to work, a network of webway breachers must be positioned at specific geomantic locations across the planet’s surface. Eager to impress the ancient Haemonculus patriarch, Coven lords of every persuasion descend upon these critical locus points to ensure that the webway breachers are in position for when the time comes.
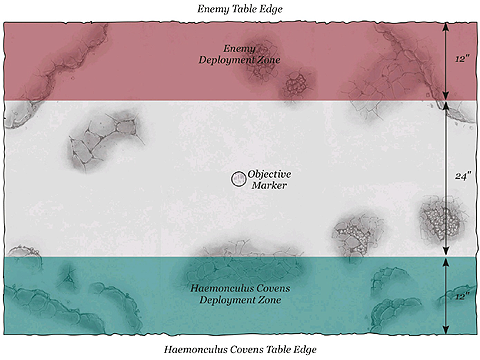 Choose armies. All units in the Haemonculus Covens player’s army must have the Dark Eldar Faction. All units in the enemy player’s army must have the Tyranids Faction. THE BATTLEFIELD Use the Deployment Map included with this mission. First of all, place a single Objective Marker in the centre of the battlefield to represent the Webway Breacher placement location (see the Webway Breacher mission special rule). Players then set up terrain. DEPLOYMENT Players deploy their armies. FIRST TURN The player that deployed first has the first turn unless their opponent can Seize the Initiative. GAME LENGTH The mission uses Variable Game Length. VICTORY CONDITIONS If, at the end of the game, one or more of the Haemonculus Covens player’s Haemonculus models (or Urien Rakarth), is within 3" of the Objective Marker, he wins automatically. If, at the end of the game, this condition has not been met, the enemy player wins. Night Fighting, Reserves. №4
ECHOES OF WAR
:
Raven’s FallThe Raven Guard have once more come to the aid of the stricken planet of Parocheus to save its inhabitants from the depredations of the malicious Haemonculus Coven known as the Altered. This time, however, the Covenite fiends have not come to prey upon the planet’s populace – they come seeking vengeance against its saviours. As the Raven Guard emerge from the haunted tunnels of Divil’s Gulch, they are assailed by the full might of the Altered’s freakish hordes. But worse still for the Raven Guard, ill chance has granted the Haemonculi an even greater opportunity for revenge – corruption of the gene-seed that is the very lifeblood of their Chapter.
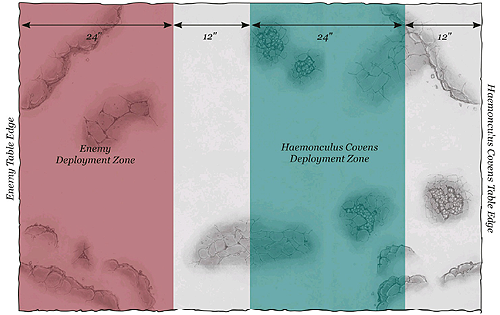
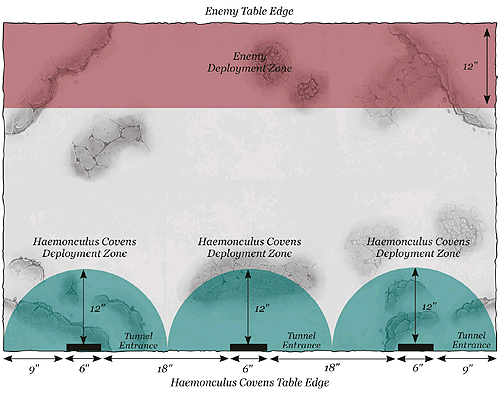 Choose armies. All units in the Haemonculus Covens player’s army must have the Dark Eldar Faction. All units in the enemy player’s army must have the Space Marines Faction and use the Raven Guard Chapter Tactics. THE BATTLEFIELD Set up terrain. Use the Deployment Map included with this mission. DEPLOYMENT The enemy player deploys first, placing all of his unit anywhere in his deployment zone. The Haemonculus Covens player then deploys, dividing all of his non-Flyer units as evenly as possible between his three deployment zones, as shown on the Deployment Map. FIRST TURN The Haemonculus Covens player has the first turn unless the enemy player can Seize the Initiative. GAME LENGTH The mission uses Variable Game Length. VICTORY CONDITIONS At the end of the game, the player who has scored the most Victory Points wins the game. If players have the same number of Victory Points, the game is a draw. Primary Objective At the end of the game, each player receives 1 Victory Point for each enemy unit that has been completely destroyed. Units that are Falling Back at the end of the game, and units that are not on the board at the end of the game, count as destroyed for the purposes of this mission. Remember that Independent Characters and Dedicated Transports are individual units and award Victory Points if they are destroyed. Furthermore, the Haemonculus Covens player earns 1 additional Victory Point for each enemy non-vehicle unit that he completely destroys in close combat. Secondary Objectives First Blood, Linebreaker, Slay the Warlord*. * Slay the Grinner: In this mission, the Slay the Warlord Secondary Objective is worth 3 Victory Points to the enemy player. Reserves. №5
ECHOES OF WAR
:
Profound DarknessHaving used potent EMP munitions to rob the surface of power, the Night Lords have descended upon the Imperial world of Wystengradt, intent on sating their desire for torment and murder on the planet’s terrified population. Yet the tables are about to turn. Seeking vengeance for a prior defeat at the hands of the Traitor Legion some months earlier, the Coven lords of the Altered strike a deal with the Aelindrachi in a bid to visit their own brand of psychological horror upon the Night Lords. With the world plunged into unnatural darkness by the Coven’s antiphoton engine, the Night Lords endure many days of war in total blackness, until even they are anxious to escape.
 Choose armies. All units in the Haemonculus Covens player’s army must have the Dark Eldar Faction. All units in the enemy player’s army must have the Chaos Space Marines Faction. THE BATTLEFIELD Use the Deployment Map included with this mission. First of all, the Haemonculus Covens player must place a single Objective Marker anywhere in his deployment zone to represent the antiphoton engine (see the Mission Special Rules). Players then set up terrain. DEPLOYMENT Players deploy their armies. FIRST TURN The player that deployed first has the first turn unless their opponent can Seize the Initiative. GAME LENGTH The mission uses Variable Game Length. VICTORY CONDITIONS At the end of the game, the player who has scored the most Victory Points wins the game. If players have the same number of Victory Points, the game is a draw. Primary Objective At the end of the game, each player receives 1 Victory Point for each enemy unit that has been completely destroyed. Units that are Falling Back at the end of the game, and units that are not on the board at the end of the game, count as destroyed for the purposes of this mission. Remember that Independent Characters and Dedicated Transports are individual units and award Victory Points if they are destroyed. Furthermore, the enemy player earns 3 additional Victory Points if he completely destroys the antiphoton engine before the end of the game (see the Mission Special Rules). Secondary Objectives First Blood, Linebreaker, Slay the Warlord. Reserves. | |||||||||||||||||||||||||||||||||||||||||||||||||||||||||||||||||||||||||||||||||||||||||||||||||||||||||||||||||||||||||||||||||||||
Factions > Dark Eldar >

