War is not a trade solely for living soldiers, but also for mighty war engines and tanks. Rhinos and Land Raiders forge forwards through incoming fire, disgorging battle-ready Space Marines into the heart of the foe. Leman Russ Battle Tanks plough across the battlefield, battle cannons roaring and heavy bolters spitting death. Eldar skimmers flit through the smoke-laced skies, darting through the enemy defences to attack crucial targets.
Such vehicles do not fight in the same manner as other models – that’s why their rules have been compiled in this section. First we’re going to look at the rules and characteristics that all vehicles have in common, then we’ll cover more specialist sets of rules for
Flyers,
Tanks and more.
Vehicles have characteristics that define how powerful they are in a similar way to Infantry. However, their characteristics are different. Shown here is one example of a vehicle’s profile:
Vehicles have a Ballistic Skill value just like other unit types and it represents the accuracy of the crew as they blast away at their enemy with the vehicle’s weapons.
The Armour Value (sometimes just referred to as Armour) of a vehicle tells you how hard it is to damage. Vehicles have separate Armour Values to represent the protection on their front (F), sides (S) and rear (R). Armour Values typically range from 10 to 14, depending on which side of the vehicle is being attacked, with the lightest armour usually on the rear, to represent vulnerable fuel tanks, engine compartments, etc.
Every vehicle has a number of Hull Points, indicating how much damage it can take before it is destroyed. This will normally be shown in the vehicle’s characteristics profile.
The different types of vehicle are:
Chariot,
Fast,
Flyer,
Heavy,
Hover,
Open-topped,
Skimmer,
Tank,
Transport,
Walker,
Super-heavy vehicle,
Super-heavy Walker and
Super-heavy Flyer. These types can be combined to define, for example, a Fast Skimmer or an Open-topped Walker, in which case, the vehicle has all of the rules for all of its types.
Vehicles & Measuring Distances
As vehicle models do not usually have bases, the normal rule of
measuring distances to or from a base cannot be used. Instead, for distances involving a vehicle,
measure to and from their hull, ignore gun barrels, dozer blades, antennas, banners and other decorative elements.
There is, however, the notable exception of a vehicle’s weaponry.
When firing a vehicle’s weapons, ranges are measured from the muzzle of the firing weapon, whilst line of sight is determined from the weapon’s mounting point and along its barrel (as explained later).
Vehicles in the Movement Phase
The distance a vehicle moves influences how accurately it can fire its weapons, as described later.
- Stationary. A vehicle that remains Stationary will be able to bring its full firepower to bear on the enemy.
- Combat Speed. A vehicle that travels up to 6" is said to be moving at Combat Speed. This represents the vehicle advancing slowly to keep firing, albeit with reduced firepower.
- Cruising Speed. A vehicle that travels more than 6" and up to 12" is said to be moving at Cruising Speed. This represents the vehicle concentrating on moving as fast as possible – all of its firepower will be wildly inaccurate.
Vehicles can turn any number of times as they move, just like any other model.
Vehicles turn by pivoting on the spot about their centre-point, rather than wheeling round. Pivoting on the spot alone does not count as moving, so
a vehicle that only pivots in the Movement phase counts as Stationary (however,
Immobilised vehicles cannot even pivot on the spot). Pivoting is always done from the centre of a vehicle to prevent it from accidentally moving further than intended or allowed. Just like other units, vehicles cannot move over friendly models.
Difficult and Dangerous Terrain
Vehicles moving through broken terrain are not slowed like other units, but risk becoming stuck, bogged down or damaged.
Vehicles are not slowed down by difficult terrain. However, they treat all difficult terrain as dangerous terrain instead. A vehicle that fails a Dangerous Terrain test immediately loses one Hull Point and suffers an Immobilised result from the Vehicle Damage table.
Vehicles in the Psychic Phase
Even vehicles can harbour powerful connections to the Warp.
Vehicles with the
Psychic Pilot special rule
manifest their psychic powers during the
Psychic phase, as normal.
Vehicles in the Shooting Phase
When a vehicle fires, it uses its own Ballistic Skill characteristic and shoots like any other unit. All its weapons must fire at a single target unit.
Moving and Shooting with Vehicles
, but the number (and accuracy) of the weapons a vehicle can fire in the
Shooting phase depends on how fast it moved in that turn’s
Movement phase, as detailed below.
- A vehicle that remained Stationary can fire all of its weapons (remember that pivoting on the spot does not count as moving).
- A vehicle that moved at Combat Speed may fire a single weapon using its Ballistic Skill. The vehicle can also fire Snap Shots with other weapons if it wishes, though, of course, it cannot fire any weapons that cannot be fired as Snap Shots.
- A vehicle that moved at Cruising Speed can only make Snap Shots, as above.
Vehicles & Ordnance Weapons
Unlike other units, vehicles can move and fire with
Ordnance weapons. However, a vehicle that fires an Ordnance weapon can only make
Snap Shots with its other weapons that turn. A vehicle that moved at
Cruising Speed can still Snap Shoot Ordnance, but of course, cannot fire any Ordnance weapon that cannot be fired as Snap Shots.
Vehicles Weapons & Line of Sight
When firing a vehicle’s weapons, point them at the target and then
trace line of sight from each weapons’ mounting and along its barrel to see if the shot is blocked by intervening terrain or models.
If the target unit is in cover from only some of the vehicle’s weapons, then work out the target’s
cover saves exactly as if each firing weapon on the vehicle was a separate firing unit. Note that, even when firing
Barrage weapons, the target unit must be in the weapon’s arc of sight.
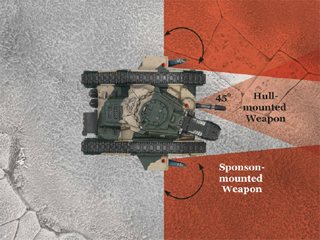
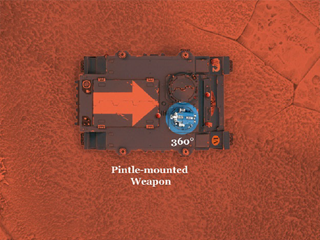
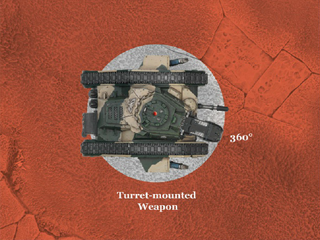
On some models, it will actually be impossible to move the gun and point it towards the target because of the way the model is assembled. In this case, players should assume that the guns on a vehicle are free to rotate or swivel on their mountings. In the rare cases when it matters, assume that guns can swivel vertically up to 45º, even if the barrel on the model itself cannot physically do that! Additionally, assume all hull-mounted weapons can swivel horizontally up to 45º.
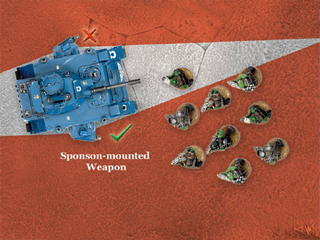
| Vehicle Weapons and Line of Sight |
Arc of Sight 1
The Predator is firing at the Ork Boyz unit. The weapon on the left sponson cannot draw a line of sight to the chosen target, and so it cannot be fired. | Arc of Sight 2
| Arc of Sight 3
| Arc of Sight 4
|
|
|
A vehicle can elect to move Flat Out instead of firing in the
Shooting phase, immediately moving up to 6"; this move triggers
Dangerous Terrain tests as normal. A
Tank cannot move Flat Out in the same turn that it performs a
Tank Shock.
When a unit fires at a vehicle, it must be able to see its hull or turret (ignoring the vehicle’s gun barrels, antennas, decorative banner poles, etc.). Note that, unlike for other models, a vehicle’s wings are not ornamental and are a part of its hull. As the whole unit must fire at the same target, this often means that some of their weapons can’t damage the target vehicle, so we assume that the other members of the squad are providing covering fire, bringing forward ammunition for heavy weapons or simply keeping their heads down. If the target vehicle is in range,
roll To Hit as normal. If any hits are scored, roll for each to see if they
penetrate the vehicle’s Armour Value (see below).
Vehicle Facing and Armour Values
Not all vehicles are equally armoured. Countless layers of adamantium and ceramite plates protect some Tanks, while lighter vehicles rely more on their speed to avoid incoming fire. As such, vehicles have different Armour Values, representing the thickness of their armour. Armour Values for individual vehicles often vary between its front, side and rear facings.
Shots are resolved against the facing of the vehicle that the shot comes from. To see what facing a shot is coming from, draw two imaginary lines through the corners of the vehicle (see diagram below). If a unit has firing models in two or more different facings of a target vehicle (some models in the front and some in the side, for example), shots are resolved separately for each facing. The direction a turret is facing has no bearing on what arc of a vehicle you are firing at.
When firing a
Blast weapon at a vehicle, place the marker with the hole over any part of the vehicle’s hull and then roll for
scatter as normal. In the case of multiple blasts, the vehicle will be hit once each time any part of a
blast marker ends up over the vehicle or its base. The
armour penetration roll is resolved against the Armour Value facing the firer, regardless of the position of the marker.
If a vehicle, or its base, is even partially under a template, it is hit on the Armour Value facing the firer.
Hitting a vehicle is no guarantee that you will actually damage it. Once a hit has been scored on a vehicle, roll a D6 and add the weapon’s Strength, comparing this total with the Armour Value of the
appropriate facing of the vehicle.
- If the total is less than the vehicle’s Armour Value, the shot has no effect.
- If the total is equal to the vehicle’s Armour Value, the shot inflicts a glancing hit.
- If the total is greater than the vehicle’s Armour Value, the shot inflicts a penetrating hit.
For example, a lascannon shot hits the front of a Space Marine Predator (Armour Value 13). Rolling a D6, the player rolls a 4 and adds this to the lascannon’s Strength of 9, for a total of 13. Because this equals the Predator’s Armour Value, it inflicts a glancing hit. If the player had rolled a 5 or a 6, the armour penetration roll would have inflicted a penetrating hit on the Predator.| Vehicle Damage Table |
| D6 | Result | | 1-3 | Crew Shaken. The vehicle is rocked by the attack, but no serious damage is sustained.
The vehicle can only fire Snap Shots until the end of its next turn. | | 4 | Crew Stunned. Either the vehicle’s crew is knocked about by the attack, or the vehicle’s targeting and steering systems are temporarily scrambled.
The vehicle can only fire Snap Shots until the end of its next turn. If the vehicle is a Zooming Flyer, it must move 18" and cannot turn at all in its next Movement phase. If the vehicle is not a Zooming Flyer, it cannot move or pivot until the end of its next turn. | | 5 | Weapon Destroyed. The strike causes critical damage to part of the vehicle’s armament.
One of the vehicle’s weapons (randomly chosen) is destroyed – including any combi- or built in weapons. This can include vehicle upgrades that are weapons, such as pintle-mounted storm bolters or hunter-killer missiles. Do not count weapons that have run out of ammunition – they’re already non-functional for the most part. If a vehicle has no weapons left, treat this result as an Immobilised result instead (see below). | | 6 | Immobilised. The vehicle has taken a hit that has crippled a wheel, track, grav plate, engine or leg.
If the vehicle is a Chariot, count this result as a Crew Stunned result instead (see above). If the vehicle is a Zooming Flyer, roll a further D6: on a 1 or 2, that Flyer will immediately Crash and Burn! (see below), on a 3+ the Flyer counts this result as Crew Stunned instead (see above). Other vehicles are Immobilised. An Immobilised vehicle cannot move – it may not even pivot, but its turrets may continue to rotate to select targets, and other weapons retain their normal arcs of fire. Any Immobilised results suffered by an already Immobilised vehicle instead remove an additional Hull Point. | | 7+ | Explodes! The vehicle is ripped apart in a spectacular explosion, as its fuel and ammo detonate.
The vehicle is destroyed. If the vehicle is a Zooming Flyer, it will immediately Crash and Burn! (see below), otherwise nearby units suffer a Strength 4 AP- hit for each model within D6" of the vehicle (resolve this once, regardless of how many times the result is inflicted), as flaming debris scatters across the area. The vehicle is then removed from the battlefield. | | Crash and Burn! The aircraft is torn apart and flaming debris rains down upon the battlefield.
Centre the large blast marker over the Flyer – it then scatters 2D6". Any units under the blast marker’s final position suffer a number of Strength 6 AP- hits equal to the number of models that unit has under the marker. The Flyer is then removed from the battlefield. |
|
A hit on a vehicle can have a variety of results. Its armour could be completely pierced, yet merely result in an area of shattered hull and a nasty shock for the crew. Alternatively, a lucky shot could detonate the ammunition cases or fuel tanks held within the vehicle, resulting in an explosion of titanic proportions.
If a glancing hit was scored, the vehicle loses 1 Hull Point.
If a penetrating hit was scored, the vehicle not only loses 1 Hull Point, but also suffers additional damage.
After deducting any Hull Points,
roll a D6 for each shot that penetrated the vehicle’s armour and look up the result using the Vehicle Damage table, applying any appropriate modifiers, such as those granted for
high AP weapons. All modifiers on the Vehicle Damage table are cumulative. If you inflict a penetrating hit, you must roll on the Vehicle Damage table even if the vehicle loses sufficient Hull Points to be Wrecked, as there is still a chance that it might Explode!
Some weapons are so destructively powerful that they can inflict masses of damage in a single strike.
If an AP2 weapon scores a penetrating hit add a +1 modifier to the roll on the Vehicle Damage table.If an AP1 weapon scores a penetrating hit add a +2 modifier to the roll on the Vehicle Damage table.
Vehicle Damage Results and Hull Points
Occasionally, a rule will state that a vehicle will suffer the effects of a
Crew Shaken,
Crew Stunned,
Weapon Destroyed or
Immobilised result. Unless that rule also specifies that the vehicle suffers a
glancing hit, a
penetrating hit, or otherwise states that the vehicle loses a Hull Point, only the relevant result on the Vehicle Damage chart is applied to the vehicle and no Hull Points are lost.
A vehicle that is reduced to 0 Hull Points is Wrecked. A Wrecked vehicle is destroyed. If the vehicle was a
Flyer in
Zoom mode, it suffers a
Crash and Burn! result (see the
Vehicle Damage table). In any other circumstance, a Wrecked model is left in place, and is treated as a Citadel scenery model with the
difficult terrain type.
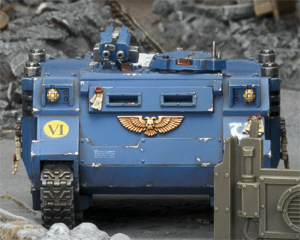
Vehicles and Cover – Obscured Targets
| Obsured Vehicles |
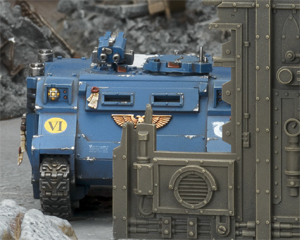
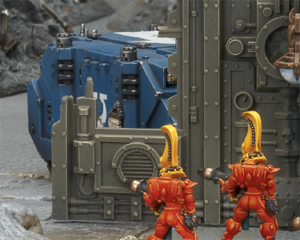
In these three pictures a unit of Eldar Fire Dragons is shooting at a Space Marine Rhino. In each case they are in its front armour facing.
Picture 1: Less than 25% of the front of the Space Marine Rhino is hidden by the ruin – the Rhino is not obscured.
Picture 2: More than 25% of the front of the Space Marine Rhino is hidden by the ruin – the Rhino is obscured and will receive a 4+ cover save from the ruin.
Picture 3: The entirety of the front of the Space Marine Rhino is hidden by the ruins. However, part of the side of the Rhino is still visible. The Rhino is obscured, and gains +1 to its cover save. |
Vehicles do not benefit from
cover in the same way as Infantry due to their sheer size and bulk, but they can position themselves in such a way as to make it harder for the enemy to hit them in a vulnerable location. The difference from the way cover works for other models is represented by the following exceptions to the normal rules for cover:
- At least 25% of the facing of the vehicle that is being targeted (its front, side or rear) needs to be hidden by intervening terrain or models from the point of view of the firer for the vehicle to be in cover. If this is the case, the vehicle is obscured (or ‘hull down’). If a unit is firing at a vehicle, the vehicle is obscured only if it is 25% hidden from the majority of the firing models that are able to damage the vehicle. If a unit has firing models in two or more different facings of a target vehicle, work out whether or not the vehicle is obscured separately for each facing, using only models firing at that facing.
- Vehicles are not obscured simply for being inside terrain such as woods or ruins. The 25% rule given above takes precedence.
- Vehicles cannot Go to Ground, voluntarily or otherwise.
- If the target is obscured and suffers a glancing hit, a penetrating hit, or is otherwise hit by an enemy shooting attack that inflicts damage upon it (such as being hit by a weapon with the Graviton special rule), it must take a cover save against it, exactly like a non-vehicle model would do against a Wound (for example, a 5+ cover save for a Citadel Wood, a 4+ cover save for a ruin and so on). If the save is passed, the hit is discarded, no Hull Points are lost and no roll is made on the Vehicle Damage table. If a special rule or a piece of wargear makes a vehicle obscured even if in the open, this is a 5+ cover save, unless specified otherwise in the codex or Army List Entry.
It may rarely happen that the firing unit cannot see any part of the facing they are in (front, side or rear), but they can still see another facing of the target vehicle. In this case, they may take the shot against the facing they can see, but to represent such an extremely angled shot, the vehicle receives a cover save one point better than that given by the cover obscuring the vehicle’s other facing.
Vehicles in the Assault Phase
Vehicles can be both very dangerous and very vulnerable at close quarters. On one hand, massively armoured vehicles can scatter Infantry before them, as no one in their right mind would wish to be caught beneath the tracks of an eighty-tonne Tank bearing down on them! On the other hand, a stationary vehicle can often be very easily destroyed, as individuals clamber over it, attaching all manner of grenades and hacking at or shooting into vulnerable spots.
Assaulting with a Vehicle
Vehicles cannot
charge. Note that
Walkers and
Chariots are exceptions to this.
Infantry can pose a grave threat to vehicles if they get close enough. They can wreck a vehicle by shooting through vision slits, planting explosives on fuel tanks, tearing open hatches to attack the crew or committing some other equally imaginative act of mayhem.
A unit can charge a vehicle in their
Charge sub-phase. The
charge move is conducted the same as for charging other enemy units.
Unless specified otherwise, vehicles cannot make
Overwatch fire – it takes too long to bring their weapons to bear.
Hitting vehicles in close combat is very straightforward due to their size. We can safely assume that any unit that has been able to reach a vehicle has been travelling swiftly enough to land a blow upon it with relative ease – though care must still be taken to strike a vital point.
Accordingly, all vehicles are treated as being Weapon Skill 1. The exceptions are
Walkers and
Chariots, which have varying Weapon Skills, and
Immobilised non-Walker vehicles, which are always treated as having Weapon Skill 0.
Armour Penetration in Assault
Armour Penetration is worked out in the
same way as for shooting (D6 + the Strength of the attacker). In close combat, however,
all hits are resolved against the vehicle’s rear armour, to represent the chance of attacking a vulnerable spot.
Combats against vehicles are very different from those among other
unit types. For a start,
whilst vehicles can be assaulted, they do not Pile In and cannot be locked in combat. At the end of a round of close combat against a vehicle, calculate the assault result as normal,
counting each glancing hit as 1 Wound, and each penetrating hit as 2 Wounds.If the vehicle loses the combat or is destroyed, nothing happens. There are no
Sweeping Advances, no
Pile Ins and no
Consolidation moves. The vehicle and the enemy remain where they are and are free to simply move away in future turns.
If the vehicle wins the combat, the enemy must make a
Morale check as normal, and
Fall Back if they fail, though the vehicle cannot
Consolidate or make a
Sweeping Advance.
If a vehicle that has been assaulted (and survived) does not move in its successive
Movement phase, enemy models will still be in base contact with it during its Shooting and
Assault phase. Enemy models that are in base contact with a vehicle (not including
Walkers or
Chariots) are not
locked in combat and can therefore be shot during the
Shooting phase. If the vehicle pivots on the spot (to shoot at its attackers for example), move these models out of the way as you shift the vehicle and then place them back into base contact with the vehicle – or as close as possible if there is no room.
Units that still have models in base contact with a vehicle during its
Assault phase may attack it again, just as in a normal ongoing combat (including all models that would count as engaged in a normal assault).
Vehicles, Leadership and Morale
It is assumed, in all cases, that the crew’s faith in their vehicle, and its considerable armour plating, is absolute. Therefore, vehicles never take
Morale checks or
Leadership tests. Any occasional lapses that do occur are represented by
Crew Shaken and
Crew Stunned results on the
Vehicle Damage table.
Most vehicles fight as individual units and are represented by a single model. However, some vehicles, such as Ork Warbuggies and Eldar Vypers, operate together in what are known as squadrons. Squadrons are treated like normal units, with a few exceptions and clarifications as described below.
Squadrons in the Movement Phase
The vehicles in a
squadron must maintain coherency, just like models in
ordinary units, but
vehicles in a squadron need only remain within 4" horizontally of each other, rather than within 2" horizontally. Indeed, they can move at different speeds, provided they maintain unit coherency.
Squadrons in the Shooting Phase
All of the weapons fired by a
squadron of vehicles in each phase must target a single enemy unit. Like other units, vehicles in squadrons can see and shoot through members of their own squadron, just as if they were not there. This represents the vehicles manoeuvring around each other in a well-practiced battle formation.
Squadrons Moving Flat Out
Vehicles in
squadrons can declare individually whether or not they are going to move
Flat Out. Note that
unit coherency must still be maintained. Those that do not move Flat Out can shoot as normal.
When a
squadron of vehicles is shot at,
roll To Hit as normal. Once you have determined the number of hits, these
hits must be resolved, one at a time, against the model in the squadron closest to the firing unit – exactly like you would resolve Wounds on a normal unit. Once the nearest model in the squadron is destroyed (i.e. is
Wrecked or
Explodes!), the next hit is allocated against the new nearest model, and so on.
Squadrons in the Assault Phase
When a
squadron is struck in close combat,
roll To Hit as normal, and resolve those hits, one at a time, first against squadron models in base contact, then against models further away, once the closest model is destroyed, just like normal.
As vehicle
squadrons don’t have Wounds or Toughness, we have to allocate hits to them slightly differently to other, more conventional, units. To do this,
allocate individual hits, rather than individual Wounds, one at a time, to the closest model in the squadron. Then roll for
Armour Penetration against the correct
facing (so against the rear armour in close combat) and determine the result of any
glancing or
penetrating hits. When this has been done, resolve the next hit, and so on, until all hits have been allocated and resolved.
Abandoning Squadron-mates
Over the course of the battle, it is likely that one or more members of a
squadron will suffer an
Immobilised result, preventing it from moving.
If a member of a squadron is Immobilised, the rest of the squadron are permitted to ‘abandon’ it. To do so, the rest of the squadron must move out of unit coherency with it; treat the Immobilised model(s) as a separate unit from then on for all rules and
victory conditions. This cannot be done if a member of a squadron has only been
Crew Stunned – we assume, in this case, that its squadron-mates rally to its defence until a full recovery is made.
FAQ
Flyers
| Q: | Flyers can fire 4 weapons at full Ballistic Skill, can they also fire any additional weapons as Snap Shots like other vehicles? |
| A: | Yes. |
| Q: | Can a Flyer with the Hover (and thus Fast Skimmer) unit type be deployed on the board as a Fast Skimmer? |
| A: | No, unless it has a rule that specifically allows it. |
Skimmers
Stomp
| Q: | When you make a Stomp attack in close combat and cause casualties outside of those in the combat, do the units outside of combat have to take Morale checks as if suffering 25% casualties, if they lose 25% or more? |
| A: | No. |
Super-heavy Vehicles
| Q: | Do you have to select all targets before any dice are rolled for the weapons mounted on a Super-heavy vehicle? If that is the case, are One Use Only/One Shot Only weapons used up if a previous weapon destroyed the target that the One Use Only/One Shot Only weapon was going to shoot? |
| A: | Yes, to both questions. |
| Q: | Do Super-heavy Walkers shoot at targets from where their weapon is modeled or from the base? |
| A: | Ranges are measured from the weapon itself. Unless modelled otherwise, assume all weapons have a 45° facing from the front of the model. |
| Q: | Are Super-heavy Walkers limited, like normal Walkers, to a 45° arc of fire from the facing of the model’s weapon? |
| A: | Yes – they follow all the normal rules for Walkers, except when explicitly stated otherwise. |
Tank Shock
| Q: | How does Tank Shock work when you stop on a unit? The rules state that the models ‘must be moved out of the way by the shortest distance’ – but what does this mean? The shortest distance that allows you to be in unit coherency? Or the shortest distance to just be out from under the vehicle, with models dying if not in unit coherency and at least 1" away from enemy units? What happens if a Gargantuan Creature or Monstrous Creature or any other non-vehicle unit gets Tank Shocked, but cannot move to another place in the shortest way? Are they destroyed or just moved further away? |
| A: | Pick up only those models actively displaced by the Tank Shock, and place them on the battlefield with all models within unit coherency, as close as possible to their starting location and with no models within 1" of an enemy unit. Any models that cannot be placed in this way will be removed as casualties. If the whole unit is displaced, it will be moved together as above, and because of this it is impossible to remove an entire unit from play with a Tank Shock, unless the unit is unable to move; units that have Gone to Ground return to normal immediately, as it counts as being forced to move. |
| Q: | When vehicles Ram, they may only fire Snap Shots for that turn. There is no allowance that I can find for Super-heavy Tanks and Thunderblitz does not seem to affect this part of the Ram rule. According to the rules, then, If a Baneblade Rams (with a Thunderblitz roll) a Warbuggy, the Baneblade can only fire Snap Shots. Is this intended? |
| A: | Yes. |
Transports
| Q: | I have a question regarding unit special rules that affect all or some units within a certain range of a model or unit. How do these interact with units inside Transports, and what happens if the unit with the rule is inside a Transport? |
| A: | When a unit embarks on a vehicle it is taken off the battlefield and does not interact with anything on the battlefield. However, certain rules may create exceptions to this rule, with the most obvious examples being Fire Points, psychic powers and Transports. If a unit’s rules are meant to apply even when embarked on a Transport, they will specify this. |
| Q: | Do non-psychic powers with an area of effect (‘aura’ powers like the Tau Ethereal’s Invocation of the Elements, or the effects of many Warlord Traits) extend from the hull of a Transport that the model with the power is embarked within? |
| A: | No, non-psychic powers such as those described cannot be used by models embarked upon a Transport unless specifically noted otherwise. |
| Q: | It’s not clear whether or not a unit that has destroyed a Transport can then charge the now-disembarked troops. The rule says ‘if allowed’ – does that mean as long as they haven’t fired weapons stopping them from charging, or do they need to have a special rule to be allowed to charge? |
| A: | The unit that destroyed the Transport vehicle can charge the now-disembarked passengers so long as, for example, it hasn’t fired any weapons that prevent it from charging, it hasn’t Gone to Ground, it is within 12", and so forth. A unit doesn’t need a special rule to allow it to do so. |
| Q: | What happens to a unit if the Transport they are in moves over 6" and is Wrecked by your opponent in their turn? |
| A: | |
Vehicles
| Q: | Is a hull-mounted weapon’s arc of fire a total of 45° or 45° to either side? The chart seems to indicate the former, but we aren’t 100% certain. |
| A: | Hull-mounted weapons have a total firing arc of 45°. |
| Q: | Are models in a unit that destroyed a Walker in close combat allowed to Consolidate? |
| A: | No. |
| Q: | How can I shoot an infantry unit that stays behind a vehicle? Сan I just shoot them normally, as if the vehicle is not there, or can I not shoot them at all? Do I need to destroy the vehicle first, or is there a way to kill infantry units behind vehicles? |
| A: | If your firing unit doesn’t have line of sight to a unit behind a vehicle, then it can’t shoot them unless your unit has weapons that do not need line of sight. |
| Q: | In a situation where there are 4 penetrating hits on a vehicle with 3 Hull Points, are they rolled one at a time or all at once? |
| A: | It doesn’t matter if you roll them all at once or one at a time, as long as you roll them all! You must roll on the Vehicle Damage table even if the vehicle loses sufficient Hull Points to be Wrecked, as there is still a chance that it might get an Explodes! result. |
| Q: | I have a question about pivoting and moving a vehicle. When is the distance that a vehicle can move measured – before it pivots for the first time or after it pivots for the first time? Some vehicles may be able to gain an extra inch or two by pivoting, then measuring, then moving. |
| A: | If a model moves, no part of the model (or its base) can finish the move more than the model’s move distance away from where it started the Movement phase. |
| Q: | Do vehicles in the same squadron have to shoot at the same target? I noticed recently that a squadron is never referred to as a unit, just as a group of vehicles that must stay in coherence. |
| A: | With noted exceptions, squadrons ‘are treated like normal units’ – in this specific case, Warhammer 40,000: The Rules states that ‘All of the weapons fired by a squadron of vehicles in each phase must target a single enemy unit’. |