In warfare, air superiority is key, and the grim darkness of the far future is no exception. Above countless planets, engines scream as heroic pilots engage in savage dogfights, formations of bombers descend through clouds of smoke to unleash incendiary hell and dropships disgorge hordes of merciless killers from their holds to wreak havoc on the ground troops below. For every strategic challenge the battlefield provides, there are aircraft perfectly designed to meet it. Surgically precise individual strikes, indiscriminate destruction – all situations are catered for with a wide variety of craft from each and every warring race.
Death From the Skies is a must-buy for Warhammer 40,000 players contains new rules for
Flyers that completely replace
those found in Warhammer 40,000, with datasheets including new
Agility,
Combat Role and
Pursuit Value characteristics and options for fielding
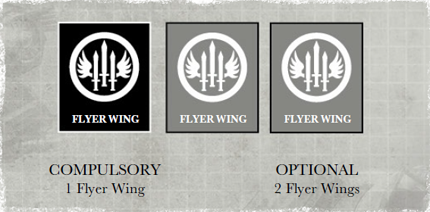
Flyer Wing units, with their own leaders. On top of this, the book introduces the
Dogfight phase – detailed combat between Flyers is now possible!
Aircraft swoop and turn through the airspace above the battlefields of the 41st Millennium. Armed with a deadly array of weapons, they unleash death and destruction on the troops and war machines on the ground below them and engage in vicious dogfights against others of their own kind in order to gain control of the skies.
Death from the Skies provides updated rules for Flyers in games of Warhammer 40,000. These expand upon those from the rulebook, allowing you to use special
Attack Patterns, to take part in vicious dogfights, to field
ace pilots, and to fight thrilling
Air War missions. This first section of the Death from the Skies rules presents the expanded rules for Flyers, which replace
those from Warhammer 40,000: The Rules.
Flyers have three additional characteristics not used by other vehicles: Combat Role, Pursuit, and Agility.
There are three Combat Roles:
- Attack Flyers are designed to attack ground targets from low altitude with their guns and missiles.
- Bombers are designed to saturate ground targets with bombs and explosive munitions.
- Fighters are designed to attack enemy Flyers, shooting them down before they can carry out their mission.
All Flyers have a Pursuit value which represents their acceleration and top speed. This is represented by a number – the higher the better.
All Flyers have an Agility value that represents how manoeuvrable they are. This is represented by a number – the higher the better.
If only one player has Flyers in
Reserve at the end of the
Dogfight phase, then they are said to have Air Superiority. A player with Air Superiority can choose to add or subtract 1 from their
Reserve Rolls, and their opponent must subtract 1 from all of their Reserve Rolls.
Air Targets and Ground Targets
Some rules refer to Air or Ground Targets. For these rules,
Flyers,
Skimmers,
Jetbikes,
Flying Monstrous Creatures and
Flying Gargantuan Creatures are Air Targets. All other types of unit are Ground Targets.
Flyers must begin the game as
Reserves. Special rules that allow an
owning player to move one or more of their units out of Reserves after
deployment, but before the game begins, cannot be used to move a Flyer out of Reserves unless they specically state that Flyers can start the game deployed on the table.
Flyers have bases that suspend them above the battlefield. However, distances are measured to and from the Flyer’s hull, with the exception of the
vehicle’s weapons and
Fire Points, which all work as normal. The base of a Flyer is effectively ignored, except for when:
- The Flyer is in close combat, in which case models may move into contact with the vehicle’s hull, its base or both.
- Models embark or disembark from the Flyer, in which case the base of the Flyer is used as an Access Point.
Models that physically fit under a Flyer model can move beneath it. Likewise, a Flyer can end its move over such models. However, when moving this way, enemy models must still remain 1" away from the base of the Flyer, and the Flyer cannot end its move with its base within 1" of enemy models.
Flyers and Crew Stunned Results
A Flyer that suffers a
Crew Stunned result has its
Pursuit and
Agility values reduced to 0 until it recovers, in addition to the eects listed on the
Vehicle Damage Table in Warhammer 40,000: The Rules.
If a Flyer comes under fire, the pilot can throw their craft into a series of evasive manoeuvres in an attempt to avoid taking damage. All Flyers have the
Jink special rule.
A Flyer that has the Hover type can choose to Hover instead of
Zooming. Hovering makes the Flyer slower, but considerably more agile, and in the case of
Transports, it allows passengers to
embark or
disembark.
A Flyer with the Hover type must declare whether it is going to Zoom or Hover before it moves, and before any embarked models disembark, each
Movement phase. This means that, if the Flyer
arrives from Reserve, you must declare which type of movement it is using before placing it on the board. A Flyer in Hover mode cannot switch to Zoom mode if it is
Immobilised. If a Flyer is Hovering, it is treated exactly as a
Fast Skimmer. This makes it more manoeuvrable, but often limits the
number of weapons it can fire.
Flyers can usually only make a special kind of move called Zoom. Some can also
Hover. Zooming allows the Flyer to move at fantastic speeds, making it very dicult to shoot down, but limits its manoeuvrability. If a Flyer Zooms, it can move up to 36". However, as a certain amount of forward thrust is required for the
vehicle to stay in the air, a Zooming Flyer can never voluntarily move less than 18" in its own
Movement phase. If a Zooming Flyer is forced to move less than 18" in its own Movement phase, it is automatically
Wrecked.
To represent its limited manoeuvrability, a Zooming Flyer can only make a single pivot on the spot of up to 90° before it moves. Thereafter, it must move directly forwards in a straight line.
In a turn in which a Flyer enters the board from
Reserve, it can do so facing any direction you wish, providing that the resulting move will not carry it off the board again. A Zooming Flyer can move over intervening units and
impassable terrain exactly as a
Skimmer. In addition, a Zooming Flyer does not have to take
Dangerous Terrain tests, even if it starts or stops over
difficult,
dangerous or
impassable terrain. Finally, unless otherwise stated, models cannot
embark upon, or voluntarily
disembark from, a Zooming Flyer.
A Zooming Flyer can attempt to make a second turn of up to 90° at any point during its move, including just after making its initial 90° turn. This is called a Break Turn. To do so, move the Flyer to the position where it will attempt the Break Turn and roll a dice. If the roll is equal to or less than the Flyer’s Agility value, then it succeeds and may make the Break Turn, and then carry on with its move. On any other roll, the turn fails and it can only carry on in a straight line.
Zoom, Tank Shock and Ramming
cannot
Tank Shock or
Ram, nor can they be Tank Shocked or Rammed. If a Ramming
vehicle would end up underneath a Zooming Flyer, move the Ramming vehicle by the shortest distance so that it is 1" away from the base of the Flyer.
Flyers have sophisticated targeting systems designed to work at the fastest speeds.
Zooming Flyers can
fire up to four of their weapons in the
Shooting phase.
Zooming Flyers with the Fighter
Combat Role can choose whether or not to enter Skyfire mode at the start of each
Shooting phase. If they do, all weapons they fire that phase are treated as having the
Skyfire special rule. Flyers with the Fighter Combat Role suffer a -1 penalty to the Ballistic Skill on their characteristic profile when targeting
Ground Targets.
Zooming Flyers are incredibly difficult targets for troops without suitably calibrated weapons and scopes. Shots resolved at a Zooming Flyer can only be resolved as
Snap Shots (unless the model or weapon has the
Skyfire special rule).
Template and
Blast weapons, and any other attacks that don’t
roll To Hit, cannot hit Zooming Flyers.
Although
Zooming Flyers can travel very close to the ground, they are not capable of making use of cover in the same way as other models. Because of this, a Zooming Flyer does not receive the benefit of
cover from intervening scenery or models.
A
Zooming Flyer that goes
Flat Out must move forwards in a straight line between 12" and 24". Add the Flyer’s
Pursuit value to the minimum and maximum distances it can move. For example, a Zooming Flyer with a Pursuit value of 4 will move between 16" and 28" when it goes Flat Out. If special rules or abilities modify the distance that a Flyer can move Flat Out, then the Flyer’s Pursuit value is added to the modied distances.
Due to their high speed (and presumably high altitude),
Zooming Flyers cannot be
charged.
Some models have the ability to repair Hull Points,
Immobilised or
Weapon Destroyed results on
vehicles. Such models can only use such abilities on a
Zooming Flyer if that Flyer is a
Transport and the model attempting to repair it is embarked inside it.
It’s quite likely that a Flyer making a
Zoom move will leave the board, either deliberately or by accident. If this happens, the Flyer is said to have left combat airspace – it then enters
Ongoing Reserves. A Flyer that leaves combat airspace must Zoom back on when it returns from Ongoing Reserves, even if it has the
Hover type.
A Flyer cannot leave combat airspace on the same turn that it entered play from Reserves – the
owning player must deploy their model in such a way that it will not leave the board on the same turn.
Engines scream and flaming wrecks pinwheel away belching smoke and flame as pilots dogfight furiously on high. This is a deadly aerial ballet in which the slightest mistake can cost a pilot their life, whole battles can be won or lost, and marauding fighter craft are the kings of the skies.
The Dogfight phase takes place at the start of each game turn between Flyers that are in
Reserve or
Ongoing Reserve. If only one player has Flyers in Reserve, or neither player does, then a Dogfight does not take place.
If both players have Flyers in Reserve, they can fight a Dogfight if they wish to do so.
Roll-off if one player wants to fight a Dogfight and the other does not – the winner decides if a Dogfight takes place. If a Dogfight does take place, it is resolved using the following rules. If not, proceed to the first player turn.
After these phases are complete, the Dogfight phase is over, and you can proceed to the first player turn. Note that only one Dogfight can take place per game turn.
Dogfights commence when one force of aircraft swoops out of nowhere to attack another. The first moments of such an engagement are crucial, pilots jockeying fiercely for position and singling out their airborne quarry. At such times the hunter can swiftly become the hunted as the deadly aerial ballet begins in earnest.
The players each roll a dice, adding 1 if they have more
Fighters than
Bombers in
Reserve, and subtracting 1 if they have more Bombers than Fighters in Reserve. Re-roll ties. The winner of the roll-off is the Attacker for the duration of the phase, and the loser is the Defender.
The Attacker picks one of their own
Flyers from their
Reserves and one enemy Flyer that is in Reserve to take part in a Dogfight. Take the two Flyers and place them on any available at surface so that they are facing directly towards each other, 36" apart.
With their targets picked out, attacking pilots thunder through the skies in pursuit, striving to close the gap and line up a killing shot. In response, the pursued victims pile on the speed, hoping to outdistance their assailant. Aircraft roll and dive while lock alarms and targeting devices ping and howl madly within the pilots’ cockpits.
| Doubling Up Ranges |
| If you only have a limited amount of space in which to carry out your Dogfights, you may want to double up the distances between aircraft, so that each inch of space counts as two inches. If you do this, start the Flyers 18" apart, only increase or close the distance by 6" (or 12", depending on the dierence between Pursuit values), and double the distance between the Flyers when working out the ranges of any attacks. |
Each player places a dice behind their hand so that it is hidden from the opponent, and then rotates it so that the number 1, 2 or 3 is uppermost. The dice are revealed at the same time, and the numbers the players chose are cross-referenced on the Engagement Tactics table below to determine the result.
The winner can choose to close or increase the range to their opponent by up to 12". If the winner’s Pursuit value is at least 2 points higher than the loser’s, they can instead choose to close or increase the range by up to 24". Alternatively, the winner can choose to disengage and end the Dogfight immediately.
| DEFENDER’S CHOICE | ATTACKER’S CHOICE | | 1 (TRACK) | 2 (CLIMB) | 3 (PURSUE) | | 1 (HEAD FOR THE CLOUDS) | The Attacker is the winner. | The Defender is the winner. | Each player rolls a dice and adds their Flyer’s Pursuit value to the roll. The player with the higher score is the winner. In the case of a tie, roll again. | | 2 (LOOP) | Each player rolls a dice and adds their Flyer’s Pursuit value to the roll. The player with the higher score is the winner. In the case of a tie, roll again. | The Attacker is the winner. | The Defender is the winner. | | 3 (DIVE) | The Defender is the winner. | Each player rolls a dice and adds their Flyer’s Pursuit value to the roll. The player with the higher score is the winner. In the case of a tie, roll again. | The Attacker is the winner. In addition, roll a dice and add the result to the Attacker’s Pursuit value for the duration of the sub-phase. |
|
With their attackers closing in for the kill, defending pilots throw their craft into increasingly frantic evasive manoeuvres. Feeling the spectre of death looming at their shoulders, the prey do everything in their power to avoid the storm of firepower that must surely fall upon them at any moment...
The players secretly pick a number on a hidden dice for a second time. Reveal the dice simultaneously, and this time look up the outcome on the Manoeuvre Tactics table, below. The winner can force their opponent to pivot their Flyer by up to 90º to the left or right, or by up to 180º if the winner’s
Agility value is at least 2 points higher than the loser’s. Alternatively, the winner can choose to
Jink. If a Flyer Jinks in the Dogfight phase, the Jink effects only last until the end of that phase.
| DEFENDER’S CHOICE | ATTACKER’S CHOICE | | 1 (WINGOVER) | 2 (SNAP TURN) | 3 (SIDE-SLIP) | | 1 (CIRCLE) | The Attacker is the winner. In addition, roll a dice and add the result to the Attacker’s Agility value for the duration of the sub-phase. | The Defender is the winner. | Each player rolls a dice and adds their Flyer’s Agility value to the roll. The player with the higher score is the winner. In the case of a tie, roll again. | | 2 (BARREL ROLL) | Each player rolls a dice and adds their Flyer’s Agility value to the roll. The player with the higher score is the winner. In the case of a tie, roll again. | The Attacker is the winner. | The Defender is the winner. | | 3 (STALL) | The Defender is the winner. | Each player rolls a dice and adds their Flyer’s Agility value to the roll. The player with the higher score is the winner. In the case of a tie, roll again. | The Attacker is the winner. |
|
Time seems to slow to a crawl as the duelling aircraft open fire. Pilots scream with hate as they squeeze their triggers. Muzzle are lights the skies, rockets slice through the air on blazing contrails, and death takes the unworthy amidst roiling blasts of flame.
As the Dogfight reaches its climax the players secretly choose a number on the dice for a third time, looking up the outcome on the Attack Tactics table, below.
Both players then carry out the equivalent of a
Shooting phase with their
Flyers, as modied by the Attack Tactic. Any damage inicted by the player that attacks rst is applied before the opposing Flyer can shoot back.
Flyers in a Dogfight are never considered to be
moving Flat Out, even if they did so in their previous Shooting phase, and they are only allowed to
Jink if they won in the
Manoeuvre sub-phase. These changes aside, they are treated in the same manner as
Zooming Flyers. Special rules and abilities that apply in the normal Shooting phase apply in the Dogfight Attack sub-phase also.
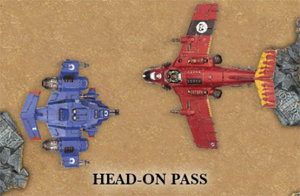
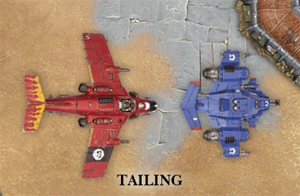
It is hard to hit an enemy when making a head-on pass. On the other hand, it is easier to hit an enemy if you can get on their tail. To represent this, the following special rules apply when shooting weapons in the Dogfight phase, depending on the angle of attack for the two Flyers.
Head-on Pass: If both Flyers have each other in their front facing, they can only fire
Snap Shots.
Tailing: All weapons used by a Flyer that has the enemy in its front facing while it is in the enemy Flyer's rear facing are fired with the attacker's full Ballistic Skill. The opposing Flyer can only fire
Snap Shots.
Other Angles of Attack: In any other circumstances,
Attack Flyers and
Bombers can only fire Snap Shots, while
Fighters attack using their full Ballistic Skill.
Jinking Flyers: Flyers that are
Jinking can only fire
Snap Shots no matter what their angle of attack.
Skyfire Weapons: Ignore the angle of attack rule for any weapons with the
Skyfire rule. They always shoot using the Flyer's full Ballistic Skill (unless they are Jinking), no matter what the angle of attack.
| DEFENDER’S CHOICE | ATTACKER’S CHOICE | | 1 (ROLL LEFT) | 2 (TAIL) | 3 (ROLL RIGHT) | | 1 (BREAK LEFT) | The Attacker is the winner. | The Defender is the winner. | Fighters shoot before Attack Flyers, and Attack Flyers shoot before Bombers. In the case of a tie, roll-off to see who shoots first. | | 2 (HOLD STEADY) | Fighters shoot before Attack Flyers, and Attack Flyers shoot before Bombers. In the case of a tie, roll-off to see who shoots first. | The Attacker shoots first. In addition, add 1 to the Attacker's Ballistic Skill for the duration of the sub-phase. | The Defender is the winner. | | 3 (BREAK RIGHT) | The Defender is the winner. | Fighters shoot before Attack Flyers, and Attack Flyers shoot before Bombers. In the case of a tie, roll-off to see who shoots first. | The Attacker is the winner. |
|
| D6 | Result | | 1 | Crash in Friendly Territory: The enemy player immediately transfers the Flyer to the battlefield, placing it anywhere that is more than 1” from any models. The Crash and Burn! result is then applied to the model just as if it had been destroyed while flying over the battlefield. | | 2-5 | Destroyed in Midair: The Flyer explodes in midrir and is destroyed. It is removed from the game and any passengers embarked upon it are removed as casualties. | | 6 | Crash in Enemy Territory: The player in command of the Flyer immediately transfers it to the battlefield, placing it anywhere that is more than 1” from any models. The Crash and Burn! result is then applied to the model just as if it had been destroyed while flying over the battlefield. |
|
The following rules apply to any damage inflicted in a Dogfight:
1. All Flyers taking part in a Dogfight are considered to be
Zooming Flyers.
2. Any damage that applies to a Flyer ‘until the end of its next turn' will apply until the end of the
controlling player’s turn in the upcoming game turn.
3. If a Flyer suffers a
Crash and Burn! result, roll a dice and refer to the table on the right.
The two Flyers taking part in the Dogfight are returned to
Reserve (assuming they survive!). The Dogfight phase is then over, and play proceeds to the first player turn.
After any Dogfights have taken place, if only one player has Flyers in
Reserve, then they are said to have
Air Superiority.
The life of most pilots is horrifically short, coming to an abrupt end in an explosion of fire and shrieking metal. Some, however, learn to master their mounts so that aircraft and pilot act as one. Such pilots are known as aces, and they have the ability to dominate the skies over the battlefields of the 41st Millennium.
| D6 | Result | | 1 | Wing Leader Ability: The Ace has the Wing Leader ability that would be received on a roll of 1 or 2 on the Wing Leader table for its Faction. | | 2 | Wing Leader Ability: The Ace has the Wing Leader ability that would be received on a roll of 3 or 4 on the Wing Leader table for its Faction. | | 3 | Wing Leader Ability: The Ace has the Wing Leader ability that would be received on a roll of 5 or 6 on the Wing Leader table for its Faction. | | 4 | Crack Shot: Add 1 to the Ace's Ballistic Skill. | | 5 | Hard Target: The Ace has a 5+ invulnerable save. | | 6 | Advanced Flying Manoeuvres: Add 1 to the Agility value of the Ace's Flyer. |
|
If a pilot can survive long enough to score 5 ‘kills' then they become an Ace. A
Flyer scores a kill every time it makes an attack that destroys an enemy Flyer or results in a
Flying Monstrous Creature being removed as a casualty. Keep track of the number of kills scored by each of your Flyers in any games in which they take part. The score is reset to zero if the Flyer is destroyed itself.
At the end of each battle, check the number of kills the Flyers in your army have accumulated over the course of all of the battles they have taken part in. Any that have reached a total of 5 or more have become an Ace! When a Flyer becomes an Ace, roll on the following table to see what new Ace skill the pilot receives. The Ace can use the skill in all future games.
| Death in the Skies |
Roll on the following table if an Ace’s Flyer is Wrecked, Explodes, or Crashes and Burns!.
| D6 | Wrecked | Explodes! | Crash and Burn! | | 1 | KIA | KIA | KIA | | 2 | WIA | KIA | KIA | | 3 | WIA | WIA | KIA | | 4 | Escape | WIA | WIA | | 5 | Escape | Escape | WIA | | 6 | Escape | Escape | Escape |
|
KIA: The Ace has been killed in action — they are replaced with a rookie who has no kills and no Ace skills.
WIA: The Ace has been wounded but survives. The Ace misses the next battle — their place is taken by a temporary pilot with no kills in the next battle, and the Ace returns for the battle after that.
Escape: The Ace escapes the crash and is fit for action by the time of your next battle. |
Aces with
Wing Leader abilities can always use them, even if they are not part of a
Flyer Wing, and also if they are part of a Flyer Wing that includes several Flyer Aces with Wing Leader abilities. If a Flyer Wing includes any Aces with a Wing Leader ability, then one of them must be chosen as the Wing Leader, and their predetermined Wing Leader abilities are used instead of them being randomly determined at the start of the battle.
If a Flyer Wing has several Aces with Wing Leader abilities, the one with the most kills must be the Wing Leader. If still tied, you can choose which is the Wing Leader.
You can roll again on the Ace Skill table each time an Ace scores another 5 kills. This means you will roll again when the Ace gets to 10 kills, then again when the Ace gets to 15 kills, and so on. If you roll a result the Ace already has, pick a different result that the Ace doesn't already have. An Ace with 30 kills cannot improve any further!
Air Superiority Detachment
RESTRICTIONS
All models must have the same
Faction.
COMMAND BENEFITSAir Commander: Pick a
Wing Leader from this
Detachment to be its commander. If the commander is in
Reserve, you can re-roll the dice in the
Interception sub-phase. If you have
Air Superiority and the commander is in Reserve, you can add or subtract 2 from your
Reserve Rolls, rather than 1, and your opponent must subtract 2 from their Reserve Rolls.
Combined Formation: You can roll once for all of the Wings in this
Detachment to see if they
arrive from Reserve. If the roll is successful they all arrive. If it fails none of them do. You can roll individually for each Wing if you prefer.
Objective Secured: All
Transports from this
Detachment which can
Hover have the
Objective Secured rule. A unit with this special rule which is Hovering controls objectives even if an enemy
scoring unit is within range of the
Objective Marker, unless the enemy also has this special rule.
Astra Militarum
Blood Angels
Chaos Space Marines
Dark Angels
Dark Eldar
Deathwatch
Eldar Craftworlds
Grey Knights
Khorne Daemonkin
Militarum Tempestus
Necrons
Orks
Space Marines
Space Wolves
Tau Empire