Although the Movement phase is the easiest to perform, it’s probably the most tactically important. Getting models into the right position on the battlefield is often the key to victory. For the time being, we’ll just explain how squads of Infantry move, as they are by far the most common units in the game. Vehicles, Jump units, Bikes and certain other units move in different ways to represent their greater mobility, and these will be discussed in full detail later in the book, in the Unit Types section. In your turn, you can move any of your units – all of them if you wish – up to their maximum movement distance. Once a unit has completed all of its movement, you can select another unit and move that one, and so on, until you have moved all of the units you wish to move. Once you have started moving a unit, you must finish its move before you start to move another unit. Note that you don’t have to move all (or any) of your units – indeed, there are several tactical advantages to remaining stationary, as we’ll explain later in the rules. Once you’ve completed a unit’s move, you cannot go back and change it, so think carefully before giving the order to advance. Models move up to 6" in the Movement phase. This represents most creatures moving at a reasonable pace but stopping several times to scan the surrounding landscape for enemies, communicate with their commanders, identify the best lines of advance and so on.
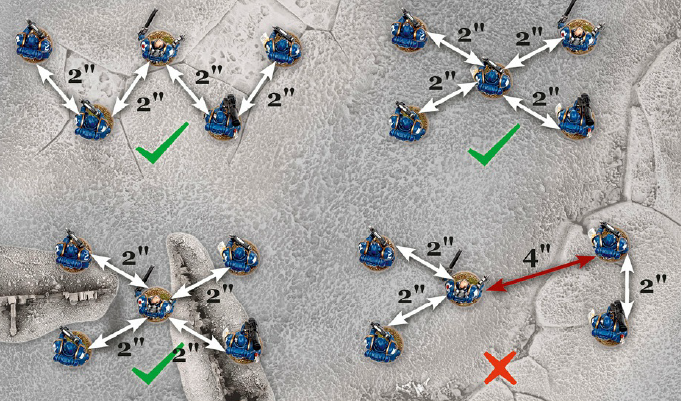
Models cannot voluntarily move off the board. When you are moving a unit, its individual models can each move up to their maximum movement distance. However, units have to stick together, otherwise individual models become scattered and the unit loses its cohesion as a fighting force. So, once a unit has finished moving, the models in it must form an imaginary chain where the distance between one model and the next is no more than 2" horizontally and up to 6" vertically. We call this ‘unit coherency’.
During the course of a game, a unit can get broken up and lose unit coherency, usually because it has taken casualties from incoming enemy fire. If this happens, in their next Movement phase, the models in the unit must be moved in such a way that they restore unit coherency (or get as close as possible to having restored coherency). If the unit cannot move in its next turn, or is unable to restore unit coherency in a single turn, then the models must move to restore unit coherency as soon as they have the opportunity, including by Running if they have that option.
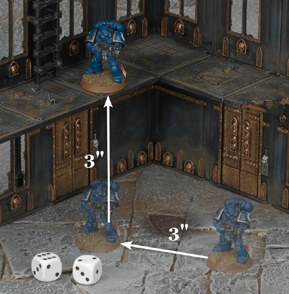
Models can also use their move to ‘climb up’ terrain, as long as the model is able to finish the move on a location where it can be stood. When measuring a move where a model climbs terrain, add the distance the model moves horizontally to the distance it has moved vertically; the result is considered to be the distance the model has moved. In addition to the rules presented in this section, certain types of terrain can affect how far your models can move, as they clamber over defence lines or pick their way through tanglewire, for example. The rules for how these different types terrain affect movement are in the Battlefield Terrain section. Sometimes you may find that a particular piece of terrain makes it hard to put a model exactly where you want. If you delicately balance it in place, it is very likely to fall as soon as somebody nudges the table, leaving your beautifully painted miniature damaged or even broken. In cases like this, we find it is perfectly acceptable to leave the model in a safer position, as long as both players have agreed and know its ‘actual’ location. If, later on, your enemy is considering shooting at the model, you will have to hold it back in the proper place so he can check line of sight. |