Apocalypse battlefields are dominated by huge formations of troops, thundering spearheads of armoured vehicles, massive Super-heavy vehicles and Gargantuan Creatures, and weapons so vast that they will blow apart anything they hit.
Apocalypse introduces many new models, units and fortifications to the war-torn universe of the 41st Millennium. On the following pages, you will find the rules for the different categories of these new models, units and fortifications, each of which builds upon the rules in the Warhammer 40,000 rulebook.
Armoured Spearhead formations are, almost without exception, heavily armoured and powerfully armed. Each is made up of three to five armoured vehicles. The crews of these vehicles are specially trained to operate together and can adopt a number of configurations that allow them to best support each other in battle. It is their duty to be at the forefront of any major assault, soaking up the enemy's fire and shielding the rest of the army from harm, while at the same time delivering crushing attacks of their own.
In order to field an Armoured Spearhead, a player must have all of the units listed on the relevant datasheet, which must be from a single codex and must comply to any listed restrictions. As long as these requirements are met, then the player may take any of the upgrades allowed to the models in the formation. All the models in the formation gain the special rules associated with the spearhead 'for free' - it does not cost extra points to field the formation.
To represent the cooperative manner in which they wage war,
the vehicles in an Armoured Spearhead are treated as a Vehicle Squadron, even if they would normally be separate units.
When an Armoured Spearhead is deployed, one of its vehicles must be nominated as the Command Vehicle. The Command Vehicle may choose to shoot at a different target from the rest of the Armoured Spearhead if it wishes.
If the
vehicles in an Armoured Spearhead deploy or end their
Movement phase in one of the Attack Patterns listed below, then they benefit from a special rule. All of the vehicles in the Armoured Spearhead that have not been destroyed or abandoned must be part of the Attack Pattern, and the Attack Pattern must be comprised of..., at least two models.
The special rule that applies is described with the Attack Pattern. Once a special rule has been triggered, it applies until the end of the Armoured Spearhead's next Movement phase, even if the vehicles in it should subsequently end up out of pattern, or if it is reduced to a single model.
Should the vehicles in the Armoured Spearhead be positioned in such a way as to be eligible for two or more Attack Patterns, you must declare which one you will use until your next Movement phase. For example, if an Armoured Spearhead could claim to be in both the
Arrowhead and
Broadsword Attack Patterns, it could use the special rules for either, but not both.
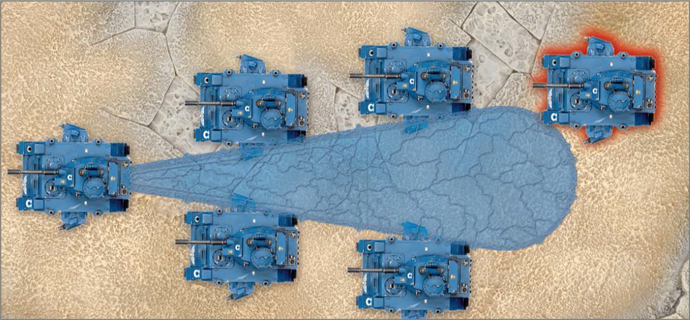
To qualify as an Arrowhead
Attack Pattern, all
vehicles in the Armoured Spearhead must be able to touch the edges of a
hellstorm template, with one vehicle touching the narrow end, and the others touching the left and right sides of the template. None of the vehicles in the Armoured Spearhead may be under the template; they must just touch it. If there are more than two vehicles in the Armoured Spearhead, then there must be vehicles touching both sides of the template as well as one touching the narrow end.
Vehicles in an Arrowhead Attack Pattern have the
Tank Hunters special rule.
| Arrowhead Pattern |
| The five leftmost vehicles are in an Arrowhead Attack Pattern. They have the Tank Hunters special rule to represent their shots being coordinated against the enemy's weak points. The highlighted vehicle is touching the round end of the template; if it was part of the Armoured Spearhead, it would prevent its formation from triggering the Tank Hunters special rule. |
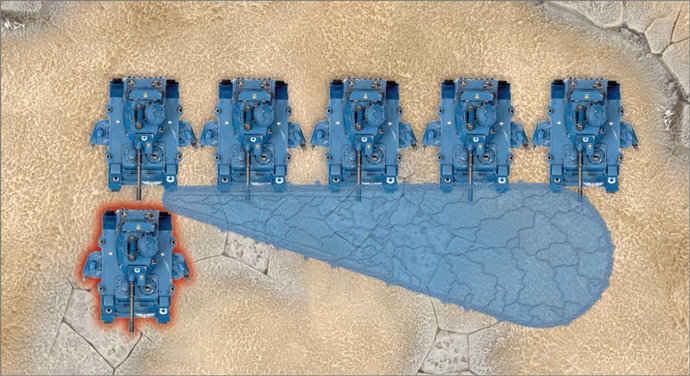
To qualify as a Broadsword
Attack Pattern, all
vehicles in the
Armoured Spearhead must be able to touch the same long edge of a
hellstorm template with the majority of their front armour vehicle facing, but not fall underneath it.
Vehicles in a Broadsword Attack Pattern have the
Preferred Enemy special rule.
| Broadsword Pattern |
| The five topmost vehicles are in a Broadsword Attack Pattern. They have the Preferred Enemy special rule to represent their overlapping targeting data. The highlighted vehicle is not touching the same side of the template; if it was part of the Armoured Spearhead, it would prevent its formation from triggering the Preferred Enemy special rule. |
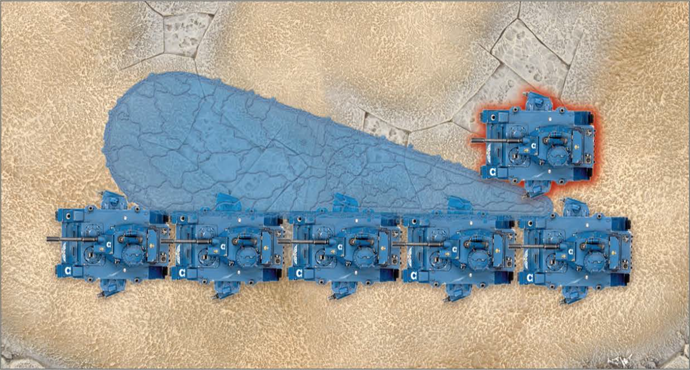
To qualify as a Rapier
Attack Pattern, all
vehicles in the
Armoured Spearhead must be able to touch the same long edge of a
hellstorm template with the majority of one of their side armour vehicle facings, but not fall underneath it.
All vehicles in the Armoured Spearhead must have the same side armour vehicle facing touching the hellstorm template (ie either their left sides or their right sides, not a mixture of the two).
Vehicles in a Rapier Attack Pattern add up to 12" to the distance they move when they move
Flat Out.
| Rapier Pattern |
| The five vehicles at the bottom of the diagram are in a RapierAttack Pattern. They can move an extra 12" when moving Flat Out to represent their streamlined advance. The highlighted vehicle is not touching the same side of the template; if it was part of the Armoured Spearhead, it would prevent its formation from moving this bonus distance. |
Flyer Wings are elite aircraft formations, whose crews have fought alongside each other in numerous campaigns. The pilots of the separate aircraft have an almost supernatural ability to anticipate what their comrades are about to do, allowing them to maximize the effect of their attacks, or ensure their survival when they come under attack.
Each Flyer Wing consists of three to five
Flyers selected from a single codex which cannot normally be taken in
squadrons. By fielding models that qualify as these formations, players gain special rules, and access to Flyer Wing
Attack Patterns that will help them in battle.
Flyer Wings use the same rules and
Attack Patterns as
Armoured Spearheads, except that a Flyer Wing in the
Rapier Attack Pattern also has the
Strafing Run special rule (it still adds 12" to its move when it
moves Flat Out).
Battle Formations represent large organisations of soldiers such as entire companies of Imperial Guard tanks, a full Battle Company of Space Marines, or an Ork Kult of Speed. Many Battle Formations are a complete army in their own right, and are perfectly capable of swinging the tide of battle when they bring their might to bear upon the foe . Battle Formations have fought together through countless campaigns, and are unshakable in their resolve while their comrades are nearby. In addition, their reputation frequently gives them access to valuable assets that they can use in battle.
Fielding Battle Formation
In order to field a Battle Formation, a player must have all of the units listed on the relevant datasheet, which must be from a single codex and must comply to any listed restrictions. As long as these requirements are met, then the player may take any of the upgrades allowed to the models in the formation, including
Dedicated Transports. All the models in the formation gain the special rules associated with the Battle Formation 'for free' - it does not cost extra points to field the formation.
Battle Formation Deployment
The units bought together to form a Battle Formation are deployed simultaneously, but then move and fight independently for the rest of the battle, unless specified otherwise. Each Battle Formation counts as a
single unit only for the purposes of
deployment and
Strategic Reserves. So, if any of the formation cannot be deployed, for whatever reason, then none of it can be deployed, and if you deploy any of the Battle Formation, then you must deploy all of it.
When deploying a Battle Formation, nominate a point on the table. All units in the formation must be deployed within 36" of this point. If arriving from Strategic Reserve, all units must arrive on the same turn, and within 36" of the nominated point (whatever method is used to arrive, be it moving on from a table edge,
deep striking, etc). This restriction does not stop a unit from
scattering out of position during its initial deployment.
For example, if deep striking Terminators belonging to a Battle Formation, the first model must be placed so that his unit deploys within 36" of the nominated point. However, scattering may cause one or more of the Terminators to end up more than 36" from the nominated point.
All units in a Battle Formation have one or more special rules, as defined on the relevant datasheet. Unless otherwise stated, these special rules apply to all models in the Battle Formation.
High Command Apocalypse Formations represent the supreme leaders of the armies fighting on the battlefields of the 41st Millennium. As well as being fearsome warriors in their own right, they can call on additional resources. While their presence is not a guarantee of victory, the combined wisdom and experience of the leaders in a High Command make victory considerably easier to achieve.
In order to field a High Command, a player must have all of the units listed on the relevant datasheet, which must be from a single codex and must comply to any listed restrictions. As long as these requirements are met, then the player may take any of the upgrades allowed to the models in the formation, including
Dedicated Transports. All the models in the formation gain the special rules associated with the command 'for free' - it does not cost extra points to field the formation.
All non-vehicle models in the formation are treated as a single unit. They cannot leave the unit, or join another unit, even if they are
Independent Characters.
If at least one HQ model in a High Command is on the table, then once per game, during a scheduled break, the side it belongs to may take an additional Strategic Asset. One such asset may be taken for each High Command that qualifies. Those in
Strategic Reserve do not qualify.
If, at the start of any turn after the first, at least one HQ model in a High Command formation is on the table, the side it belongs to may order a single unit to make an All-out Attack in their Movement phase.Declare which unit will All-out Attack before moving it.
The unit triples the distance it can move in that Movement phase, but may not shoot or Run in the Shooting phase. It can charge in the
Charge sub-phase. A unit making an All-out Attack is not slowed by
difficult terrain, but treats all difficult terrain as
dangerous terrain instead.
Vehicles may not move
Flat Out when making an All-out Attack, but can
Ram or
Tank Shock.
The battlefields of the 41st Millennium are thronged with looming edifices raised to the glory of the lmperium - and just as often torn down again by the wars raging across them. However, there remain those rare structures large and powerful enough to endure the millennia of war, titanic monuments that are a testament to the stubborn power of Mankind.
These Massive Fortifications are all but impervious to conventional weaponry. Their rockcrete walls bristle with automated defences; to assault such a fortress is invariably to sign your own death warrant. Such vital strongpoints are inevitably the lynch pins of the occupying army's war effort, and they are never defended lightly.
Massive Fortifications follow all the rules for
buildings as defined in the Warhammer 40,000 rulebook, with the additional rules and exceptions given below.
A Massive Fortification can have an Armour Value of up to 15 (rather than having a limit of 14 as is normally the case). The Apocalypse Formation entry for the fortification will list the actual
Armour Values it has.
In addition,
when a Massive Fortification suffers a penetrating hit, there is a -1 modifier to the roll on the Building Damage table. This makes Massive Fortifications considerably harder to destroy than normal buildings.
There are individuals abroad in the galaxy who can mould the material universe with the power of their minds. Some races take this process further, combining the mental talents of a group of such individuals into a single team that can unleash mental barrages of unthinkable destruction. Such reality-bending attacks are not without danger, and under the stress and confusion of battle, these Psykers can tear a rift in space-time that allows the terrors of the Warp to spill into real space.
In order to field a Psychic Choir, a player must have all of the units listed on the relevant datasheet, which must be from a single codex and must comply to any listed restrictions. As long as these requirements are met, then the player may take any of the upgrades allowed to the models in the formation, including
Dedicated Transports. All the models in the formation gain the special rules associated with the choir 'for free' - it does not cost extra points to field the formation.
All models in a Psychic Choir are treated as a single unit. They cannot leave the unit, or join other units, even if they are
Independent Characters.
The Psykers in a Psychic Choir combine their Warp Charge points into a single pool that all of the Psykers in the formation can draw upon. This aside, the normal rules for
manifesting psychic powers still apply.
Each Psychic Choir also has one Psychic Choir Power. The power in question is described on the relevant datasheet for the choir.
A Psychic Choir may use its Psychic Choir Power once per turn, as long as there are still at least three models left in the unit at the time the power is manifested. Choose one of the
Psykers from the Psychic Choir to manifest the power and use the rules for
manifesting psychic powers from the Warhammer 40,000 rulebook.
If a Psyker suffers Perils of the Warp while using a Psychic Choir Power, they must roll on the Terrors of the Warp table after rolling on the Perils of the Warp table.
| Terrors of the Warp Table |
| D6 | Effect | | 1 | The Rift Closes: No additional effect. | | 2 | Psychic Feedback: Each model in the Psychic Choir suffers a Strength 6 AP- hit with no saves allowed. | | 3 | Dimensional Cascade: Centre the large blast marker over the Psyker manifesting the power. Units under it suffer a number of Strength 10 AP1 hits equal to the number of models from that unit under the marker. | | 4 | Tentacles of Chaos: Each Psyker in the Choir takes a Strength test. Any that fail are removed as casualties with no saves allowed. | | 5 | Chaos Spasm: Replace the Psyker manifesting the power with a Chaos Spawn controlled by the opposing side. Move the Spawn into combat with another model in the Psychic Choir. If you don't have a Spawn, the Psyker is removed as a casualty with no saves allowed. | | 6 | Hellspawned Damnation: Place a Greater Daemon (chosen and controlled by the opposing side) in base contact with a model in the Psychic Choir; both units are locked in combat. It has no upgrades. If there isn't one available, the Psychic Choir are removed as casualties with no saves allowed. |
|