As the galaxy’s most numerous warlike race, it has long been said that, should the Orks unify, they would crush all of the so-called civilised peoples of the galaxy. Now, as the hour grows dark, that doomsday draws near. With every crunching step of his great metal boots, the Ork Warlord Ghazghkull Thraka strides closer to realising that dread prediction.
How This Supplement WorksThis page contains special rules, Warlord Traits, relics, a Detachment and Formations, Altar of War missions and Tactical Objectives that reflect the fighting style of Waaagh! Ghazghkull. You can add the Detachment and Formations from this section to an existing army, or use them to field an army from Waaagh! Ghazghkull itself.
Books
FAQWaaagh! Ghazghkull (reprint)
Waaagh! Ghazghkull Special RulesIf you use the Formations or The Great Waaagh!-band Detachment on this page, the following supplemental special rules apply to all of the units they contain.Biggest an’ da Best
Da Boss iz Watchin’
Special RulesDead KillyThe controlling player can choose to exchange all of the wielder’s close combat Attacks for a single Attack with the Instant Death special rule.Grand DestinyAt the end of any Assault phase in which the bearer of the Choppa of da Ragnarork inflicted one or more casualties, the weapon’s Strength modifier is increased by 1 and its AP value is lowered by 1. These effects are cumulative and last for the rest of the battle (but cannot be made better than AP1).Tactical Objectives
Presented below are six Tactical Objectives to use in your games of Warhammer 40,000 that are exclusive to Waaagh! Ghazghkull armies, and which reflect Ghazghkull’s unique methods of waging war. If your Warlord belongs to a Waaagh! Ghazghkull Detachment or Formation, you may use these Tactical Objectives instead of those presented in Codex: Orks. If you do, the Tactical Objectives listed on this page replace the Capture & Control Tactical Objectives (numbers 11-16) from Warhammer 40,000: The Rules.If a Warhammer 40,000 mission has the Tactical Objectives special rule, players use the normal rules for using Tactical Objectives with the following exception: when a Waaagh! Ghazghkull player generates a Capture & Control Objective (numbers 11, 12, 13, 14, 15 or 16), generate the corresponding Waaagh! Ghazghkull Tactical Objective instead. Other Tactical Objectives (numbers 21-66) are generated normally. GET ’EM LADZ! WAAAGH! Orks are never more in their element than when piling in for a good scrap. The more ladz that join in the better! 11 Score 1 Victory Point at the end of your turn if at least three of your units made successful charges against enemy units during your turn. Type: WAAAGH! GHAZGHKULL DA BIGGER DEY ARE... Nothing proves that an Ork is the meanest and the ’ardest quite like giving something big or scary-looking a good krumping. 12 When this Tactical Objective is generated, make a note of which of the enemy models on the battlefield has the highest number of Wounds or Hull Points remaining. If several models are tied for the highest number of remaining Wounds or Hull Points, your opponent selects one amongst them. Score 1 Victory Point at the end of your turn if this model has been destroyed. Type: WAAAGH! GHAZGHKULL KUNNIN’ AND BRUTAL A sign of true Orky greatness is when a Warboss displays mastery of battlefield awareness and overwhelming aggression. 13 When this Tactical Objective is generated, select either one unit in your opponent’s army or one Objective Marker. Your opponent then selects a unit in their army (if you selected an Objective Marker) or an Objective Marker (if you selected a unit in their army). Score 1 Victory Point at the end of your turn if you destroyed a selected unit during your turn or if you control a selected Objective Marker at the end of your turn. Score D3 Victory Points instead if you destroyed the unit and control the Objective Marker in the same turn. Type: WAAAGH! GHAZGHKULL DEAD KUNNIN’ Though their methods may seem deceptively simple at first, Orks can be surprisingly sneaky when the need arises. 14 When this Tactical Objective is generated, secretly write a number between 1 and 6. You must then tell your opponent what number you’ve written down, though you can lie if you wish. You cannot achieve this Tactical Objective in the same turn it was generated, but at the end of any of your turns thereafter you score 1 Victory Point if you lied but control the Objective Marker matching the number you wrote down. If you told the truth and you control that Objective Marker – a sneaky double bluff – score D3 Victory Points instead. Type: WAAAGH! GHAZGHKULL DEAD BRUTAL Ork tactics are often unsubtle, yet their sheer brutality causes such wanton destruction that their enemy never fully recovers. 15 When this Tactical Objective is generated, pick a number between 1 and 6, representing the number of enemy units you intend to destroy during your turn. Score a number of Victory Points equal to the number you picked at the end of your turn, but only if you completely destroyed at least that many enemy units during your turn. Type: WAAAGH! GHAZGHKULL SHOW ’EM WHO’S BOSS Greenskins bosses have ever shown a primal need to prove that they are the bestest by giving enemy leaders a bashin’ for all the boyz to see. 16 Score 1 Victory Point at the end of your turn if at least one of your Ork characters killed an enemy character in a challenge during your turn. Type: WAAAGH! GHAZGHKULL
Warlord TraitsWhen generating his Warlord Traits, an Ork Warlord may choose to roll on the table below instead of those found in Warhammer 40,000: The Rules (see Warlord Traits tables) or Codex: Orks.
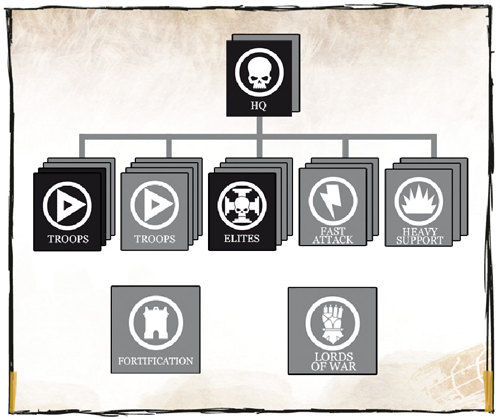
DetachmentsThe Great Waaagh!-bandThe Great Waaagh!-band Detachment allows you to field the hordes of Ghazghkull’s Orks on the Warhammer 40,000 battlefield. Whether you wish to represent a Warboss and his chosen mob of hand-picked ladz or a vast tide of greenskin brutes stomping their way across the galaxy, the choices below offer a great way to pick your army. The Great Waaagh!-band Detachment you can see below can be included in any Ork Battle-forged army. Unlike the Detachments shown in Warhammer 40,000: The Rules, it has a Force Organisation Chart whose slots are a combination of Formations and Army List Entries instead of Battlefield Roles. However, it still has compulsory and optional elements, as well as Restrictions and Command Benefits, just like any other Detachment.Although units cannot normally belong to more than one Detachment, units from a Formation that is part of a Great Waaagh!-band Detachment are an exception. They count as part of both their Formation and the Detachment, and have all associated Command Benefits and special rules. If your Warlord is part of a Formation or an Army List Entry that makes up part of a Great Waaagh!-band Detachment, that entire Detachment is your Primary Detachment.  Command per Core
0-1  Core
1+  Auxiliary per Core
1-10
This Detachment must include at least one Core choice. For each Core choice you must include between 1 and 10 Auxiliary choices (in any combination) and up to one Command choice. Only the datasheets listed here may be included in this Detachment. The Great Waaagh!-band is a Ghazghkull Detachment. COMMAND BENEFITS • Biggest an’ da Best • Da Boss iz Watchin’ Great Waaagh! Detachment
Waaagh! Ghazghkull details a unique Detachment – the Great Waaagh! Detachment – that reflects the fighting style of Ghazghkull Thraka’s horde. This follows all the Detachment rules presented in Warhammer 40,000: The Rules.
|


|
Kaptin Badrukk’s Flash Gitz
Kaptin Badrukk’s Flash Gitz: During deployment, the controlling player can choose to form Kaptin Badrukk and all of the units of Flash Gitz in this Formation into a single unit known as Kaptin Badrukk’s Flash Gitz. Badrukk cannot leave this unit. Kaptin Badrukk’s Flash Gitz counts as 3 units for Victory Points purposes if it is completely destroyed.
Waaagh!-band

None.

Boss of Da Waaagh!: If this Formation is chosen as your Primary Detachment, you can re-roll the result when rolling on the Warlord Traits table in Codex: Orks or Waaagh! Ghazghkull.
Green Tide
")
The entire Formation must fight on foot – no Dedicated Transports can be taken as upgrades, and the Warboss cannot be equipped with a Warbike.
• Biggest an’ da Best
• Da Boss iz Watchin’
Orkimedes’ Kustom Gubbinz are unique and incredible pieces of technowotnotz that have been forged or heavily kustomised by Ghazghkull’s ingenious Mekboss, Orkimedes. Only one of each of the following Kustom Gubbinz can be chosen per army – there is only one of each of these items in the entire galaxy!
Any units from a Detachment or Formation presented in this book that can select Gifts of Gork and Mork can select an item from Orkimedes’ Kustom Gubbinz, presented below, at the points costs shown, in addition to the Gifts of Gork and Mork from Codex: Orks.| Choppa of da Ragnarok | 20 pts |
| Big Bosspole | 20 pts |
| Kill-dakka | 30 pts |
| Da Killa Klaw | 40 pts |
| Da Supa-Cybork | 50 pts |
| Mega Force Field | 75 pts |
| Named after the Big Boss himself, legend states that this enormous bosspole originally belonged to Ghazghkull Thraka during his wars to unite the Ork tribes on Urk. The story goes on to say that the bosspole was snapped off Ghazghkull’s armour whilst he fought an enormous Greater Daemon during his conquest of the space hulk, Wurld Killa. Though Ghazghkull later had a new trophy pole made as a mount for the skull of the Daemon he had slain, his original bosspole was recovered by some wily grot and has since been sold on to numerous owners over the years, each time for an exorbitant cost in teef. Whether or not the current owner does indeed possess Ghazghkull’s original bosspole or merely some dodgy knock-off copy, as long as his Boyz believe it to be the genuine article, it makes little difference – its inspirational effect is all that matters. |
| It is said that this choppa embodies everything it means to be an Ork – the more it fights, the stronger and meaner it becomes. The greenskins hold to the belief that, by the time of the Ragnarork, this mighty weapon will have absorbed enough Waaagh! energy to split a mountain in half with a single blow. |
| Range | S | AP | Type |
| - | +2 | 5 | Melee, Grand Destiny, Two-handed |
| Orkimedes fashioned this fearsome weapon from the blades of a Soul Grinder of Khorne. Thanks to its reputation for being dead killy, the baleful crimson glow emitted by da Killa Klaw has yet to discourage any Orks from donning the fabled gauntlet. |
| Range | S | AP | Type |
| - | x2 | 2 | Melee, Dead Killy, Specialist Weapon, Unwieldy |
| Beneath this Ork’s skin exists a marvel of bio-engineering. This perfect storm of technical and medical know-how came about from the only known instance of Orkimedes and Grotsnik working together (during one of the Mad Dok’s rare periods of lucidity). In an operation that should have killed the procedure’s unfortunate recipient more than a dozen times over, sheets of armour were crudely inserted beneath the Ork’s skin. When he came about, the traumatised greenskin soon discovered that his new internal armour made him much tougher and that he could carry weapons that even the largest Meganob would struggle to lift. The name of the Ork is not known, for he does not remember anything from before he was ‘volunteered’ for the pioneering operation. Ever since his apotheosis, he has simply been known as da Supa-Cybork. |
| It has been Orkimedes’ lifelong dream to create the perfect weapon, and he believes that Kill-dakka may yet hold the key. There is always a long list of volunteers willing to fieldtest Kill-dakka for Orkimedes. Even though the Orks have no idea what form of killy-death the weapon has been modified to fire, they know it will be loud, flashy and spectacularly violent. |
| D6 | Effect | Range | S | AP | Type |
| 1 | Heavy | 24" | 7 | 4 | Heavy (D3+1) |
| 2 | Burny | Template | 5 | 4 | Assault 1 |
| 3 | Shooty | 24" | 6 | 4 | Assault 3 |
| 4 | Zappy | 24" | 2D6 | 2 | Assault 1, Zzap |
| 5 | Blasty | 24" | 6 | 5 | Assault 1, Blast |
| 6 | Bubbly | 24" | * | * | Assault 1, Large Blast |
* Roll a D6 each Shooting phase to determine the Strength and AP value, after the target unit has been chosen. For example, if you rolled a 3, the shot would be resolved at Strength 3 AP3.
| This force field was repurposed from the only salvageable pieces of the incredibly potent shield network that protected Wurld Killa as it crash-landed on Armageddon. |
Altar of War: Waaagh! Ghazghkull Missions
| D6 | Missions |
| 1-2 | Might Makes Right |
| 3-4 | Waaagh! |
| 5-6 | A Kunnin’ Plan |
Might Makes Right
Select armies as described in the Choosing Your Army section. The Waaagh! Ghazghkull player’s Warlord must have the Orks Faction.
THE BATTLEFIELD
Use the deployment map included with this mission. Set up terrain.
DEPLOYMENT
Players should first roll for Warlord Traits and then deploy their armies.
FIRST TURN
The player that deployed first has the first turn unless their opponent can Seize the Initiative.
GAME LENGTH
The mission uses Variable Game Length.
VICTORY CONDITIONS
At the end of the game, the player who has scored the most Victory Points wins the game. If players have the same number of Victory Points, the game is a draw.
Primary Objectives
At the end of the game, each player receives 1 Victory Point for each enemy unit that has been completely destroyed. Units that are Falling Back at the end of the game, and units that are not on the board at the end of the game, count as destroyed for the purposes of this mission. Remember that Independent Characters and Dedicated Transports are individual units and award Victory Points if they are destroyed. Furthermore, both players earn additional Victory Points as follows:
- Every time you slay an enemy character in a challenge, you score 1 Victory Point.
- Every time you slay an enemy Independent Character in a challenge, you score 2 Victory Points.
- If you slay the enemy Warlord in a challenge, you instead score 3 Victory Points.
- If your Warlord slays the enemy Warlord in a challenge, you instead score 5 Victory Points.
Secondary Objectives
First Blood, Linebreaker, Slay the Warlord*.
* Players do not achieve this Secondary Objective if they killed the enemy Warlord in a challenge.
Night Fighting, Reserves.
Waaagh!
Select armies as described in the Choosing Your Army section. The Waaagh! Ghazghkull player’s Warlord must have the Orks Faction.
THE BATTLEFIELD
Use the deployment map included with this mission. Set up terrain.
Objective Markers
After setting up the terrain, the enemy player places 3 Objective Markers anywhere within his deployment zone. No objective can be placed within 6" of any battlefield edge or 12" of another objective.
DEPLOYMENT
Players should first roll for Warlord Traits and then deploy their armies.
FIRST TURN
The player that deployed first has the first turn unless their opponent can Seize the Initiative.
GAME LENGTH
The mission uses Variable Game Length.
VICTORY CONDITIONS
At the end of the game, the player who has scored the most Victory Points wins the game. If players have the same number of Victory Points, the game is a draw.
Primary Objectives
At the end of the game, each Objective Marker is worth 3 Victory Points to the player that controls it.
Secondary Objectives
First Blood, Linebreaker, Slay the Warlord.
Mysterious Objectives, Night Fighting, Reserves.
A Kunnin’ Plan
Select armies as described in the Choosing Your Army section. The Waaagh! Ghazghkull player’s Warlord must have the Orks Faction.
THE BATTLEFIELD
Use the deployment map included with this mission. Set up terrain.
Objective Markers
After setting up the terrain, the players take it in turns to place a total of 3 Objective Markers anywhere on the battlefield. No objective can be placed within 6" of any battlefield edge or 12" of another objective.
DEPLOYMENT
Players should first roll for Warlord Traits and then deploy their armies.
FIRST TURN
The player that deployed first has the first turn unless their opponent can Seize the Initiative.
GAME LENGTH
The mission uses Variable Game Length.
VICTORY CONDITIONS
At the end of the game, the player who has scored the most Victory Points wins the game. If players have the same number of Victory Points, the game is a draw.
Primary Objective
At the end of the game, each Objective Marker is worth 3 Victory Points to the player that controls it.
Secondary Objectives
First Blood, Linebreaker, Slay the Warlord.
Mysterious Objectives, Night Fighting, Reserves.
Echoes of War: Waaagh! Ghazghkull Missions
Here you will find a selection of Echoes of War missions inspired by the battles fought by Waaagh! Ghazghkull. The Armies section of each of these missions provides guidance on the forces present so that you can replay the pivotal events using the armies and characters described in this book. Many of the Echoes of War missions include a map that depicts the battlefield on which the conflicts were fought.For those with a mind to historical accuracy, you’ll notice certain restrictions and rules that we use to replicate the conditions of the battle in question. However, whilst the Echoes of War missions have been inspired by specific events, with a little imagination they can easily be repurposed to recreate battles of your own invention. If you choose to go down this route, you can modify these missions so that they can be fought using any combination of forces and terrain in your collection.
Uniting the Clans
Select armies as described in the Choosing Your Army section. Both armies may only include units with the Orks Faction and fortifications. The Waaagh! Ghazghkull player must include Ghazghkull Thraka in his army to be his Warlord. The Waaagh! Ghazghkull player can include no more than three Ork vehicles of any kind in his army.
The enemy player must include an Ork Warboss in his army to be his Warlord (representing Snazzdakka). The enemy player must include at least five Ork vehicles with one or more of the following unit types: Fast, Transport, Flyer. In addition, he may upgrade each of his vehicles with options worth up to 25 points for free; any additional options that he chooses to take must be paid for as normal.
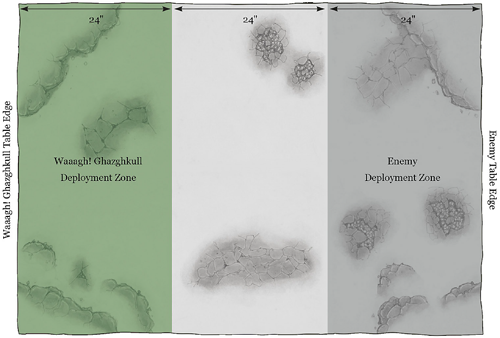
THE BATTLEFIELD
Set up terrain using the deployment map opposite.
DEPLOYMENT
Before any models are deployed, the enemy player should roll to determine his Warlord Trait.
The Waaagh! Ghazghkull player deploys first, placing all of his units in the deployment zone depicted on the map. The enemy player then deploys his units anywhere in his deployment zone.
FIRST TURN
The Waaagh! Ghazghkull player has the first turn unless their opponent can Seize the Initiative.
GAME LENGTH
The mission uses Variable Game Length.
VICTORY CONDITIONS
At the end of the game, the player who has scored the most Victory Points wins the game. If players have the same number of Victory Points, the game is a draw.
Primary Objectives
At the end of the game, each player receives 1 Victory Point for each enemy unit that has been completely destroyed. However, for each enemy vehicle that he completely destroys, the Waaagh! Ghazghkull player receives 2 Victory Points instead. Units that are Falling Back at the end of the game, and units that are not on the board at the end of the game count as destroyed for the purposes of this mission. Remember that Independent Characters and Dedicated Transports are individual units and award Victory Points if they are destroyed.
Secondary Objectives
First Blood, Linebreaker, Slay the Warlord*.
* If Ghazghkull slays Snazzdakka in a challenge, or Snazzdakka slays Ghazghkull in a challenge, the game ends immediately. The controlling player of the victorious Warlord wins the game automatically.
Reserves.
The Second War for Armageddon – The Fall of Hive Volcanus
Select armies as described in the Choosing Your Army section. The Waaagh! Ghazghkull player’s army may only include units with the Orks Faction and fortifications. The enemy player’s army may only include units with the Astra Militarum Faction and fortifications.
The Waaagh! Ghazghkull player must include a Blitz Brigade Formation in his army. In addition to his army, the Waaagh! Ghazghkull player should ensure that he has some spare Boyz or Burna Boyz as well as a Trukk or two for potential reinforcements (see the Anuva’ Wave special rule below). The enemy player can place a Wall of Martyrs Imperial Defence Network anywhere within his deployment zone. He does not pay any points for this Fortification Network, and it does not take up a slot on any Detachment’s Force Organisation Chart.
THE BATTLEFIELD
Set up terrain using the deployment map opposite.
Objective Markers
After setting up the terrain, the enemy player places 3 Objective Markers anywhere within his deployment zone. No objective can be placed within 6" of any battlefield edge or 12" of another objective.
DEPLOYMENT
Before any models are deployed, the players should roll to determine their Warlord Traits. The enemy player deploys first, placing all of his units in the deployment zone depicted on the map. The Waaagh! Ghazghkull player then deploys his units anywhere in his deployment zone.
FIRST TURN
The Waaagh! Ghazghkull player has the first turn unless their opponent can Seize the Initiative.
GAME LENGTH
The mission uses Variable Game Length.
VICTORY CONDITIONS
At the end of the game, the player who has scored the most Victory Points wins the game. If players have the same number of Victory Points, the game is a draw.
Primary Objective
At the end of the game, each Objective Marker is worth 3 Victory Points to the player that controls it.
Secondary Objectives
First Blood, Linebreaker, Slay the Warlord.
Mysterious Objectives, Night Fighting, Reserves.
War on Piscina IV
Select armies as described in the Choosing Your Army section. The Waaagh! Ghazghkull player must include a Stompa in their army, and may only include units with the Orks Faction in their army. As Nazdreg commands the Stompa personally, this model is the Waaagh! Ghazghkull player’s Warlord.
The enemy player’s army may only include units with the Dark Angels Faction and fortifications. The enemy player must place a Fortress of Redemption anywhere on the table as one of the free fortifications he is allowed to set up (see below).
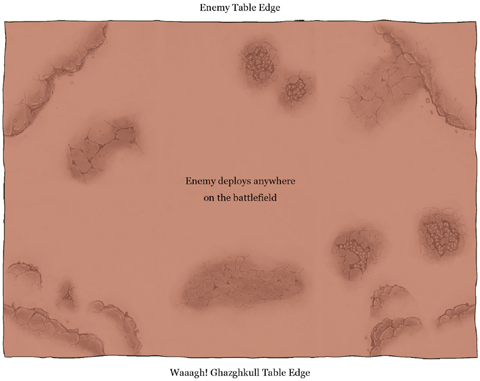
THE BATTLEFIELD
The enemy player can place any number of fortifications anywhere on the table. He does not pay any points for these fortifications, and none start the game dilapidated. All buildings start the games claimed by the enemy player. Once all fortifications have been placed, the enemy player can then set up any other terrain on the table in a manner of his choosing.
Objective Markers
After setting up the terrain, the enemy player must place three Objective Markers anywhere on the battlefield.
DEPLOYMENT
Before any models are deployed, the enemy player should roll to determine his Warlord Trait. The Waaagh! Ghazghkull player’s Warlord automatically has the Supa-Shootist Warlord Trait. Both players then select their Planetstrike Stratagems. Each player has 4 Stratagem Points.
The enemy player deploys his force anywhere on the battlefield. He can, however, deploy any number of units in Reserve, but must, whenever possible, deploy at least one unit for each building or gun emplacement that he placed on the battlefield. Each part of a multiple-part building counts as a separate building. All of the Waaagh! Ghazghkull player’s units start the game in Reserve.
FIRST TURN
The Waaagh! Ghazghkull player has the first turn.
GAME LENGTH
The mission uses Variable Game Length.
VICTORY CONDITIONS
At the end of the game, the player who has scored the most Victory Points wins the game. If players have the same number of Victory Points, the game is a draw.
Primary Objective
At the end of the game, each Objective Marker is worth 3 Victory Points to the player that controls it.
Secondary Objectives
First Blood, Slay the Warlord*.
* If Nazdreg’s Stompa is destroyed, the enemy player scores 5 Victory Points for achieving this Secondary Objective.
Mysterious Objectives, Night Fighting, Reserves.
* The Waaagh! Ghazghkull player rolls a D6 and adds the number of buildings and gun emplacements that are on the table to the result. Each part of a multiple-part building counts as a separate building. The total is the number of Firestorm Attacks that the Waaagh! Ghazghkull player makes.
The Third War For Armageddon – The Battle of Ghattana Bay
Select armies as described in the Choosing Your Army section. The Waaagh! Ghazghkull player’s army may only include units with the Orks Faction and fortifications. The enemy player’s army may only include units with the Blood Angels, Space Marines and Space Wolves Factions and fortifications.
The Waaagh! Ghazghkull player must include a Dread Mob Formation in their Primary Detachment. The enemy player must include a minimum of five Walkers in their Primary Detachment. However, any Walkers selected by either player do not use up any slots on their Detachment’s Force Organisation Chart. Furthermore, instead of taking an Allied Detachment, the enemy player can include any Walkers in any combination from whichever two Factions he didn’t choose for his Warlord. For example, the enemy player could choose a Warlord with the Blood Angels Faction, but could include any Walkers with the Space Marines and Space Wolves Factions in their army.
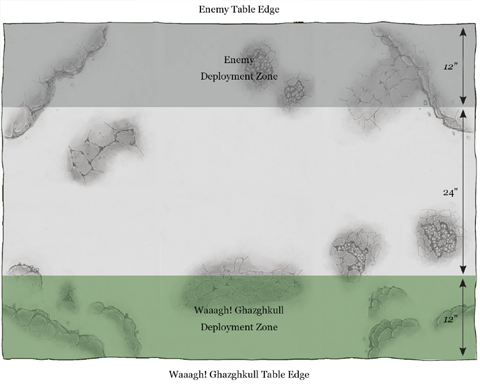
THE BATTLEFIELD
Set up terrain using the deployment map opposite. To represent the cramped conditions in the Ghattana Bay complex, you should use lots of terrain.
DEPLOYMENT
Players should first roll for Warlord Traits and then deploy their armies.
FIRST TURN
The player that deployed first has the first turn unless their opponent can Seize the Initiative.
GAME LENGTH
The mission uses Variable Game Length.
VICTORY CONDITIONS
At the end of the game, the player who has scored the most Victory Points wins the game. If players have the same number of Victory Points, the game is a draw.
Primary Objectives
At the end of the game, each player receives 1 Victory Point for each enemy unit that has been completely destroyed. Units that are Falling Back at the end of the game, and units that are not on the board at the end of the game count as destroyed for the purposes of this mission. Remember that Independent Characters and Dedicated Transports are individual units and award Victory Points if they are destroyed. Furthermore, both players can earn additional Victory Points as follows:
- Every time you completely destroy an enemy Walker with 3 or 4 Hull Points on its profile, you instead score 2 Victory Points.
- Every time you completely destroy an enemy Walker with 5 or more Hull Points on its profile, you instead score 3 Victory Points.
First Blood, Linebreaker, Slay the Warlord.
Night Fighting, Reserves.
|
The Green Beast and the Leviathan
Select armies as described in the Choosing Your Army section. The Waaagh! Ghazghkull player must include Ghazghkull Thraka in his army to be his Warlord, and may only include units with the Orks Faction and fortifications in his army. The enemy player must include a Mawloc in his army to be his Warlord (see the Queen Beast special rule below), and may only include units with the Tyranids Faction and fortifications in his army.
THE BATTLEFIELD
Set up terrain using the deployment map opposite.
Objective Markers
After setting up the terrain, the Waaagh! Ghazghkull player places 3 Objective Markers anywhere within his deployment zone. No objective can be placed within 6" of any battlefield edge or 12" of another objective.
DEPLOYMENT
Before any models are deployed, the enemy player should roll to determine his Warlord Traits.
The Waaagh! Ghazghkull player deploys first, placing half of his units (rounding up) in the deployment zone depicted on the map. Ghazghkull and any remaining units begin the game in Reserve. The enemy player then deploys his units anywhere in his deployment zone.
FIRST TURN
The enemy player has the first turn unless the Waaagh! Ghazghkull player can Seize the Initiative.
GAME LENGTH
The mission uses Variable Game Length.
VICTORY CONDITIONS
At the end of the game, the player who has scored the most Victory Points wins the game. If players have the same number of Victory Points, the game is a draw.
Primary Objectives
At the end of the game, each Objective Marker is worth 3 Victory Points to the player that controls it.
Secondary Objectives
First Blood, Linebreaker, Slay the Warlord*.
* In this mission, the Slay the Warlord Secondary Objective is worth 3 Victory Points. If your Warlord slays the enemy Warlord in a challenge, you instead score 5 Victory Points.
Mysterious Objectives, Night Fighting, Reserves.