The following missions illustrate the different sorts of strategies used by Tyranids, and they will provide new tests of your tactical ability as a commander.
Echoes of War: Rising Leviathan MissionsOn the following pages y ou will find a selection of Echoes of War missions, which represent key historical battles inspired by the Rising Leviathan campaign. The Armies section of each of these missions provides guidance on the forces present so that you can replay the pivotal events using the armies, characters and war machines described in this book. Similarly, each Echoes of War mission includes a map that depicts the battlefield on which these vital conflicts were fought.For those with a mind for historical accuracy, you’ll notice certain restrictions and rules that we use to replicate the conditions of the battle in question. Whilst the Echoes of War missions have been inspired by specific events, with a little imagination they can easily be repurposed to recreate battles of your own invention. As such, if you choose to go down this route, you can modify these missions using any combination of forces and terrain you have in your collection. №1
ECHOES OF WAR
:
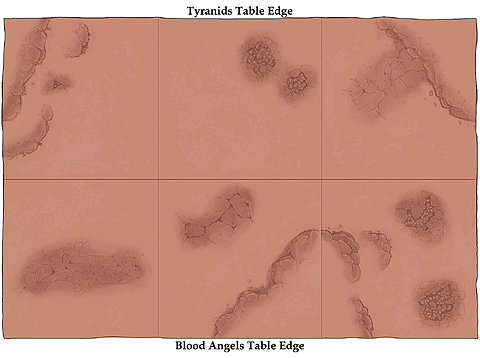
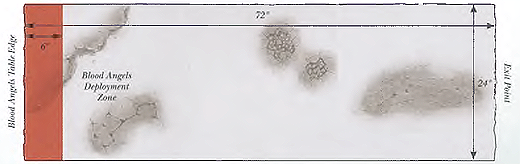
The Screaming ForestThe Imperial Guardsmen of the 203rd Catachan Regiment, under the command of Colonel Skree, were ordered to protect Satys’ jungles. Although initially successful, the increasing numbers of Tyranid invaders quickly began to overwhelm the regiment, which was forced to fall back to the command bunker controlled by Captain Norensis and the Space Marines of the Aurora Chapter. Though there was sanctuary to be found within the small compound, Norensis realised that the inevitable swarm, when it manifested, would surround them. So it was that they began to carve a path towards the cities, where they could join the larger force defending the manufactorums.
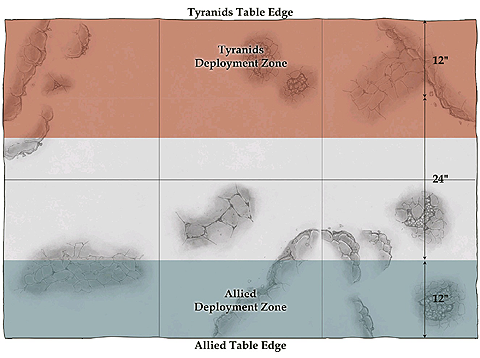
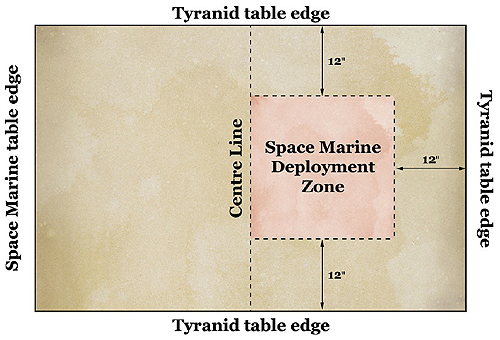 Choose armies. One player must choose a primary detachment from Codex: Tyranids, and should include either a Lictor Forest Brood and/or Deathleaper’s Assassin Brood. The other player must choose a primary detachment from Codex: Space Marines, and can take an allied detachment from Codex: Imperial Guard. THE BATTLEFIELD Use the deployment map included with this mission. Then, set up terrain. The players then roll-off. The winner of the roll-off can decide which of the short table edges will be the Space Marine table edge. All other table edges are the Tyranid table edges. DEPLOYMENT Players should first roll for Warlord Traits. The Space Marine player deploys first, anywhere in the half of the table that is opposite to the Space Marine table edge, and which is more than 12” from any of the Tyranid table edges (see deployment map). No Space Marine units can be placed in Reserve. The Tyranid player deploys second. Tyranid models can be deployed anywhere that is within 3” of a Tyranid table edge. FIRST TURN The Space Marine player goes first unless the Tyranid player can Seize the Initiative. GAME LENGTH The mission continues until there are no units from the Space Marine player’s army left on the battlefield. VICTORY CONDITIONS At the end of the game, the player that has scored the most Victory Points wins the battle. If the players have the same number of Victory Points, the game is a draw. Primary Objective At the end of the game, the Space Marine player receives 1 Victory Point for each unit that has been evacuated (see Evacuation, below), and the Tyranid player receives 1 Victory Point for each enemy unit that has been completely destroyed. Units that are Falling Back, or otherwise not on the table, at the end of the game count as destroyed for the purposes of this mission. Remember that Independent Characters and Dedicated Transports are individual units and award Victory Points if they are destroyed. Night Fighting, Reserves.
№2
ECHOES OF WAR
:
Battle for the UnderenginesThe defenders of Satys discovered to their dismay that swarms of creatures from the Tyranid vanguard had infiltrated the tunnel networks below the planet’s manufactorums. These tunnels were known as the underengines, and ranged in size from narrow access crawlspaces to vast underground caverns hundreds of yards across. Guardsmen from the Catachan 87th headed down into the tunnels to scour the underengines of Tyranid creatures, and to stop them from infiltrating Imperial lines.
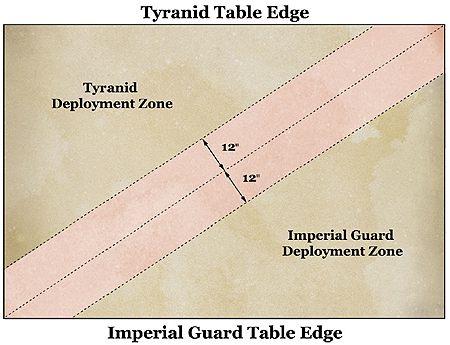 Choose armies. One player must choose a primary detachment from Codex: Tyranids. The other player must choose a primary detachment from Codex: Imperial Guard. Army Contingents The players must split their armies into contingents, using the following method. Each player has three contingents, named Contingent A , Contingent B, and Contingent C. To organize your army into the contingents, first select a unit from your army roster. This unit joins Contingent A (place the letter ‘A ’ next to the unit on your roster to show this). Then pick a second unit, which must join Contingent B, and then a third unit, which must join Contingent C. The fourth unit you select must join Contingent A , and so on until all of your units have been assigned to one of the contingents, in the order A, B, C, A, B, C, A, B, C, etc. The Battles Having selected your contingents, you must fight three battles to determine the winner of the mission. Each of the battles is fought using the following mission instructions. Before either player has set up, they must first note down which of their three contingents they will use. Each contingent may only be used in one of the three battles you fight, but they can be used in any order you desire. THE BATTLEFIELD Set up terrain. The battle is being fought in underground tunnels and chambers, and you should use appropriate terrain from your collection to represent the gloomy depths in which the forces are clashing. Representing the Underengines Do not be put off from playing this mission if you lack terrain that has a suitably subterranean appearance. An easy way to represent the tunnel complex is to cut out black or grey cartridge paper or cardboard into irregular shapes. These pieces can be used to represent the solid rock walls of the tunnels, and placed on the battlefield to create a suitably maze-like set of tunnels and large chambers. DEPLOYMENT Players should first roll for Warlord Traits. In this mission the table is divided into two halves from corner to corner, as shown on the deployment map. The players roll-off and the winner chooses the two opposite corners to be used and which half of the table each player will deploy in. The player that won the roll-off must deploy their entire contingent first. Before deploying the contingent, roll a dice for each separate unit. On a roll of 1 the unit must be held back in Reserve. After all units have been rolled for, those not in Reserve can be deployed in their side’s deployment zone, anywhere that is more than 12" from the centre line. Note that you can add additional units to your Reserves. FIRST TURN The player that deployed first goes first unless the opposing player can Seize the Initiative. GAME LENGTH The mission uses Variable Game Length. VICTORY CONDITIONS At the end of each battle, the player that has scored the most Victory Points wins the battle. If the players have the same number of Victory Points, the battle is a draw. If you win two of the battles, or win one and draw the other two, then you win the mission. Primary Objective At the end of the game, each player receives 1 Victory Point for each enemy unit that has been completely destroyed. Units that are Falling Back at the end of the game count as destroyed for the purposes of this mission. Remember that Independent Characters and Dedicated Transports are individual units and award Victory Points if they are destroyed. Reserves. №3
ECHOES OF WAR
:
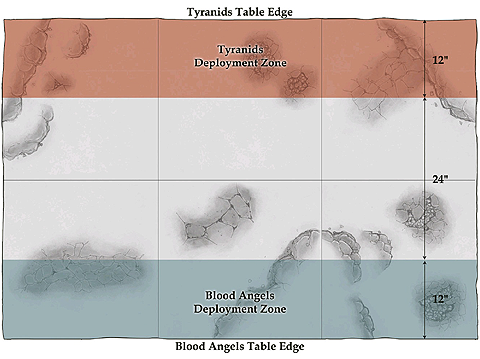
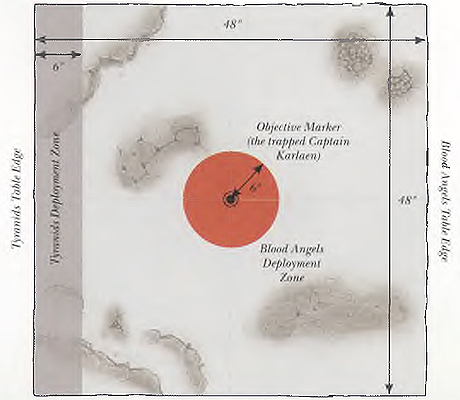
The Swarm UnleashedThe world of Satys lies firmly in the grasp of a tendril of Hive Fleet Leviathan. As more and more alien horrors descend to the planet’s surface, the Hive Mind adapts its strategy to overwhelm the prey world’s defenders to one of overwhelming force. So is a vast swarm of lesser Tyranids mustered by a synaptic network of alpha warriors and leader-beasts, and thrown headlong into the guns of those foolish enough to stand before their soulless malice.
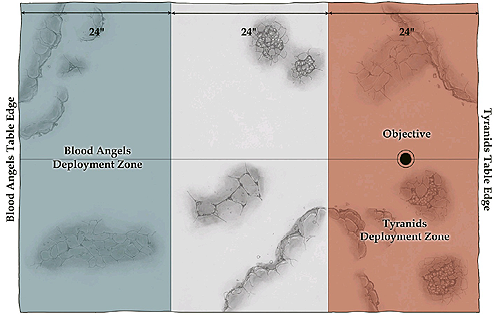
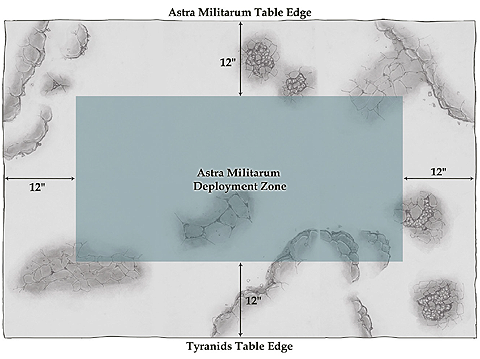
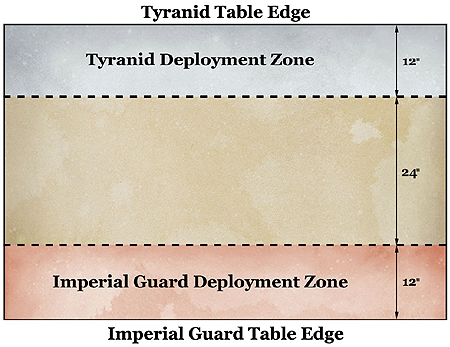 The Tyranid player chooses an army from Codex: Tyranids. He must include at least one of the following Formations included in this dataslate: Incubator Node, Synaptic Swarm and/or Endless Swarm. The Imperial player chooses an army from Codex: Imperial Guard. He can also include an allied detachment chosen from Codex: Space Marines to represent the warriors from the Aurora Chapter present at the battle. Both players must also choose an additional force - called a Secondary Force - to an agreed points value of up to half the points cost of their main armies. The Tyranid player must choose his Secondary Force from Codex: Tyranids. The Imperial player must choose his Secondary Force from Codex: Blood Angels, and must include Brother Corbulo. THE BATTLEFIELD Set up terrain using the deployment map below. Primary Objectives After setting up the terrain, the Imperial player places 3 objective markers anywhere within his deployment zone. No objective marker can be placed within 6” of any battlefield edge or 12” of another objective. DEPLOYMENT Before any models are deployed, both players must roll to determine their Warlord Traits. The Imperial player deploys first, placing all of his units in the deployment zone depicted on the map. The Tyranid player then deploys his units anywhere in his deployment zone. Neither player deploys his Secondary Force at this stage (see Mission Special Rules). FIRST TURN The Tyranid player has the first turn. The Imperial player cannot attempt to Seize the Initiative in this mission. GAME LENGTH The mission uses Variable Game Length. VICTORY CONDITIONS At the end of the game, the player who has scored the most Victory Points wins the game. If players have the same number of Victory Points, the game is a draw. Primary Objective At the end of the game, each Objective Marker is worth 3 Victory Points to the player that controls it. Secondary Objectives First Blood, Slay the Warlord. Mysterious Objectives, Night Fighting, Reserves. №4
ECHOES OF WAR
:
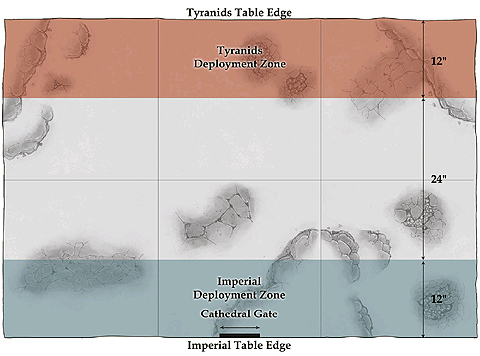
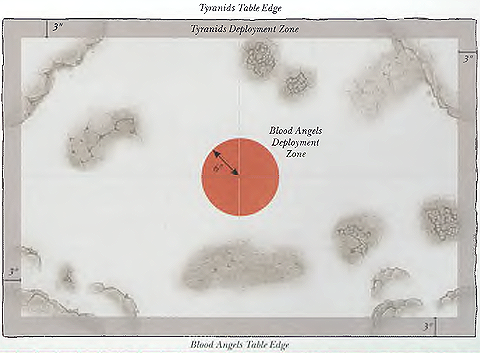
Into the Jaws of the BeastThe chittering hordes of Hive Fleet Leviathan are running rampant across the surface of Satys. Its beleaguered defenders are gradually being smothered beneath the sheer weight of xenos numbers, and many of the remaining pockets of resistance have been systematically overrun. Yet for the Blood Angels, retreat from this doomed world is not an option, for their work here is not yet done. So does Corbulo lead his valiant warriors into the Manfuactorum district - one of the few regions of Satys yet to fall to the Tyranid menace - to recover valuable stockpiles of satryx. But as the Blood Angels divide their strength to cover more ground, little do they know that the Hive Mind had been waiting for just such an opportunity to pick them off whilst they are vulnerable.
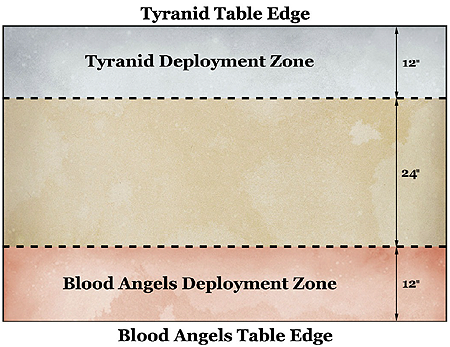 The Tyranid player chooses an army from Codex: Tyranids. The Imperial player chooses an army from Codex: Blood Angels. He must include Brother Corbulo to be his army’s Warlord. THE BATTLEFIELD Set up terrain using the deployment map below. Primary Objectives After setting up the terrain, the players take it in turns to place a total of 6 Objective Markers. DEPLOYMENT Players should first roll for Warlord Traits and then Deploy Forces. FIRST TURN The player that deployed first has the first turn unless their opponent can Seize the Initiative. GAME LENGTH The mission uses Variable Game Length. VICTORY CONDITIONS At the end of the game, the player who has scored the most Victory Points wins the game. If players have the same number of Victory Points, the game is a draw. Primary Objective At the end of the game, the Satryx Stockpile (see Mission Special Rules, below) is worth 3 Victory Points to the player that controls it. If the Satryx Stockpile has not been revealed before the end of the game (see Mission Special Rules, below), neither player receives any Victory Points for the Primary Objective. Secondary Objectives First Blood, Linebreaker, Slay the Warlord. Night Fighting, Reserves.
If the Satryx Stockpile is dropped in impassable terrain, place it as close as possible to the point where it was dropped that is not impassable terrain.
№5
ECHOES OF WAR
:
Jaws of the DevourerThe Tyranids have reached the outskirts of the Sky Palace and gather in vast numbers to assail it in force. The surviving Space Marines stand firm beside the brave men of the Imperial Guard, intent on selling their lives dearly in a valiant effort to repel the xenos forces long enough for the planet’s final evacuation to begin. Little do they know that this seemingly crucial battle is merely a cunning feint by the Hive Mind whilst it deploys other forces to destroy the palace’s landing pad and the bulk landers being loaded there. The brave defenders of Satys fight and die in ignorance of the trap that has been laid, while the jaws of the Great Devourer close in swiftly around them...
 The Tyranid player chooses an army from Codex: Tyranids. He must include at least one of the following Formations included in this dataslate: Wrecker Node and/or Subterranean Swarm. The Imperial player chooses an army from Codex: Imperial Guard. He can also include an allied detachment chosen from Codex: Blood Angels or Codex: Space Marines to represent the warriors from the Aurora Chapter present at the battle. THE BATTLEFIELD Use the deployment map included in this mission. The Imperial player can place any number of fortifications anywhere within his deployment zone. He does not pay any points for these fortifications, and none start the game dilapidated. All fortifications deployed in this manner start the game claimed by the Imperial player. Set up any remaining terrain. Primary Objectives After setting up the terrain, the Imperial player places 3 objective markers anywhere within his deployment zone. No objective marker can be placed within 6" of any battlefield edge or 12" of another objective. DEPLOYMENT Before any models are deployed, both players should roll to determine their Warlord Traits. First, the Imperial player deploys his units anywhere within his deployment zone (see map). Then the Tyranid player deploys his units anywhere within his deployment zone (see map). FIRST TURN The Tyranid player has the first turn. The Imperial player cannot attempt to Seize the Initiative in this mission. GAME LENGTH This mission lasts for 10 game turns. VICTORY CONDITIONS At the end of the game, the player who has scored the most Victory Points wins the game. If players have the same number of Victory Points, the game is a draw. Primary Objective At the end of the game, each Objective Marker is worth 3 Victory Points to the player that controls it. Secondary Objectives First Blood, Slay the Warlord. Mysterious Objectives, Night Fighting, Reserves. №6
ECHOES OF WAR
:
Victory or DeathFor Corbulo and his remaining survivors of the bitter fighting on Satys, only one hope of salvation remains — to fight their way through to the improvised evacuation site in the Manufactorum district, where the archeoship engines’ last defiant roar will clear the skies of airborne xenos organisms and offer them a brief window of opportunity for extraction. The Hive Mind, however, has other plans for its stubborn prey, and moves to encircle and destroy them before they can make their escape.
 The Tyranid player chooses an army from Codex: Tyranids. He must include a Tyrant Node Formation in his army. The Imperial player chooses an army from Codex: Imperial Guard. He must also include two allied detachments; one chosen from Codex: Space Marines to represent the warriors from the Aurora Chapter present at the battle, and one chosen from Codex: Blood Angels. The Blood Angels detachment must include Brother Corbulo, and at least one Terminator Squad chosen from Codex: Blood Angels. THE BATTLEFIELD Set up terrain using the deployment map below. DEPLOYMENT Before any models are deployed, both players should roll to determine their Warlord Traits. The Imperial player deploys first, placing all of his non-Flyer units in the deployment zone depicted on the map. Any units of Terminators or Assault Terminators chosen from Codex: Blood Angels must be held back in Reserve. The Tyranid player then deploys any of his units in either deployment zone depicted on the map. FIRST TURN The Tyranid player has the first turn unless the Imperial player can Seize the Initiative. GAME LENGTH The mission uses Variable Game Length. VICTORY CONDITIONS At the end of the game, the Imperial player wins if he has any models remaining on the battlefield, including those in units that are falling back. If he has no models remaining, the Tyranid player wins. Units that are not on the board at the end of the game count as destroyed for the purposes of this mission. Night Fighting, Reserves. Shield of Baal: Exterminatus MissionsThis section contains a selection of Echoes of War missions inspired by the battles fought as the Blood Angels and their allies tried to wrest the worlds of the Cryptus System from the jaws of the Leviathan. The Armies section of each of these missions provides guidance on the forces present so that you can replay the pivotal events using the armies and characters described in the story of Shield of Baal: Exterminatus. Many of the Echoes of War missions include a map that depicts the battlefield on which the conflicts were fought.If you wish to fight an Echoes of War mission, you and your opponent must agree which mission you wish to fight, ensuring that you have the appropriate armies and models you will need. Designer’s Note: Whilst the Echoes of War missions in this book have been inspired by specific events, with a little imagination they can easily be repurposed to recreate battles of your own invention. If you choose to go down this route, you can modify these missions so that they can be fought using any combination of forces and terrain in your collection. There are several ways in which you can use these Echoes of War missions. The first and most straightforward is simply to select the particular mission for a battle you are excited about from the campaign, and use the appropriate mission to recreate the battle on your tabletop! The Armies section of each mission provides guidance on the forces present so that you can replay the battles using the armies and characters described in the story, while the mission’s special rules will ensure that all of the most important elements of the original battle will be recreated.Another way to use these missions is to fight a campaign by playing through the missions sequentially. If you do so, then one player should command the forces of the Tyranids in all of the battles, while their opponent commands the opposing side. Keep a note of each player’s wins and losses, and the winner of the campaign is the player with the highest number of victories at the end of the campaign. №1
ECHOES OF WAR
:
The Avenging Host DescendsAsphodex lies firmly in the tendrils of Hive Fleet Leviathan, the planet’s surface all but overrun. As Dante’s response fleet draws closer, scans indicate that only one significant bastion of resistance remains - a spaceport in the sprawling city of Phodia. Gathering his forces to him, Dante leads the Blood Angels in an immediate assault to relieve the spaceport’s beleaguered defenders and drive back the swarms threatening to overrun them.
 Choose armies. One player is the Blood Angels player, and his opponent is the Tyranid player. All units in the Blood Angels player’s army must have the Blood Angels Faction. He must include the Dante’s Avenging Host Formation as part of his army. All other units in the Blood Angels player’s army must have the Deep Strike special rule, have the Jump, Skimmer or Flyer unit type, or be embarked upon a vehicle with the Deep Strike special rule or the Flyer unit type. Commander Dante must be the Blood Angels player’s Warlord. All units in the Tyranid player’s army must have the Tyranids Faction. THE BATTLEFIELD Set up terrain. Use the Deployment Map included with this mission. Objective Markers After setting up the terrain, the players take it in turns to place a total of 6 Objective Markers. DEPLOYMENT The Tyranid player deploys first, anywhere on the battlefield. The Blood Angels player does not deploy at this stage - his units arrive during the first turn (see Mission Special Rules). FIRST TURN The Blood Angels player has the first turn. GAME LENGTH The mission uses Variable Game Length. VICTORY CONDITIONS At the end of the game, the player who has scored the most Victory Points is the winner. If both players have the same number of Victory Points, the game is a draw. Primary Objectives At the end of the game, each Objective Marker is worth 3 Victory Points to the player that controls it. Secondary Objectives First Blood, Slay the Warlord. Mysterious Objectives, Night Fighting, Reserves. №2
ECHOES OF WAR
:
Against the Hive MindDante’s devastating assault on the Tyranids has sent the xenos hordes reeling. But as the Blood Angels regroup and prepare to consolidate their beachhead on Asphodex, the Tyranids are suddenly on the attack once more. This time, a terrible psychic presence looms as Leviathan’s deadliest broods arrive to combat Mephiston’s esoteric powers. Can the mighty Lord of Death contend with the manifest will of the Hive Mind itself?
 Choose armies. One player is the Blood Angels player, and his opponent is the Tyranid player. All units in the Blood Angels player’s army must have the Blood Angels Faction. He must include Mephiston in his army, as well as Commander Dante to be his army’s Warlord. All units in the Tyranid player’s army must have the Tyranids Faction. He must also include at least one Neural Node Formation. THE BATTLEFIELD Set up terrain. Use the Deployment Map included with this mission. DEPLOYMENT The Blood Angels player deploys first, anywhere in his deployment zone. The Tyranid player deploys second, anywhere in his deployment zone. FIRST TURN The Tyranid player can choose to take the first or second turn. If he decides to take the first turn, the Blood Angels player can attempt to Seize the Initiative. GAME LENGTH The mission uses Variable Game Length. VICTORY CONDITIONS At the end of the game, the player who has scored the most Victory Points is the winner. If both players have the same number of Victory Points, the game is a draw. Primary Objectives At the end of the game, each player receives 1 Victory Point for each enemy unit that has been completely destroyed. Units that are Falling Back at the end of the game, and units that are not on the board at the end of the game count as destroyed for the purposes of this mission. Remember that Independent Characters and Dedicated Transports are individual units and award Victory Points if they are destroyed. However, the Blood Angels player instead receives 2 Victory Points for each Maleceptor or Neurothrope he completely destroys. The Tyranid player instead receives 2 Victory Points for each Librarian or Librarian Dreadnought he completely destroys. If the Tyranid player slays Mephiston, he instead receives 3 Victory Points. Secondary Objectives First Blood, Linebreaker, Slay the Warlord. Night Fighting. №3
ECHOES OF WAR
:
Breaching the Living WallOn Lysios, the valour of the surviving Battle Sisters from the Order of the Sacred Rose has enabled a single convoy to escape the tides of water and Tyranids sweeping across the planet’s surface. Upon his arrival, Gabriel Seth wastes no time in leading his Flesh Tearers to the aid of the fleeing caravan, aiming to spearhead a breach through the vast horde of Tyranids to enable the Sisters and the Lysites to escape both the xenos attack and the tidal wave to the rear.
 Choose armies. One player is the Imperial player, and his opponent is the Tyranid player. All units in the Imperial player’s army must have the Blood Angels or Adepta Sororitas Faction. The Imperial player must include Gabriel Seth to be his army’s Warlord. All units in the Tyranid player’s army must have the Tyranids Faction. THE BATTLEFIELD Set up terrain. Use the Deployment Map included with this mission. DEPLOYMENT The Tyranid player deploys first, anywhere in his deployment zone. The Imperial player deploys second, anywhere in his deployment zone. FIRST TURN The Imperial player can choose to take the first or second turn. If he decides to take the first turn, the Tyranid player can attempt to Seize the Initiative. GAME LENGTH The mission uses Variable Game Length. VICTORY CONDITIONS At the end of the game, the player who has scored the most Victory Points is the winner. If both players have the same number of Victory Points, the game is a draw. Primary Objectives Each time a unit with the Blood Angels Faction completely destroys a Tyranid unit, the Imperial player earns 1 Victory Point. Each time a non-Flyer Imperial unit voluntarily moves off the Tyranid player’s table edge (see Mission Special Rules), the Imperial player earns 1 Victory Point. Each time the Tyranid player completely destroys an Imperial unit, he earns 1 Victory Point. Remember that Independent Characters and Dedicated Transports are individual units for the purposes of awarding Victory Points if they are destroyed or escape via the Tyranid player’s table edge. Secondary Objectives First Blood, Slay the Warlord. Night Fighting, Reserves. №4
ECHOES OF WAR
:
Cathedral of BloodHaving fought his way through the dense aerial swarm assailing Aeros, Sanguinary High Priest Corbulo believes he has found what he is looking for. A last desperate Imperial defence line is holding off a teeming horde of xenos creatures before a vast cathedral on the Aerosian primary refining platform. It is here that Corbulo is convinced that he can secure a huge stockpile of the satryx elixir - but only if the Blood Angels can hold back the xenos tide...
 Choose armies. One player is the Imperial player, and his opponent is the Tyranid player. All units in the Imperial player’s army must have the Blood Angels or Astra Militarum Faction. He must include the Blooded Demi-company Formation (including the Captain) as part of his army and Brother Corbulo to be his Warlord. All units in the Tyranid player’s army must have the Tyranids Faction. He must also include at least one Skyblight Swarm. THE BATTLEFIELD First, the Imperial player places two markers 6” apart (or a suitable terrain piece if you have one in your collection) centred on his table edge to represent the Cathedral Gate. Then set up terrain. Use the Deployment Map included with this mission. DEPLOYMENT The Imperial player deploys first, anywhere in his deployment zone. The Tyranid player deploys second, anywhere in his deployment zone. FIRST TURN The Tyranid player can choose to take the first or second turn. If he decides to take the first turn, the Imperial player can attempt to Seize the Initiative. GAME LENGTH The mission uses Variable Game Length. VICTORY CONDITIONS At the end of the game, the player who has scored the most Victory Points is the winner. If both players have the same number of Victory Points, the game is a draw. Primary Objectives At the end of the game, each player receives 1 Victory Point for each enemy unit that has been completely destroyed. Units that are Falling Back at the end of the game, and units that are not on the board at the end of the game, count as destroyed for the purposes of this mission. Remember that Independent Characters and Dedicated Transports are individual units and award Victory Points if they are destroyed. In addition, at the end of the game, the Imperial player scores 3 Victory Points if there are no models belonging to the Tyranid player within 6” of the Cathedral Gate.
First Blood, Slay the Warlord* * In this mission, the Slay the Warlord Secondary Objective is worth 3 Victory Points to the Tyranid player. Reserves. №5
ECHOES OF WAR
:
Divine InterventionDesperate circumstances have forced Dante’s hand, and he now shares an uneasy alliance with the newly-arrived Necron host of Anrakyr the Traveller. Though the Blood Angels Commander is justifiably doubtful about the Overlord’s true intentions, the fighting on Asphodex has reached a critical stage, and the two forces battle together against the Tyranids. But as they converge upon the cogitator spires, they will not find them undefended...
 Choose armies. One player is the Allied player, and his opponent is the Tyranid player. All units in the Allied player’s army must have the Blood Angels or Necrons Faction. He must include Commander Dante, Anrakyr the Traveller and a C’tan Shard (representing Nyadra’zatha, the Burning One - see Mission Special Rules) in his army, though none of these units cost any points. All units in the Tyranid player’s army must have the Tyranids Faction. The Tyranid player must include a Hive Tyrant with the wings biomorph to be his army’s Warlord, though this unit does not cost any points. THE BATTLEFIELD Set up terrain. Use the Deployment Map included with this mission. Objective Markers After terrain has been set up, the Tyranid player places a total of 3 Objective Markers anywhere in his deployment zone. No objective can be placed within 6” of any battlefield edge or 12” of another objective. DEPLOYMENT The Tyranid player deploys first, anywhere in his deployment zone. The Allied player deploys second, anywhere in his deployment zone. The C’tan Shard is not deployed at this stage (see Mission Special Rules). FIRST TURN The Allied player can choose to take the first or second turn. If he decides to take the first turn, the Tyranid player can attempt to Seize the Initiative. GAME LENGTH The mission uses Variable Game Length. VICTORY CONDITIONS At the end of the game, the player who scored the most Victory Points is the winner. If both players have the same number of Victory Points, the game is a draw. Primary Objective At the end of the game, each Objective Marker is worth 3 Victory Points to the player that controls it. Secondary Objective First Blood, Linebreaker, Slay the Warlord. Night Fighting, Reserves.
№6
ECHOES OF WAR
:
A Battle Against TimeGabriel Seth leads his combined force of Flesh Tearers and Adepta Sororitas in a desperate last stand against the approaching Tyranid horde. If Seth’s embattled warriors can hold out long enough to buy time for the Solariam crawler to send the vital signal, then even if they fall their deaths will not be in vain. As the xenos swarm approaches under cover of a thick spore cloud, their determination will be put to the ultimate test.
 Choose armies. One player is the Imperial player, and his opponent is the Tyranid player. All units in the Imperial player’s army must have the Blood Angels or Adepta Sororitas Faction. He must include The Defenders of the Cathedrum Formation. Gabriel Seth must be the Imperial player’s Warlord. All units in the Tyranid player’s army must have the Tyranids Faction. THE BATTLEFIELD Set up terrain. Use the Deployment Map included with this mission. DEPLOYMENT The Imperial player deploys first, anywhere in his deployment zone. The Tyranid player deploys second, anywhere in his deployment zone. FIRST TURN The Tyranid player can choose to take the first or second turn. If he decides to take the first turn, the Imperial player can attempt to Seize the Initiative. GAME LENGTH The mission uses Variable Game Length. VICTORY CONDITIONS At the end of the game, the Tyranid player wins if he has completely destroyed all of the Imperial player’s forces. If there are any models belonging to the Imperial player remaining, including those in units that are Falling Back, the Imperial player wins. Units that are not on the board at the end of the game count as destroyed for the purposes of this mission. Night Fighting, Reserves. №7
ECHOES OF WAR
:
Of Monsters and MachinesAs the Blood Angels stationed far below on Aeros fight hard to perform their part in Anrakyr the Traveller’s grand strategy, Zarathusa the Ineffable leads his phalanxes to secure the promethium fuel platform in low orbit. If the imperious Overlord can reach the central command hub, he will be able to override the mechanisms that control the vast flow of fuel and prepare the way for the Magnovitrium beam. But the Hive Mind, it seems, has other ideas...
 Choose armies. One player is the Necron player, and his opponent is the Tyranid player. All units in the Necron player’s army must have the Necron Faction. He must include the Zarathusa’s Royal Decurion Formation in his army; the Necron Overlord from this Formation (representing Zarathusa the Ineffable) must be his army’s Warlord. All units in the Tyranid player’s army must have the Tyranids Faction. THE BATTLEFIELD Set up terrain. Use the Deployment Map included with this mission. DEPLOYMENT The Tyranid player deploys first, anywhere in his deployment zone. The Necron player deploys second, anywhere in his deployment zone. FIRST TURN The Necron player can choose to take the first or second turn. If he decides to take the first turn, the Tyranid player can attempt to Seize the Initiative. GAME LENGTH The mission uses Variable Game Length. VICTORY CONDITIONS At the end of the game, the player who has scored the most Victory Points is the winner. If both players have the same number of Victory Points, the game is a draw. Primary Objectives At the end of the game, the Necron player receives 1 Victory Point for each of his units that is completely within the Tyranid player’s deployment zone. If Zarathusa the Ineffable voluntarily moves off the Tyranid player’s table edge (see Mission Special Rules), the Necron player earns 3 Victory Points. At the end of the game, the Tyranid player receives 1 Victory Point for each enemy unit that has been completely destroyed. Remember that Independent Characters and Dedicated Transports are individual units for the purposes of awarding Victory Points if they are destroyed or end the game in the Tyranid player’s Deployment Zone.
First Blood, Slay the Warlord. Reserves. №8
ECHOES OF WAR
:
Forlorn HopeIn accordance with Anrakyr the Traveller’s plan, the allied forces of Necrons, Blood Angel and Flesh Tearers stationed across the worlds of the Cryptus System stand poised to direct the fury of the Magnovitrium towards the destruction of Aeros and, if fate smiles, much of the Tyranid fleet. Yet all will be for naught if the Blood Angels’ doomed brotherhood of Death Company cannot reach the Magnovitrium’s activation mechanism on Tartoros in time.
 Choose armies. One player is the Blood Angels player, and his opponent is the Tyranid player. All units in the Blood Angels player’s army must have the Blood Angels Faction. He must include the Strike Force Mortalis Formation in his army, as well as the Sanguinor. All units in the Tyranid player’s army must have the Tyranids Faction. He must include at least two Carnifex Broods in his army. THE BATTLEFIELD Set up terrain. Use the Deployment Map included with this mission. Objective Markers After setting up the terrain, place one Objective Marker in the centre of the Tyranid player’s Deployment Zone (see map). DEPLOYMENT The Tyranid player deploys first, anywhere in his deployment zone. The Blood Angels player deploys second, anywhere in his deployment zone. The Blood Angels player cannot choose to keep any non-Flyer units in Reserve. The Sanguinor is not deployed at this stage (see Mission Special Rules). FIRST TURN The Blood Angels player has the first turn. GAME LENGTH The mission uses Variable Game Length. VICTORY CONDITIONS At the end of the game, if the Blood Angels player has one or more models anywhere within 3" of the Objective Marker, he wins the game. Any other result is a victory to the Tyranid player. The Objective Secured special rule has no effect in this mission. Night Fighting, Reserves.
Shield of Baal: Deathstorm MissionsThis page includes several Warhammer 40,000 missions inspired by the pivotal battles fought as Karlaen’s Blood Angels encountered the Tyranids. All of the missions can be fought using just the miniatures provided with Shield of Baal: Deathstorm, or can be expanded to use additional Citadel miniatures from your collection if you wish.There are several ways in which you can use the missions. The first is simply to select a particular mission you are excited about and fight it out using the Citadel miniatures provided with Shield of Baal: Deathstorm. The Armies section of each mission provides guidance on the forces present so that you can replay the battles using the units, characters and Formations described in the background section of this book. Another way to use these missions is to play a campaign. You can do this by simply playing through the missions sequentially. If you do so, keep a note of your cumulative Victory Points, and the winner of the campaign is the player with the highest score. If you are playing a campaign, we suggest you maintain the same side (the Blood Angels or the Tyranids) throughout the course of the campaign, but upon its completion swap roles and see how much better (or worse) you fare when fighting for the other side. №1
ECHOES OF WAR
:
Hunters in the DarkWhilst searching the ruins of the Flaxian Palace to find the Planetary Governor, Captain Karlaen and Squad Alphaeus are ambushed by a swarm of Genestealers. If the Blood Angels are to achieve their mission they will have to fight their way through a great shadow-haunted corridor, into which Genestealers flood through with every second that passes whilst yet others descend from their hiding places concealed in the ceiling above.
 One player commands the Blood Angels, the other the Tyranids. Each player takes the following models: Blood Angels Army • Captain Karlaen • Squad Alphaeus Tyranids Army • The Children of Cryptus (Do not take the Spawn of Cryptus in this mission. The Tyranids army does not have a Warlord in this mission). THE BATTLEFIELD Use the deployment map included with this mission. Set up terrain. DEPLOYMENT The Blood Angels player deploys first. He must deploy all his units within 6" of the Blood Angels table edge. In this mission, the models in Squad Alphaeus are all individual units, and so move, shoot, charge etc. independently. No u nit can be placed in Reserve. The Tyranids player deploys second. He deploys his units anywhere that is more th an 18" away from any Blood Angels model. In this mission, the models in the Children of Cryptus are also individual units. FIRST TURN The Tyranids player goes first unless the Blood Angels player can Seize the Initiative. GAME LENGTH The game continues until Captain Karlaen is either removed as a casualty or exits the battlefield. VICTORY CONDITIONS At the end of the game, the Blood Angels player scores 5 Victory Points if Captain Karlaen has exited the battlefield (see below), and the Tyranid player scores 1 Victory Point for every Blood Angels model that was removed as a casualty. The player who has scored the most Victory Points is the winner. If both players have the same number of Victory Points, the game is a draw. Hidden in Shadow: The maximum range for any line of sight in this mission is 18". №2
ECHOES OF WAR
:
Storm of BloodWhilst engaged in a desperate duel, Captain Karlaen has become trapped beneath a fallen Ecclesiarchal statue. Though Squad Alphaeus stand guard near their fallen lord, their minds are still reeling from a brutal psychic onslaught, leaving Karlaen dangerously vulnerable in the face of the approaching Tyranid broods. Unless aid arrives soon, the Blood Angels Terminators will be overrun and tom to pieces.
 One player commands the Blood Angels, the other the Tyranids. Each player takes the following models: Blood Angels Army • Squad Alphaeus • Raphen’s Death Company • Cassor the Damned Tyranids Army • The Beast of Phodia • Phodian Hive Warriors • The Children of Cryptus (Do not take the Spawn of Cryptus in this mission. The Tyranids army does not have a Warlord in this mission). THE BATTLEFIELD Use the deployment map included with this mission. Set up terrain. Objective Markers After setting up terrain, place a single Objective Marker in the centre of the table. DEPLOYMENT The Blood Angels player deploys first. He must deploy Squad Alphaeus within 6" of the centre of the table. Raphen’s Death Company start the game in Deep Strike Reserve. Cassor the Damned starts the game in Reserve. The Tyranids player deploys second. He deploys his units anywhere within 6" of the Tyranids table edge. The Beast of Phodia starts the game in Reserve. FIRST TURN The Blood Angels player goes first. GAME LENGTH This mission uses Variable Game Length. VICTORY CONDITIONS At the end of the game, the player that controls the Objective Marker scores 5 Victory Points and wins the game. Crash through the Ruins: When Cassor the Damned and The Beast of Phodia arrive from Reserve, they may move on from any table edge. №3
ECHOES OF WAR
:
Shadow of the BeastCaptain Karlaen and the survivors of his strike force have rescued Governor Flax and fought their way back to the world’s surface. Now they must hold out against the waves of Tyranids long enough for the Chapter’s Stormravens to arrive from orbit and extract them and their prize. The Spawn of Cryptus has sensed its prey’s attempt to flee, and has urged every Tyranid under its command to attack, intent that its quarry will not escape.
 One player commands the Blood Angels, the other the Tyranids. Each player takes the following formations: Blood Angels Army • Strike Force Deathstorm Tyranids Army • Phodian Annihilation Swarm THE BATTLEFIELD Use the deployment map included with this mission. Set up terrain. DEPLOYMENT The Tyranids player deploys first. He must deploy his units within 3" of any table edge. The Children of Cryptus can deploy using their Infiltrate special rule. The Blood Angels player deploys second. He must deploy all his units within 6" of the centre of the board. Neither player can place any units in Reserve. FIRST TURN The Tyranids player goes first unless the Blood Angels player can Seize the Initiative. GAME LENGTH This mission uses Variable Game Length. VICTORY CONDITIONS At the end of the game, the Blood Angels player scores 3 Victory Points if Captain Karlaen is still alive and 1 Victory Point for each other Blood Angels unit that is still alive. The Tyranid player scores 3 Victory Points if Captain Karlaen was removed as a casualty and 1 Victory Point for each other Blood Angels unit that was completely destroyed. The player who has scored the most Victory Points is the winner. If both players have the same number of Victory Points, the game is a draw. The Edge of Oblivion: Each time a Tyranid unit is completely destroyed you can immediately place a new unit into Ongoing Reserve that is identical in terms of the original number of models, weapons and upgrades to the unit that was just destroyed. The only exception is the Spawn of Cryptus who, if slain, will not return (although its Genestealers will). Tyranid units arriving from Ongoing Reserves enter play from any table edge. Shield of Baal: Leviathan MissionsThis section contains a selection of Echoes of War missions inspired by the battles fought as the Leviathan attacked the worlds of the Cryptus System. The Armies section of each of these missions provides guidance on the forces present so that you can replay the pivotal events using the armies and characters described in the story. Many of the Echoes of War missions include a map that depicts the battlefield on which the conflicts were fought.If you wish to fight an Echoes of War mission, you and your opponent must agree which mission you wish to fight, ensuring that you have the appropriate armies and models you will need. Designer’s Note: Whilst the Echoes of War missions in this book have been inspired by specific events, with a little imagination they can easily be repurposed to recreate battles of your own invention. If you choose to go down this route, you can modify these missions so that they can be fought using any combination of forces and terrain in your collection. There are several ways in which you can use these Echoes of War missions. The first and most straightforward is simply to select the particular mission for a battle you are excited about from the campaign, and use the appropriate mission to recreate the battle on your tabletop! The Armies section of each mission provides guidance on the forces present so that you can replay the battles using the armies and characters described in the story, while the mission’s special rules will ensure that all of the most important elements of the original battle will be recreated.Another way to use these missions is to fight a campaign by playing through the missions sequentially. If you do so, then one player should command the forces of the Tyranids in all of the battles, while their opponent commands the opposing side. Keep a note of each player’s wins and losses, and the winner of the campaign is the player with the highest number of victories at the end of the campaign. №1
ECHOES OF WAR
:
The Vitria StrikeThe first inkling the Imperium has of the doom engulfing the Cryptus System comes on the planet of Vitria. Amidst a labyrinth of buildings made from hardened glass, the warriors of the Militarum Tempestus are forced to battle their way past a series of ferocious ambushes before they are finally able to learn the true target of the Tyranid invaders.
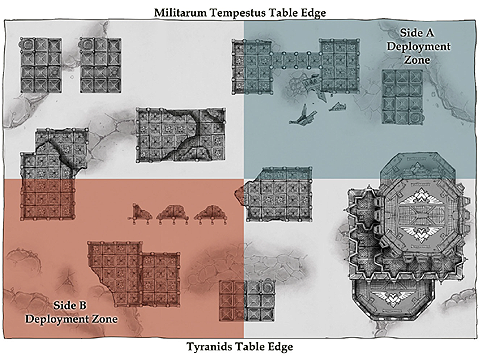 Choose armies. One player is the Tyranid player, and his opponent is the Militarum Tempestus player. All units in the Tyranid player’s army must have the Tyranids Faction. All units in the Militarum Tempestus player’s army must have the Militarum Tempestus Faction. Designer’s Note: The Tyranids encountered upon Vitria were part of a Tyranid vanguard force. If the Tyranid player wishes to represent such an army accurately, then they should primarily use Genestealers and Lictors in their army. THE BATTLEFIELD Use the deployment map included with this mission. Set up terrain. We recommend that you set up at least six buildings and/or ruins, and that you use more buildings and ruins if they are available. Note that special rules apply to the buildings (see Mission Special Rules, below). Each player rolls a D6, re-rolling ties. Whoever scores higher decides which quarter of the table they wish to deploy in. The opposing player deploys in the diagonally opposite quarter. Objective Markers After terrain has been set up, but before determining table quarters, the players must place 6 Objective Markers that are individually numbered 1 through 6 on the battlefield, using the rules from Warhammer 40,000: The Rules, as modified by the Cities of Death special rules (see the Cities of Death section of these rules). DEPLOYMENT The Militarum Tempestus player deploys first, anywhere in his deployment zone. The Tyranid player deploys second, anywhere in his deployment zone. FIRST TURN The Militarum Tempestus player can choose to take the first or second turn. If they decide to take the first turn, their opponent can attempt to Seize the Initiative as described in Warhammer 40,000: The Rules. Cities of Death Objectives Each player generates 3 Cities of Death Objectives at the start of their first turn (see the Cities of Death section of these rules). GAME LENGTH The mission uses Variable Game Length. VICTORY CONDITIONS At the end of the game, the player who has scored the most Victory Points is the winner. If both players have the same number of Victory Points, the game is a draw. Primary Objectives Achieve as many Cities of Death Objectives as possible. If, at the start of a player’s turn, he has fewer than 3 Active Cities of Death Objectives, he must generate a number of new Cities of Death Objectives until he has 3. Secondary Objectives First Blood, Linebreaker, Slay the Warlord. Cities of Death Objectives, Mysterious Objectives, Night Fighting, Reserves. №2
ECHOES OF WAR
:
The Great CorralLysios was the first planet in the Cryptus System to feel the full weight of the Tyranid invasion. Lysios is a desolate wilderness, its lands and cities scoured by a slow-moving tidal wave of water and debris. The inhabitants lived in huge crawler hulks, constantly moving to keep ahead of the perpetual tsunami. When the Tyranids struck, the crawler hulks were drawn up into a defensive corral, protected from the Tyranids by the warriors of the Adepta Sororitas.
 Choose armies. One player is the Tyranid player, and his opponent is the Adepta Sororitas player. All units in the Tyranid player’s army must have the Tyranids Faction. All units in the Adepta Sororitas player’s army must have the Adepta Sororitas Faction or be fortifications. THE BATTLEFIELD Use the deployment map included with this mission. Set up terrain. Each player rolls a D6, re-rolling ties. Whoever scores higher decides which half of the table they wish to deploy in. The opposing player deploys in the opposite half. DEPLOYMENT The Adepta Sororitas player deploys first, anywhere in their deployment zone. The Tyranid player deploys second. The Tyranid player must divide their army into three waves. Any number of units can be in each wave, as long as each wave has at least one unit. The Tyranid player must then select one wave. The units in this wave can deploy anywhere in the Tyranid deployment zone, or be placed in Reserves. The remaining two waves of units arrive separately (see Mission Special Rules, below). FIRST TURN The Tyranid player can choose to take the first or second turn. If they decide to take the first turn, their opponent can attempt to Seize the Initiative. GAME LENGTH The mission uses Variable Game Length. VICTORY CONDITIONS At the end of the game, the player who has scored the most Victory Points is the winner. If both players have the same number of Victory Points, the game is a draw. Primary Objectives At the end of the game, each player receives 1 Victory Point for each enemy unit that has been completely destroyed. Units that are Falling Back at the end of the game, and units that are not on the board at the end of the game, count as destroyed for the purposes of this mission. Remember that Independent Characters and Dedicated Transports are individual units and award Victory Points if they are destroyed. Secondary Objectives First Blood, Slay the Warlord. Night Fighting, Reserves.
№3
ECHOES OF WAR
:
The Shield TestedThe most densely populated planet in the Cryptus System is Asphodex. Home to billions of Imperial citizens, the planet is two-thirds covered by a vast cityscape. It was here that millions of warriors of the Astra Militarum prepared to meet and defeat the swarms of Hive Fleet Leviathan. When the first Tyrannocytes began to fall from the skies, they were met with a barrage of fire, and within minutes the streets of the planet-wide city were engulfed by war.
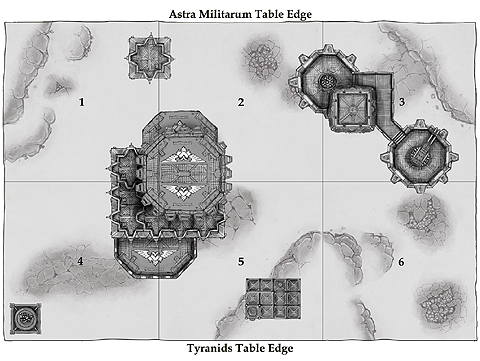 Choose armies. One player is the Tyranid player, and the other is the Astra Militarum player. All units in the Tyranid player’s army must have the Tyranids Faction. All units in the Astra Militarum player’s army must have the Astra Militarum Faction or be fortifications. THE BATTLEFIELD Use the deployment map included with this mission. Set up terrain. We recommend that you set up at least six buildings and/or ruins, and that you use more buildings and ruins if they are available. Split the table into six zones, as shown on the deployment map. Objective Markers After terrain has been set up the players must place 6 Objective Markers that are individually numbered 1 through 6 on the battlefield, using the rules from Warhammer 40,000: The Rules, as modified by the Cities of Death special rules (see the Cities of Death section of these rules). DEPLOYMENT The Astra Militarum player deploys first by picking a unit and either placing it in Reserve or rolling a D6 for the unit and deploying it anywhere fully within the zone corresponding to the dice roll. The Astra Militarum player then repeats this process for his next unit, and so on. No Tyranid units are deployed at the start of the battle. Instead the Tyranid player must designate which of their units will enter play on their first turn (see the First Wave mission special rule) and which (if any) are placed in Reserve. The Infiltrate and Scout special rules cannot be used in this mission. FIRST TURN The Tyranid player has the first turn. Cities of Death Objectives Each player generates 3 Cities of Death Objectives at the start of their first turn (see the Cities of Death section of these rules). GAME LENGTH The mission uses Variable Game Length. VICTORY CONDITIONS At the end of the game, the player who has scored the most Victory Points is the winner. If both players have the same number of Victory Points, the Tyranid player wins. Primary Objectives Achieve as many Cities of Death Objectives as possible. If, at the start of a player’s turn, he has fewer than 3 Active Cities of Death Objectives, he must generate a number of new Cities of Death Objectives until he has 3. Secondary Objectives First Blood, Slay the Warlord. Cities of Death Objectives, Mysterious Objectives, Night Fighting, Reserves. №4
ECHOES OF WAR
:
The Skywar of AerosAeros is a massive gas giant that is mined for precious fuels by large floating processing centres. Although battles were fought across these floating platforms by conventional ground forces, the vast majority of the fighting for the planet took place between the skimmers of the Astra Militarum and the monstrous flying creatures of Hive Fleet Leviathan’s numerous Skytide invasion formations.
 Choose armies. One player is the Tyranid player, and his opponent is the Astra Militarum player. All units in the Tyranid player’s army must have the Tyranids Faction. All units in the Astra Militarum player’s army must have the Astra Militarum Faction or be fortifications. THE BATTLEFIELD Use the deployment map included with this mission. The only terrain pieces that can be used in this mission are buildings and Skyshield Landing Pads. The areas of open ground between these terrain features are treated as impassable terrain (but see Skywar, below). Objective Markers After terrain has been set up, but before deploying any units, the players must place 1 Objective Marker on each building and Skyshield Landing Pad, even if this would require the Objective Marker to be placed within 6" of a table edge or 12" of another Objective Marker. Gas Clouds If the players desire, they may mark some areas of open ground as being Gas Cloud terrain. If they do so, these areas are treated as being open ground for all rules purposes, except that a line of sight cannot be drawn through more than 3" of Gas Cloud terrain. DEPLOYMENT The Astra Militarum player deploys first, anywhere on the table that is more than 12" from a table edge. He can deploy fortifications that are buildings or Skyshield Landing Platforms. Any other type of fortification cannot be used. No Tyranid units are deployed at the start of the battle. Instead the Tyranid player must designate which of its units will enter play on its first turn and which (if any) will be placed in Reserve. The Infiltrate and Scout special rules cannot be used in this mission.
The Tyranid player has the first turn. GAME LENGTH The mission uses Variable Game Length. VICTORY CONDITIONS At the end of the game, the player who controls the most Objective Markers is the winner. If both players control the same number of Objective Markers, the Tyranid player wins. Mysterious Objectives, Reserves. In addition to the above, the following special rules apply:
№5
ECHOES OF WAR
:
The Beasts of TartorosTartoros is bathed in deadly radiation. Only the largest of creatures can survive for long on its surface, and smaller beings are forced to shelter within protective shelters or armoured vehicles. When the Tyranids attacked the planet, their spearheads were made up exclusively of the large monsters of the hive fleet, which were opposed by the fortifications, armoured companies and battle formations of the Astra Militarum.
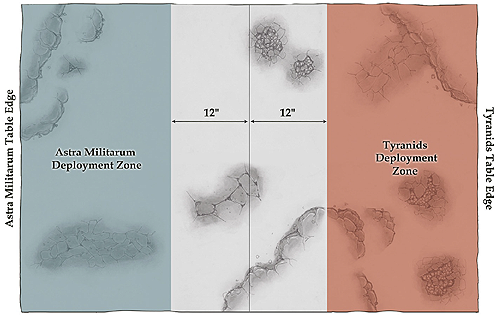 Choose armies. One player is the Tyranid player, and his opponent is the Astra Militarum player. All units in the Tyranid player’s army must have the Tyranids Faction. All units in the Astra Militarum player’s army must have the Astra Militarum Faction or be fortifications. Designer’s Note: We highly recommend that both players read the special rules for this mission before they pick their armies. The environment on Tartoros is a deadly one for anything other than vehicles or Monstrous Creatures, so you will need to pick your armies carefully. THE BATTLEFIELDUse the deployment map included with this mission. Set up terrain. Each player rolls a D6, re-rolling ties. Whoever scores higher decides which half of the table they wish to deploy in. The opposing player deploys in the opposite half. DEPLOYMENT The Astra Militarum player deploys first, anywhere in his deployment zone. The Tyranid player deploys second, anywhere in his deployment zone. FIRST TURN The Astra Militarum player can choose to take the first or second turn. If they decide to take the first turn, their opponent can attempt to Seize the Initiative. GAME LENGTH The mission uses Variable Game Length. VICTORY CONDITIONS At the end of the game, the player who has scored the most Victory Points is the winner. If both players have the same number of Victory Points, the game is a draw. Primary Objective At the end of the game, each player receives 1 Victory Point for each enemy unit that has been completely destroyed. Units that are Falling Back at the end of the game, and units that are not on the board at the end of the game, count as destroyed for the purposes of this mission. Remember that Independent Characters and Dedicated Transports are individual units and award Victory Points if they are destroyed. Secondary Objectives First Blood, Linebreaker, Slay the Warlord. Night Fighting, Reserves.
№6
ECHOES OF WAR
:
The Wrath of ShelseEven the exceptional prowess and fortitude of the Adepta Sororitas could not oppose a full-scale Tyranid invasion indefinitely. Soon they were forced to accept that the Tyranids could be slowed but not stopped, and that the only hope of saving the population was evacuation. Caught between the Tyranid hordes and the slowly advancing tidal wave that circled the planet, the Sisters of Battle raced against time to save as many Imperial citizens as possible.
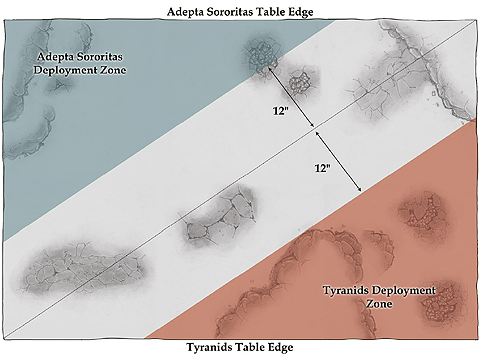
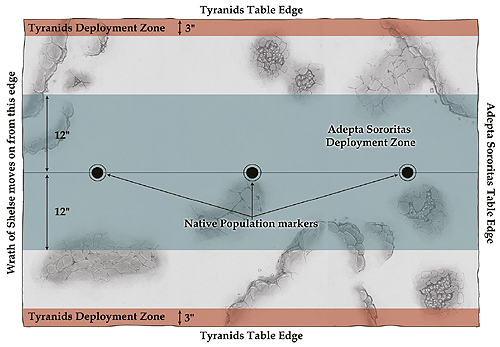 Choose armies. One player is the Tyranid player, and his opponent is the Adepta Sororitas player. All units in the Tyranid player’s army must have the Tyranids Faction. All units in the Adepta Sororitas player’s army must have the Adepta Sororitas Faction or be fortifications. THE BATTLEFIELD Use the deployment map included with this mission. Set up terrain. The players then roll-off. The winner of the roll-off can decide which of the short table edges will be the Adepta Sororitas table edge. The two long table edges are both Tyranid table edges. Native Population Markers Set up three Native Population markers (see Mission Special Rules, below) as shown on the deployment map. DEPLOYMENT The Adepta Sororitas player deploys first as shown on the deployment map. The Tyranid player then deploys wholly within 3" of either long table edge. FIRST TURN The Adepta Sororitas player can choose to take the first or second turn. If they decide to take the first turn, their opponent can attempt to Seize the Initiative. GAME LENGTH The mission uses Variable Game Length. VICTORY CONDITIONS At the end of the game, the player who has scored the most Victory Points is the winner. If both players have the same number of Victory Points, the game is a draw. Primary Objectives At the end of the game, the Tyranid player receives 6 Victory Points for each Native Population marker that has been harvested, and the Adepta Sororitas player receives 6 Victory Points for each Native Population marker that has been evacuated. No Victory Points are received for markers that have been neither harvested nor evacuated. Secondary Objectives At the end of the game, each player receives 1 Victory Point for each opposing unit that has been completely destroyed. Units that are Falling Back at the end of the game, and units that are not on the board at the end of the game, count as destroyed for the purposes of this mission. Night Fighting, Reserves. The markers are moved in the Adepta Sororitas Movement phase. If the closest unit to the marker at the start of its move is an Adepta Sororitas unit, then the marker Falls Back towards the Adepta Sororitas table edge. If the closest unit to the marker at the start of its move is a Tyranid unit, then the marker Falls Back directly away from the closest Tyranid model. A Native Population marker is evacuated if it Falls Back off the Adepta Sororitas player’s table edge. A Native Population marker is harvested and removed from play if the closest unit to the marker at the start of the Tyranid player’s turn is a Tyranid unit, or if it is moved over by the Wrath of Shelse (see below). |

