Before we dive into the turn sequence and the main meat of the rules, there are a few basic ideas and game mechanics that are worth discussing. These are principles that are so common that they pop up again and again while you’re playing a game, so it makes a lot of sense to establish them before hitting the more specialised rules to be found later.
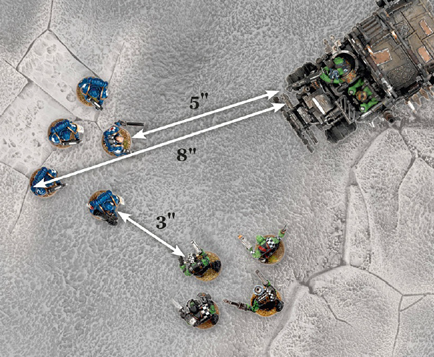
In a game of the size and complexity of Warhammer 40,000, there are bound to be occasions where a situation is not covered by the rules, or you can’t seem to find the right page. Even if you know the rule, sometimes it is just a really close call, and players don’t agree on the precise outcome. Nobody wants to waste valuable gaming time arguing, so be prepared to interpret a rule or come up with a suitable solution for yourselves (in a manner befitting the better class of Imperial Citizen, of course). If you find that you and your opponent cannot agree on the application of a rule, roll a dice to see whose interpretation will apply for the remainder of the game – on a result of 1-3 player A gets to decide, on a 4-6 player B decides. Then you can get on with the fighting! Once the game is over, you can happily continue your discussion as to the finer points of the rules. In games of Warhammer 40,000, distances are measured in inches (") with a tape measure or measuring stick. You can always check any distance at any time. This allows you to check whether your units are in range of their target before they attack. After all, the soldiers are led by seasoned veterans who can accurately judge the range of their weapons, even if we, their generals, cannot. Distances between models and all other objects (which can be other models, terrain features and so on) are always measured from the closest point on one base to the closest point on the other base. Distances between units are always measured to and from the bases of the closest models in each of the units (see the diagram below). For example, if any part of a model’s base is within 6" of the base of an enemy model, the two models are said to be within 6" of each other. Sometimes the rules will call upon a unit to move directly towards another unit, or some other feature on the battlefield. Where this is the case, move each model in the unit directly towards its destination a number of inches equal to the distance stated.
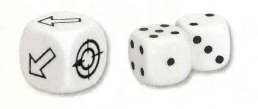 If you re-roll a 2D6 or 3D6 roll, you must re-roll all of the dice, not just some of them, unless the rules specify otherwise. Any modifiers that applied to the first roll also apply to the re-roll. If two or more special rules combine to the effect that both all failed and all successful dice results would have to be re-rolled, do not re-roll any dice; simply use the original result(s) instead. For example, Matthew must randomly select one of five models. He assigns each model a number between 1 and 5, and rolls a D6, re-rolling results of 6 until he gets a number between 1 and 5. If you have more than six items to randomise between, split them into equal sized groups of six or less (or as near to this as you can). Then randomly select one group, further randomising between the items in this group to find the (un)lucky item! Of course, if your gaming surface is very textured and results in a lot of cocked dice (or simply if you prefer a tidy battlefield), you can make all your rolls in a tray or box lid. However, one player we know has a house rule that if your dice misses the table, you have failed the roll – after all, if you can’t hit a huge table with a tiny dice, then what chance do your warriors have of hitting the enemy? Some weapons are so powerful that they don’t just target a single model or unit, but have an ‘area effect’ which might encompass (and often utterly devastate!) several different units. To better represent these circumstances, Warhammer 40,000 uses a series of different blast markers and templates:
The templates and blast markers are used as a way of determining how many models have been hit by an attack that has an area of effect or blast radius. When an attack uses a template or blast marker, it will explain how the template is positioned, including any kind of scatter that might occur (scatter is discussed more completely next in this section). To work out the number of hits, you normally need to hold the template or blast marker over an enemy unit or a particular point on the battlefield, and then look underneath (or through, if using a transparent template) to see how many models lie partially or completely underneath. A unit takes a hit for each model that is fully, or even partially, underneath the template or blast marker. Remember that a model’s base is counted as being part of the model itself, so all a template or blast marker has to do to cause a hit is to cover any part of the target’s base.
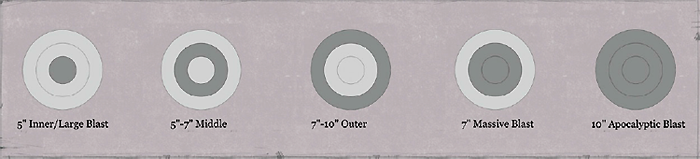 The 10" apocalyptic blast marker has two rings marked on it (at 5" and 7"). The rings are used when resolving attacks with a large blast, massive blast or apocalyptic mega-blast marker, which uses the inner, middle and outer zones (see diagrams). Sometimes a rule will call for an object (a template, counter, model or even a whole unit) to be placed on the battlefield and then scattered. When this occurs, follow this procedure:
For example, if something is said to ‘scatter 2D6" in a random direction’, then you’d roll the scatter dice for the direction and 2D6 for the distance. It’s a good idea to roll these as close to the scattering object as possible, to minimise the inaccuracy that will inevitably creep in as you attempt to match the vector. A model will sometimes be called upon to take a characteristic test. Such a test can be applied against any characteristic that the model has, except for Leadership and Armour Save. A Toughness test is a characteristic test, as is a Strength test or an Initiative test, a Wounds test and so on. Models don’t have a choice of which characteristic to use – the characteristic to be tested will be specified in the rule. To make a characteristic test, use the following procedure:
When rolling dice to take a characteristic test, a dice roll of 6 is always a failure, and a dice roll of 1 is always a success, regardless of any other modifiers. At certain times, a model or unit might be called upon to take a Leadership test. This usually represents them drawing upon their courage to face disheartening circumstances. To take a Leadership test, use the following procedure:
When rolling dice to take a Leadership test, a dice roll of 12 (a double 6) is always a failure, and a dice roll of 2 (a double 1) is always a success, regardless of any other modifiers that apply. Models that are removed as casualties are removed from the table and placed to one side. When all of the models in a unit are removed as casualties, the unit is said to have been ‘completely destroyed’. Models that are ‘removed from play’ by special rules or attacks are also considered to have been removed as casualties, as far as the game rules are concerned. For game purposes, units that are Falling Back at the end of the game or are not on the table at the end of the game, either because they have Fallen Back off a table edge or because they are in Ongoing Reserves are also counted as completely destroyed. Basic rules apply to all the models in the game, unless stated otherwise. They include the rules for movement, shooting and close combat as well as the rules for morale. These are all the rules you’ll need for infantry models. Advanced rules apply to specific types of models, whether because they have a special kind of weapon (such as a boltgun), unusual skills (such as the ability to regenerate), because they are different to their fellows (such as a unit leader or a heroic character), or because they are not normal infantry models (a bike, a swarm or even a tank). The advanced rules that apply to a unit are indicated in its Army List Entry. Army List Entries can be found in a number of Games Workshop publications, such as a Warhammer 40,000 codex. Where advanced rules apply to a specific model, they always override any contradicting basic rules. For example, the basic rules state that a model must take a Morale check under certain situations. If, however, that model has a special rule that makes it immune to Morale checks, then it does not take such checks – the advanced rule takes precedence. On rare occasions, a conflict will arise between a rule in this rulebook, and one printed in a codex. Where this occurs, the rule printed in the codex or Army List Entry always takes precedence. Warhammer 40,000 may be somewhat different to any other game you have played. Above all, it’s important to remember that the rules are just the framework to support an enjoyable game. Whether a battle ends in victory or defeat, your goal should always be to enjoy the journey. What’s more, Warhammer 40,000 calls on a lot from you, the player. Your responsibility isn’t just to follow the rules, it’s also to add your own ideas, drama and creativity to the game. Much of the appeal of this game lies in the freedom and open-endedness that this allows; it is in this spirit that the rules have been written. Sometimes, a rule will ask the owning, opposing or controlling player to make an action or decision of some kind. The owning player is always the player who ‘owns’ the model in question – the one who has included the model in his army. The opposing player is always his opponent. The controlling player is always the player in current command of that model – there are some special rules which can force models to switch sides during the course of the game. Line of sight determines what a model can ‘see’. Many situations call for you to determine whether or not a model has line of sight. A model normally needs line of sight whenever it wishes to attack an enemy, whether with power sword, gun or psychic power. Line of sight literally represents your warriors’ view of the enemy – they must be able to see their foes through, under or over the battlefield terrain and other models (whether friendly or enemy). For one model to have line of sight to another, you must be able to trace a straight, unblocked line from its body (the head, torso, arms or legs) to any part of the target’s body. Sometimes, all that will be visible of a model is a weapon, banner or other ornament he is carrying. In these cases, the model is not visible. Similarly, we ignore wings, tails and antennae even though they are technically part of a model’s body. These rules are intended to ensure that models don’t get penalised for having impressive banners, weaponry, and so on. Naturally, you can’t ask your models what they can see – they’re plastic and resin, which is always a barrier to effective communication – therefore, you’ll have to work it out on their behalf. In many cases, this will be obvious – if there’s a hill, building or monster in the way, the enemy might be blatantly out of sight. In other cases, two units will be clearly in view of each other as there is nothing at all in the way. On those other occasions, where it’s not entirely obvious whether or not one unit can see another, the player will have to stoop over the battlefield and look from behind the model’s head for a ‘model’s eye view’. This means getting down to the level of your warriors and taking in the battlefield from their perspective to ‘see what they can see’. You will find that you can spot lurking enemies through the windows of ruined buildings, catch a glimpse of a model’s legs under tree branches and see that high vantage points become very useful for the increased line of sight that they offer.
|
The Rules >