While firepower alone may be enough to drive an enemy back from open ground or lightly held positions, shifting a determined foe from a fortified bunker or ruined settlement will need more direct measures. In an assault, troops storm forwards into a furious close combat, screaming their battle cries, eager to strike at their foes with shrieking chainswords, glittering power weapons (and not a few gun butts, knives and desperate fists).
It’s time for your warriors to hurl themselves into close combat and carry the day through bitter melee.
To resolve a charge, use the following procedure:
- First, pick one of your units, and declare which enemy unit it wishes to charge.
- Then, the target enemy unit gets to make a special kind of shooting attack called Overwatch.
- Once Overwatch is resolved, roll the charge distance for the unit and, if it is in range, move it into contact with the enemy unit – this is sometimes called ‘launching an assault’.
Once this has been done, you can either choose to
declare a charge with another unit, or proceed to the
Fight sub-phase.
Choose a unit in your army that is declaring a charge and nominate the enemy unit(s) it is attempting to charge.
A unit can never declare a charge against a unit that it cannot reach, nor can it declare a charge against a unit that it cannot see, though it is allowed to charge an enemy unit it is impossible for it to harm. This means that a charge can usually only be declared on a unit up to 12" away (the maximum
charge range for most models, as we’ll discover later).
Some units are disallowed from charging. Common reasons a unit is not allowed to declare a charge include:
In addition to the above,
a unit that fired in the Shooting phase can only charge the unit that it targeted during that turn’s Shooting phase.
Few warriors sit idly by when an enemy horde descends upon them, but let fly with every weapon at their command. Though such shots are often inaccurate (there’s not much time to aim, and there’s something distinctly off-putting about the onset of a bellowing foe), each has a chance of felling an enemy and altering the balance of the ensuing melee before it even begins. In fact, a particularly lucky burst of Overwatch fire can rob a charge of so much momentum that it comes to a stumbling halt!
As soon as a charge has been declared against one of your units, that unit can immediately fire Overwatch at the would-be attacker – it doesn’t have to, but it’s often a good idea.
An Overwatch attack is resolved like a normal shooting attack (albeit one resolved in the enemy’s
Assault phase) and uses all the normal rules for range,
line of sight,
cover saves and so on. Unlike a normal shooting attack,
Overwatch cannot cause Morale checks or Pinning tests. Any shots fired as Overwatch can only be fired as Snap Shots. Therefore, weapons and models that cannot fire Snap Shots cannot fire Overwatch.
It is worth pointing out that units that are
locked in close combat cannot fire
Overwatch – we can assume that other events have their full attention. Also note that
a unit being charged may only fire Overwatch once per turn.
| Q: | How many shooting attacks can I do when firing Overwatch? |
| A: | |
| Q: | How many shots do Salvo weapons get when firing Snap Shots in Overwatch, if the unit moved in their previous player turn? |
| A: | When determining if the unit moved for the purposes of firing Salvo weapons, only the previous Movement phase is considered. In the case of firing Overwatch, this will have been your opponent’s Movement phase, and therefore the unit firing Overwatch is very unlikely to have moved. As a consequence, it counts as having not moved, and can fire the higher number of shots with its weapons that have the Salvo type. |
| Q: | How does Overwatch work when a unit is assaulted by multiple enemy units in the same turn? Can the assaulted unit choose against which one it fires or does it have to fire against the first unit to declare a charge? |
| A: | You can choose not to fire Overwatch against units that declare a charge against your unit, but you must do so as each charge is declared – you can’t wait until all charges are declared before deciding which unit(s) to fire Overwatch against. Obviously, if you’re successfully charged by one of your opponent’s units, you can’t fire Overwatch against subsequent chargers as you’re locked in combat. |
Once all
Overwatch shots have been resolved, the controller of the charging unit rolls to determine his unit’s charge distance. There are myriad factors that can speed or slow a charging unit as it launches itself forward.
Roll 2D6. This is your charge range – the number of inches your assaulting unit can charge. This total is important, so remember it. If a unit has models that roll differently for their charge range, the whole unit must charge at the speed of the slowest model.
The charging unit now moves into close combat with the unit(s) it has declared a charge against – this is called a charge move.
Charging units must attempt to move into base contact with as many opposing models in the enemy unit as possible with as many of their models as possible – no holding back or trying to avoid terrain! All of the
models in a charging unit make their charge move – up to the 2D6 distance you rolled earlier –
following the same rules as in the Movement phase, with the exception that they can be moved within 1" of enemy models. Charging models still cannot move through friendly or enemy models, and cannot move into base contact with enemy models from a unit they are not charging (a unit can charge more than one enemy unit by declaring a multiple charge – this is described in the
Multiple Combats section).
Start each charge by moving the initial charger from the charging unit.
The initial charger is always the model nearest to the enemy (as measured by the shortest possible route, going around
impassable terrain, friendly models and enemy models in other units).
Move the initial charger into contact with the nearest enemy model in the unit being charged, using the shortest possible route. Roll for
dangerous terrain if necessary, and if the model is killed by a
Dangerous Terrain test, choose a new initial charger and try again.
After moving the first model in the unit, you can move the others in any sequence you desire, providing you abide by the following conditions:
- If possible, a charging model must end its charge move in unit coherency with another model in its own unit that has already moved. If it is not possible for a charging model to move and maintain unit coherency, move it as close as possible to another model in its own unit that has already moved instead.
- If possible, a charging model must move into base contact with an enemy model within reach that is not already in base contact with another charging model. If there are no such enemy models in reach, the model must move into base contact with an enemy model that is already in base contact with a charging model.
- If a charging model cannot reach any enemy models, it must try to move within 2" horizontally or 6" vertically of one of its own unit’s models that is already in base contact with an enemy. If this is impossible, it must simply stay in unit coherency.
If you follow this sequence, you will end up with all the models in the charging unit in unit coherency, having engaged as many enemy models as possible with as many charging models as possible. The two units are now
locked in combat.
Charging Through Difficult Terrain
| Charging Through Difficult Terrain |
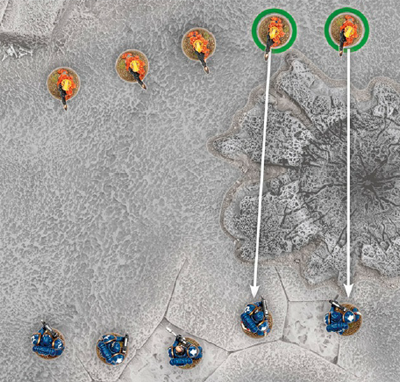
The Eldar Fire Dragon unit at the top has declared a charge against the Space Marine unit on the bottom. As they must attempt to move into base contact with as many enemy models as possible, two of the Fire Dragons (circled in green) must move through a crater. This means the whole unit counts as charging through difficult terrain. They roll 2D6 when determining their charge range but must subtract 2 from their result. In addition, if their charge is successful, all of the Fire Dragons will strike at Initiative 1 as they have charged through difficult terrain. This only affects the Initiative step they will fight at during the turn in which they charged the enemy. |
Models are slowed when charging through difficult terrain.
If, when charging, one or more models have to move through difficult terrain in order to reach the enemy by the shortest possible route, the entire unit must subtract 2 from its dice roll total when determining its charge range. Normally, this means that if a unit rolls a double 1 and they are charging through difficult terrain, it will automatically be a
failed charge.
For example, Phalanx 10001111, a unit of Necron Warriors, is charging through ruins, which are difficult terrain. They roll 2D6, resulting in a 4 and a 6. The dice are added together and then 2 is subtracted from the total to give a total charge range of 8" (4+6-2=8).Warriors who charge through difficult terrain are subject to deadly salvoes of close range fire and must advance more cautiously. To represent this,
if at least one model in the charging unit moved through difficult terrain as part of its charge move, all of the unit’s models must attack at Initiative step 1, regardless of other Initiative modifiers, even if the charging unit is not slowed by difficult terrain. Remember that charging models must engage as many enemies in the target unit as possible.
Charging Through Dangerous Terrain
In addition to the penalties for charging through
difficult terrain, if any model in a charging unit goes through
dangerous terrain, that model must immediately take a
Dangerous Terrain test. If a model has a rule that states it is not slowed when charging through difficult terrain, it is not slowed by charging through dangerous terrain either, but it must still take a Dangerous Terrain test.
Charging Units That Have Gone to Ground
and the unit charging through difficult terrain fights at its normal Initiative.
If the initial charger is found to be further than its
charge range from the enemy, the charge fails and no models are moved.
Once all models in a charging unit have moved, the player can choose another unit and declare another charge if he wishes.
Ending The Charge Sub-phase
Once you have launched all of the charges you wish to, the
Charge sub-phase is ended. Move on to the
Fight sub-phase.
If a unit has one or more models in base contact with an enemy model (for any reason), then it is locked in combat. Units that are locked in close combat must fight in the
Assault phase. Units are no longer locked in combat if, at end of any phase, they no longer have any models in base contact with an enemy model.
Units that are locked in combat cannot move in the Movement phase, Run or shoot in the Shooting phase, and cannot fire Overwatch if charged. Similarly,
models cannot shoot at units locked in close combat – while some commanders may wish their warriors to fire indiscriminately into the middle of close combats in the hopes of hitting the enemy, this is not permitted. The events in a close combat move too quickly and the warriors themselves will be understandably hesitant about firing on their comrades. While
blast markers and
templates cannot be deliberately placed such that they cover any models locked in combat, they may end up there after
scattering and will then cause hits on any units they touch (friends and foes!) as normal.
Units that are locked in close combat do not take Morale checks or Pinning tests caused by shooting attacks and cannot go to ground; they are much too focused on fighting to be worried about being shot at!
With all the assaults launched, it’s time to strike blows! How effective creatures are in close combat depends almost entirely on their physical characteristics – how fast, strong, tough and ferocious they are. In close combat, armour remains useful for warding off your enemies’ attacks, but ranged weapons become a secondary consideration – the best gun in the galaxy won’t save you if your opponent is bashing your brains out with a rock!
There may be several separate assaults being fought at the same time in different parts of the battlefield. If this is the case,
the player whose turn it is chooses the order to resolve the combats, completing each combat before moving on to the next one, and so on until all combats are resolved.
In close combat, both players’ models fight. Attacks in close combat work like shots in shooting – each attack that hits has a chance to wound. The wounded model gets a chance to save, and if it fails, is (generally) removed as a casualty. How many blows are struck and who strikes first is detailed later.
In close combat, slow, lumbering opponents can often be dispatched quickly by faster and more agile foes. However, many ponderous opponents are tough enough to withstand a vicious pummelling and keep coming back for more. To represent this, a model’s Initiative determines when he attacks in close combat.
Work your way through the Initiative values of the models in the combat, starting with the highest and ending with the lowest. This means that each combat will have ten Initiative steps, starting at Initiative 10 and working down to Initiative 1. You’ll rarely have models fighting at all of the Initiative steps, so just skip any that don’t apply.
Models make their attacks when their Initiative step is reached, assuming they haven’t already been killed by a model with a higher Initiative! If both sides have models with the same Initiative, their attacks are made simultaneously. Note that certain situations, abilities and weapons can modify a model’s Initiative.
For example, Space Marine Tactical Squad Adrax consists of Sergeant Adrax and 4 Space Marines (Initiative 4). Sergeant Adrax has a power fist (the Unwieldy special rule of which causes him to attack at Initiative step 1). Squad Adrax charges Gnashrag’s Choppas, a mob of 10 Orks (Initiative 2). The Space Marines strike first at Initiative step 4, followed by the Orks at Initiative step 2, then Sergeant Adrax strikes with his power fist last at Initiative step 1.
Start of Initiative Step Pile In
At the start of each
Initiative step, any model whose Initiative is equal to the value of the current Initiative step, that isn’t already in base contact with an enemy model, must make a Pile In move.
Models that
charged through difficult terrain Pile In at Initiative step 1. In addition, models that are using a weapon which modifies the Initiative step in which they fight will Pile In at the modified Initiative step. If a model can attack in several Initiative steps, it only Piles In at the highest of these steps.
A Pile In move is a 3" move that is performed in the following order:
- First, any models Pile In if this will bring them into base contact with an enemy locked in this combat.
- Second, any models Pile In if this will bring them to within 2" horizontally or 6" vertically of a friendly model that is in base contact with an enemy locked in this combat.
- Any remaining models that are not in base contact with one or more enemy models and have yet to Pile In must now do so, and must attempt to get as close as possible to one or more of the enemy units locked in this combat.
Pile In moves follow the same rules as
charge moves, except that they are not slowed by difficult terrain (though
Dangerous Terrain will still trigger
Dangerous Terrain tests). In addition, a Pile In move cannot be used to move into base contact with any units that are not already involved in the close combat.
When making Pile In moves, the player whose turn it is moves his unit(s) first. If both players’ Pile In moves combined would be insufficient to bring any combatants back together (that’s more than 6" – very unlikely!), the assault comes to an end. All remaining Initiative steps are lost – work out the assault result as described below.
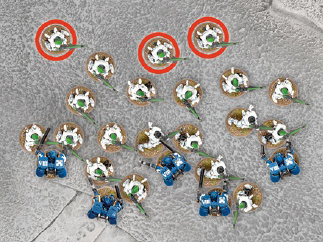
| Who Can Fight? |
| All of the Guardians in base contact with a Space Marine, as well as the ones within 2" of a Guardian that is in base contact with a Space Marine, are engaged and can therefore attack. The remaining Guardians (circled in red) cannot attack, although they are locked in combat. |
After models have Piled In, any model whose Initiative is equal to the value of the current
Initiative step and who is engaged with an enemy model must fight.
A model is
engaged in combat if:
- It is in base contact with one or more enemy models.
- It is within 2" horizontally and/or 6" vertically of a friendly model in base contact with one or more enemy models in the same combat.
Unengaged models cannot attack in close combat – they’re too far from the crush of battle.
Each engaged model makes a number of attacks (A) as indicated on its characteristics profile, plus the following bonus attacks:- +1 Charge Bonus: Engaged models that charged this turn get +1 Attack this turn. Models in units that made a disordered charge do not get this bonus.
- +1 Two Weapons: Engaged models with two single-handed weapons (often a Melee weapon and/or pistol in each hand) get +1 Attack. Models with more than two weapons gain no additional benefit; you only get one extra Attack, even if you have four arms and a sword in each.
- Other Bonuses: Models may have other special rules and wargear that confer extra Attacks.
For example, a unit of five Orks with two Melee weapons rolls fifteen dice (2 Attacks on their profile +1 for two weapons = 3 each). If they were charging, however, they would roll twenty (2 Attacks on their profile +1 for charging +1 for two weapons = 4 each!).
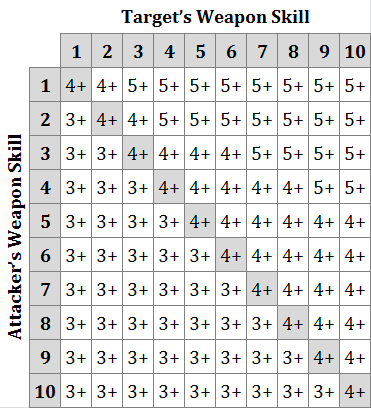
To determine whether hits are scored, roll a D6 for each Attack a model gets to make and compare the WS of the attacking model to the WS of the target unit. Then, consult the To Hit chart opposite to find the minimum result needed on a D6 To Hit.It is worth explaining the mechanic behind the chart: if the target’s WS is lower than the attacker’s, he is hit on 3+; if the target’s WS is equal or up to twice as high as the attacker’s, he is hit on 4+; and if it is more than twice as high, he is hit on 5+.
Where the same roll To Hit is needed, the dice should be rolled together (use different coloured dice for Attacks with different Strengths, AP etc.), as this speeds up the game. In the previous example, the Ork player therefore rolls all twenty dice at once.
Units With Multiple Weapon Skills
A few units contain models with different Weapon Skills.
Whilst each model in such a unit rolls To Hit using its own Weapon Skill, Attacks made against such a unit are resolved using the Weapon Skill of the majority of the engaged enemy models. If two or more Weapon Skill values are tied for majority, use the highest of those tied values.
For example, a mob of 20 Gretchin (Weapon Skill 2) led by an Ork Runtherd (Weapon Skill 4) are engaged in a combat. Since the Gretchin are in the majority, close combat attacks against the unit are resolved using their Weapon Skill of 2 – the Runtherd can’t do much to prevent the Gretchin getting hit. However, when the Gretchin and Runtherd attack their enemies, the Gretchin will hit based on a comparison of their Weapon Skill 2 and the enemy’s Weapon Skill, while the Runtherd will compare his Weapon Skill 4 with the enemy’s Weapon Skill – he’s got a better chance of hitting the enemy than a measly grot!
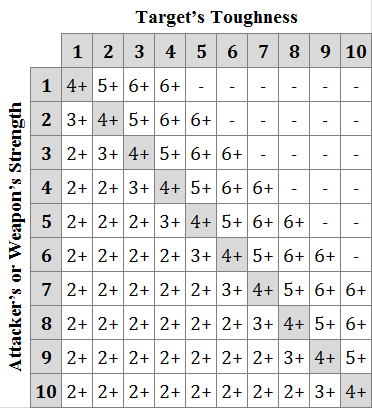
Not all of the Attacks that hit will harm the enemy – they may merely graze or inflict a flesh wound. As with shooting, once you have scored a hit with an Attack, you must roll a D6 for each successful hit to see if you cause a Wound and damage your foe.
Consult the chart above, cross-referencing the attacker’s Strength characteristic with the defender’s Toughness. The chart indicates the minimum result on a D6 roll required to inflict a Wound, and is just like the one in the
Shooting phase section. A ‘-’ indicates that the target cannot be Wounded by the Attack. In most cases, when rolling To Wound in close combat, you use the Strength on the attacker’s profile regardless of what weapon he is using. However, there are some
Melee weapons that give the attacker a Strength bonus, and this is explained later in the
Weapons section.
For example, in a unit containing Gretchin and an Ork Runtherd, the Gretchin’s Attacks are made with their puny Strength of 2, but the Runtherd’s Attacks use his Strength of 3.
Multiple Toughness Values
Quite rarely, a unit will contain models that have different Toughness characteristics. When this occurs,
roll To Wound using the Toughness value of the majority of the engaged foe. If two or more Toughness values are tied for majority, use the highest of those tied values.
For example, the Court of Krusabael the Black, a Dark Eldar Archon (Toughness 3), consists not only of Krusabael, but three Sslyth (Toughness 5) and two Ur-Ghuls (Toughness 3). You would therefore roll To Wound against Toughness 5. If the unit was joined by a Haemonculus (Toughness 4), you’d still use the Sslyths’ Toughness 5.
Finally, total up the number of Wounds you have caused during that
Initiative step. Keep the dice that have scored Wounds and create a ‘pool’, where each dice represents a Wound.
If there are Wounds with different Strengths, AP values or special rules that affect saving throws or the effect of any Wounds they inflict, split them into several pools of Wounds. All Wounds with exactly the same Strength, AP value and special rules must go into the same pool. If all the Wounds are the same, there will be only one Wound pool.
Allocating Wounds & Remove Casualties
| Allocating Wounds |
| The four Assault Marines’ Attacks cause 9 Wounds. Wounds must first be allocated amongst the Orks in base contact with the Assault Marines (red). Once all of the Orks in base contact have been removed as casualties, the remaining Wounds are allocated to the Orks closest to the Assault Marines (orange). |
To determine how many casualties are caused at a particular
Initiative step, you will need to allocate the Wounds caused and resolve any
saving throws the target is allowed. If several pools of Wounds need to be allocated, the player making the Attacks must decide in which order they are allocated.
All Wounds from a single pool must be allocated before moving on to the next pool of Wounds.Wounds are allocated and resolved starting with the closest model, just like in the Shooting phase. However, as you’ll often have many models in base contact with the enemy, there will be many models tied for the privilege of dying first.
To resolve casualty removal, allocate each Wound as follows:
- A Wound must be allocated to an enemy model in base contact with a model attacking at that Initiative step. If there is more than one eligible candidate, the player controlling the models being attacked chooses which model it is allocated to. Roll the model’s saving throw (if it has one) and remove the casualty (if necessary).
- If there are no enemy models in base contact with a model attacking at that Initiative step, the Wound is allocated to the next closest enemy model locked in that combat. If two or more models are equidistant from the attack, the player controlling the models being attacked chooses which model is closest. Take any save and remove the casualty (if necessary).
In either case, once a model has a Wound allocated to it during an Initiative step, you must continue to allocate Wounds to it until it is either removed as a casualty or the
Wound pool is empty. Note that
all of the models in the target unit may be hit, wounded and removed as casualties during an Initiative step, including those that are not engaged. You can speed this process up by allocating Wounds in groups (see
Fast Dice).
Models do not get
cover saves against any Wounds suffered from close combat attacks, and for obvious reasons, cannot
Go to Ground – there is nowhere to hide!
Models can take
armour saves to prevent Wounds caused in close combat – provided that their armour is good enough, of course! As in the
Shooting phase, if the Wound is caused by a weapon with an AP that ignores the wounded model’s Armour Save, then the save cannot be taken.
An
invulnerable save can be made, if it is the best save available. It can even be made if a model is not permitted to take an
armour save (because the AP of the attack negates it or the rules for a weapon or Attack state that no armour save is allowed).
If a model is removed as a casualty before its Initiative step, it cannot strike back. When striking blows simultaneously, it may be convenient to resolve one side’s attacks and simply turn the dead models around to remind you that they have yet to attack back.
Fight Next Initiative Step
Fight the next
Initiative step as previously described until all the Initiative steps have been completed (remember to skip Initiative steps which have no models in them).
Determine Assault Results
Assaults are usually decisive; one side or the other quickly gains the upper hand and forces their foe back. Good Leadership can keep a side in the fight, but the casualties that each side inflicts are usually the most telling factor.
To decide who has won the combat, total up the number of unsaved Wounds inflicted by each side onto their opponents. This includes all Wounds caused during the
Fight sub-phase, whether from normal Attacks, the
Hammer of Wrath special rule, or other factors. Do not include Wounds caused in the
Charge sub-phase, such as those from
Overwatch, failed
dangerous terrain tests, etc.
The side that caused the most Wounds is the winner. The losing unit must make a Morale check and Falls Back if it fails. If both sides suffer the same number of Wounds, the combat is drawn and continues next turn. Of course, if one side destroys the enemy completely, it wins automatically, even if it sustained more casualties!
Wounds that have been negated by
saving throws or special rules do not count towards determining who won the combat. Neither do Wounds in excess of a model’s Wounds characteristic;
only the Wounds actually suffered by enemy models count (including all of the Wounds lost by models that have suffered
Instant Death). In rare cases, certain models can cause Wounds on themselves or their friends – these Wounds are added to the other side’s total for working out who has won.
Units that lose a close combat must make a Morale check to hold their ground, with a penalty depending on how severe the defeat was.
- If they pass, the unit fights on – the combat is effectively drawn and no further account is made of the unit’s defeat.
- If the unit fails, they abandon the fight and Fall Back. Morale checks and Falling Back are covered in the Morale section.
If a unit is
locked in combat with an enemy it cannot hurt, it can choose to automatically fail its
Morale check for losing a combat. This can be a risky tactic, but sometimes worthwhile.
When a unit
Falls Back from combat, the victors make a Sweeping Advance, attempting to cut down their fleeing foes.
When a Sweeping Advance is performed, both the unit Falling Back and the winning unit roll a D6 and add their unmodified Initiative to the result.
In a unit with mixed Initiative characteristics, use the highest – we can assume the quicker-witted individuals in the unit guide the others.
The units then compare their totals.
- If the winner’s total (Initiative + dice roll) is equal to or greater than the foe’s, the Falling Back unit is caught by the Sweeping Advance and destroyed. We assume that the already demoralised foe is comprehensively scattered, ripped apart or otherwise sent packing so demoralised that they won’t return; its members are left either dead, wounded and captured, or at best, fleeing and hiding. The destroyed unit is immediately removed as casualties. Unless otherwise specified, no save or other special rule can rescue the unit at this stage; for them the battle is over.
- If the Falling Back unit’s total is higher, they break off from the combat successfully. Make a Fall Back move for the losing unit. The winners can then consolidate as detailed below.
Disallowed Sweeping Advances
If a victorious unit is still
locked in combat with other units that are not
Falling Back, it does not get a chance to execute a
Sweeping Advance and the retreating enemy automatically makes their Fall Back move safely.
Some units, as detailed in their special rules, are not permitted to make Sweeping Advances – when a victorious unit contains one or more models that are not allowed to make a Sweeping Advance, the enemy always manages to disengage safely – there is no need to roll.
After the combat has been resolved, it can happen that some models from units that did not
Fall Back are not in base contact with an enemy. These models must make a
Pile In move, starting with the side whose turn it is.
At the end of a combat, if a unit’s opponents are all either destroyed or
Falling Back, or the
end of combat Pile In was insufficient so that it is no longer
locked in combat, that unit may Consolidate.
Consolidating units move up to D6" in any direction as the sudden victory may leave the warriors raring to storm onwards or flat-footed and dumbfounded, according to the vagaries of fate.
Units making a Consolidation move are not slowed by difficult terrain but do trigger Dangerous Terrain tests where appropriate. A Consolidation move cannot be used to move into base contact with any enemy models.
Consolidating models must stop at least 1" away from all enemy models, including any that have just
Fallen Back from the combat that the Consolidating unit has fought in.
| Multiple Combats |
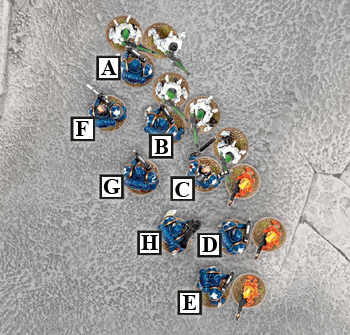
| The Space Marines have charged the Guardians and the Fire Dragons. Space Marine C can attack either of the two units he is in base contact with (or split his attacks). Space Marines G and H can also choose to fight either enemy unit (or split their attacks) because they are both within 2" of a friendly model that is in base contact with both units. Space Marines A, B, D and E can only attack the unit they are in base contact with. Space Marine F can only attack the Guardians (as he is only within 2" of friendly models in base contact with the Guardians). |
Combats that involve more than two units are called multiple combats (see the diagram opposite for an example). These occur when one unit charges two or more enemy units, or when a unit charges into an ongoing combat. Because of the extra complexity, they need some additional rules.
Sometimes, you’ll find it advantageous to have one of your units charge two or more enemy units – this works as follows.
We break a multiple charge declaration into two different categories: the primary target, and secondary targets.
Primary and Secondary Targets
The primary target is the charging unit’s main target. If the charging unit shot in the
Shooting phase, it can only declare a charge if its primary target is the unit it targeted.
Secondary targets are other targets of opportunity that you think the charging unit can engage at the same time as the primary assault. Remember that a unit cannot declare a charge against a unit it cannot reach or cannot see, and all targets being charged by the unit must be declared at the same time.
If a unit declares that it is charging multiple units, its charge is disordered.
A unit making a disordered charge does not gain the +1 Charge Bonus to its number of Attacks usually gained from a charge, even if after its charge move it has no models in base contact with the secondary target.
Resolve Multiple Overwatch
If a unit declares a charge against two or more target units, all of the target units can fire
Overwatch! Resolve each unit’s Overwatch shots separately in an order determined by the firing units’
controlling player. Remember that a unit can only fire Overwatch once per turn – this doesn’t give them a chance to make an extra Overwatch attack!
Difficult Terrain and Ongoing Combats
In this case the enemy warriors are not set to receive the charge, and the unit charging through difficult terrain fights at its normal Initiative.
Resolving the Fight sub-phase of a multiple combat is done just as it is for a combat between two units except for the following clarifications and adjustments.
In multiple combats, during a model’s
Initiative step, the following extra rules apply:
- A model that is in base contact with, or engaged with, just one enemy unit when it comes to strike must attack that unit.
- A model that is in base contact with, or engaged with, more than one enemy unit when it strikes blows, can split its Attacks freely between those units. Declare how each model is splitting its attacks immediately before rolling To Hit. Wounds from Attacks that have been directed against a unit in a multiple combat cannot be transferred to another unit, even if the original target unit is completely destroyed (in this case, any excess Wounds are simply discounted and have no further effect).
When
determining assault results in a multiple combat, total up the number of Wounds inflicted by all units on each side to see which side is the winner. Every unit on the losing side has to check their Morale (they all use the same penalty).
After all of the losing units have taken their
Morale checks, each winning unit that is now free to make a
Sweeping Advance rolls the dice and compares its total with the total of each of the
Falling Back enemy units it was engaged with. Any that it equals or beats are destroyed. Remember that winning units can only make a Sweeping Advance if all of the units they were
locked in combat with Fall Back or are wiped out in the fight.
After determining assault results, all remaining units – those that fought in the multiple combat but aren’t Falling Back or making a Sweeping Advance – must make
Pile In moves towards each other. If none of a unit’s models are in base contact with any enemy models, and the combined Pile In moves would be insufficient to bring them into base contact with a unit that is locked in that close combat, it
Consolidates instead.
FAQ
Assault Phase
| Q: | Can you charge an enemy unit if friendly models from other units make it impossible for the chargers to get into base contact with the enemy? |
| A: | No. |
| Q: | What constitutes an attacker and target in regard to the To Hit chart? |
| A: | The model you are making the To Hit roll for is the attacker. |
| Q: | An enemy unit is engaged in combat with one of your units. You want to charge an enemy unit with another of your units, but they’re behind the one already locked in combat. Do they have to move around in order to get into base contact? |
| A: | Yes. |
| Q: | How do you allocate wounds in close combat, where it can be difficult to tell which model is closest? Is it possible to specifically allocate wounds to an enemy character not in a challenge, and would they get ‘Look Out, Sir’ tests? |
| A: | You must determine which models are the closest before allocating wounds – if it is impossible to tell, they are considered equally close, and the player controlling the models being attacked decides. This means that only the player controlling a character could choose to allocate wounds to them. If they did so, the ‘ Look Out, Sir’ rules would apply. |
| Q: | One of your units is about to charge. As per the rules, you would measure the distance of the closest models in both squads, say 7", and there is nothing in the way of moving the first model into base contact, but a different model must move through a forest. Do you need to roll a 9, or is it still a 7? |
| A: | |
Overwatch
| Q: | How many shooting attacks can I do when firing Overwatch? |
| A: | |
| Q: | How many shots do Salvo weapons get when firing Snap Shots in Overwatch, if the unit moved in their previous player turn? |
| A: | When determining if the unit moved for the purposes of firing Salvo weapons, only the previous Movement phase is considered. In the case of firing Overwatch, this will have been your opponent’s Movement phase, and therefore the unit firing Overwatch is very unlikely to have moved. As a consequence, it counts as having not moved, and can fire the higher number of shots with its weapons that have the Salvo type. |
| Q: | How does Overwatch work when a unit is assaulted by multiple enemy units in the same turn? Can the assaulted unit choose against which one it fires or does it have to fire against the first unit to declare a charge? |
| A: | You can choose not to fire Overwatch against units that declare a charge against your unit, but you must do so as each charge is declared – you can’t wait until all charges are declared before deciding which unit(s) to fire Overwatch against. Obviously, if you’re successfully charged by one of your opponent’s units, you can’t fire Overwatch against subsequent chargers as you’re locked in combat. |