Sanctus Reach: Hour of the Wolf (Chaos Missions)You will notice that Mission 8, the Battle for Scrap Peak, is not the final mission presented in Sanctus Reach: Hour of the Wolf campaign. We have included two additional missions – The Hour of Khorne, and A Saga Written in Blood – that follow the Battle for Scrap Peak. These missions enable you to reenact the two desperate battles fought first by the surviving Orks and then by the Imperial forces against the horde of Chaos Daemons that burst forth from the Warp. However, the Hour of the Wolf campaign (and indeed the saga of the Ork invasion of Sanctus Reach) effectively culminates in the Battle of Scrap Peak.№9
ECHOES OF WAR
:
The Hour of KhorneAs fortunes turn against him in the Battle for Scrap Peak, Mogrok once more reverts to his kunnin’ ways in a bid to rescue the situation. A battery of rare and incredibly volatile vortex missiles lie within a concealed silo beneath the caldera’s surface, and a team of Mekboyz have been hard at work kustomizin’ them for their own purposes. Ignoring the pleas of his underlings, Mogrok orders the launch of the incomplete missiles.
The vortex missiles misfire spectacularly, the unfathomable technologies in their warheads tearing the veil asunder and forming a conduit between reality and the Warp. Within moments, as if they already knew such a cataclysmic event would occur, a host of Daemons storms through the breach to assail the dumbstruck Ork host. Invigorated by crimson rains that pour from the sky, the legions of Khorne lead the charge. Within heartbeats, the Daemons and Orks are battling in a bloodbath of epic proportions. Meanwhile, Logan Grimnar orders his forces to make a tactical withdrawal, leaving their mutual enemies to slaughter one another in earnest. 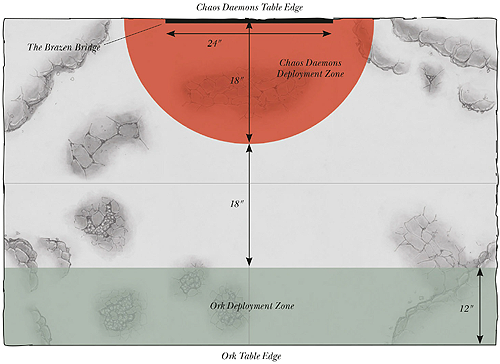 Choose armies as described in Warhammer 40,000: The Rules. The Ork player’s army may only include units with the Orks Faction and fortifications, and must include at least one unit of Meganobz. The Chaos Daemons player’s army may only include units with the Chaos Daemons Faction and fortifications, and must include at least two units with the Daemon of Khorne special rule. THE BATTLEFIELD Use the deployment map included in this mission. Set up terrain as described in Warhammer 40,000: The Rules. DEPLOYMENT Before any models are deployed, the both players should roll to determine their Warlord Traits. First, the Ork player deploys his units anywhere within his deployment zone (see map). Then the Chaos Daemons player deploys his units anywhere within his deployment zone (see map).
The Chaos Daemons player has the first turn unless the Ork player can Seize the Initiative. GAME LENGTH This mission uses Variable Game Length. VICTORY CONDITIONS If, at the end of any game turn, the Ork player has no models on the battlefield, the Chaos Daemons player wins. If the game ends before this condition has been met, the Ork player wins instead. Reserves. №10
ECHOES OF WAR
:
A Saga Written in BloodKhorne’s vengeance has come for Logan Grimnar. In masterminding the defeat of Angron’s World Eaters during the First War for Armageddon centuries earlier, the Great Wolf earned the eternal enmity of Khorne. Now the Blood God has sent forth his chosen harbinger – the Eater of Skulls – to exact bloody retribution from the High King of Fenris. Yet Logan Grimnar does not stand alone. The stage is set for a titanic confrontation as two of the Space Wolves’ mightiest heroes face off against the terrible manifestation of Khorne’s wrath…
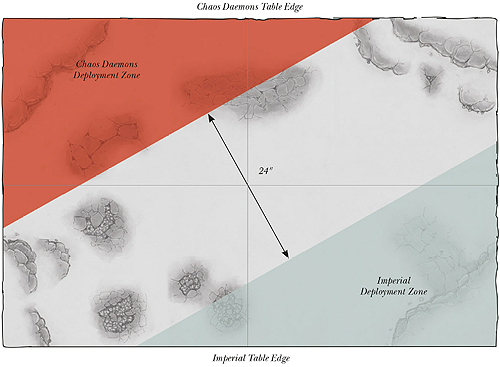 Choose armies as described in Warhammer 40,000: The Rules. The Chaos Daemons player’s army may only include units with the Chaos Daemons Faction and fortifications. The Imperial player’s army may only include units with the Astra Militarum, Imperial Knights, Militarum Tempestus and Space Wolves Factions and fortifications. Furthermore, both players receive a number of free units in addition to those included in their army lists (neither player pays any points for these units):
THE BATTLEFIELD Use the deployment map included in this mission. Set up terrain as described in Warhammer 40,000: The Rules. DEPLOYMENT The Chaos Daemons player need not roll for his Warlord Trait – the Eater of Skulls has the Immortal Commander Warlord Trait. First, the Chaos Daemons player deploys his units anywhere within his deployment zone (see map). Then the Imperial player deploys his units anywhere within his deployment zone (see map).
The Imperial player has the first turn unless the Chaos Daemons player can Seize the Initiative. GAME LENGTH This mission uses Variable Game Length. VICTORY CONDITIONS At the end of any game turn in which the Eater of Skulls’ Bloodthirster form (see Mission Special Rules) has been slain, the Imperial player wins automatically. If the game ends before this condition has been met, the player who has scored the most Victory Points wins the game. If players have the same number of Victory Points, the game is a draw. Primary Objectives At the end of the game, each player receives 1 Victory Point for each enemy unit that has been completely destroyed. Units that are Falling Back at the end of the game, and units that are not on the board at the end of the game count as destroyed for the purposes of this mission. Remember that Independent Characters and Dedicated Transports are individual units and award Victory Points if they are destroyed. Furthermore, additional Victory Points are awarded as follows for achieving the following objectives:
Secondary Objectives First Blood, Linebreaker. Reserves. |
Factions > Chaos Daemons >

