Sometimes warriors and war machines are not sufficient to hold a vital patch of battlefield, for both are easily swept away by a concentrated assault. With this in mind, many commanders anchor their battle lines with impregnable fortresses, lines of barricades and armoured bunkers. All fortifications and fortification networks have a datasheet that has all the information you’ll need to use them in your games. Each datasheet uses up a single fortification slot on the Force Organisation chart.The following section introduces new rules that are required to use the fortifications found within this book in your games of Warhammer 40,000. This section introduces two new types of fortification which feature among the datasheets in this book: Massive Fortifications and Fortification Networks. When you deploy fortifications on the battlefield, fortifications chosen as part of a Fortification Network can be placed in contact with each other. Furthermore, if one of the fortifications in the network has an instruction saying that ‘each section must be placed in contact with at least one other section’, that section satisfies the instruction if it is placed in contact with any section or building from the same Fortification Network. For example, in a Wall of Martyrs Defence Network, Defence Lines and Emplacements can be placed in contact with each other in any order, as well as in contact with Imperial Bunkers, Firestorm Redoubts etc. Terrain datasheets contain the following information:
Many players enjoy making their own terrain features from scratch (thus the term ‘scratch-built terrain’), and it’s also possible to improvise a perfectly usable set of terrain using everyday objects at hand. Players that do so will need to devise their own datasheets for the terrain models they have created. Don’t worry, this is very easy if you use the rules and datasheets presented here as examples of how to do so. For example, if you chose to use both the Basilica Administratum and Sanctum Imperialis models to make a single large ruin mounted on a scenic base, you and your opponent could agree that this piece of scratch-built terrain would use the rules for ruins and have both The Eternal Progress to Victory and the Benevolent Light special rules. Though it is a battle-torn relic of a more glorious age, the Shrine of the Aquila still bears the signature relief that gives the sacred building its name. Gazing impassively upon the tempest of battle is a stylised eagle, its metallic form cast from the molten remains of space-faring vessels that once defended humanity. Far more than mere statuary, the sacred symbol serves as an inspiration for those nearby. Those Imperial troops that fight under the Aquila’s ceaseless vigil find a new determination welling in their hearts, knowing that they are the last in a line of heroes that stretches across the stars. Conversely heretics, iconoclasts and foul xenos alike fight all the harder to spill the blood of the faithful in its shadow.
Terrain type: Ruins Access Points & Fire Points: None. Weapons: None. Options: None. The Eagle’s Gaze: If a unit from the Armies of the Imperium has any of its models within a Shrine of the Aquila, it re-rolls failed Morale checks. Any other model that is in a Shrine of the Aquila has the Hatred (Armies of the Imperium) special rule.
The Manufactorums that stud the industrial zones of the Imperium are forbidding but functional buildings. They are so rugged in construction that even in the most war-torn district the shells of these once-thriving factories stand tall. The spirit of industry lingers within them still, and benediction lies close at hand for the Machine God’s blessed flock. When hopeful souls seek the grace of the Omnissiah near a Manufactorum’s walls, they find its embedded cog-skulls clicking and chattering a stream of sacred code that soothes troubled machine spirits and complements battlefield rituals of reconstruction. Some believe that merely to fight within the bounds of a Manufactorum is to protect one’s wargear against malfunction and mischance.
Terrain type: Ruins Access Points & Fire Points: None. Weapons: None. Options: None. The Omnissiah’s Benediction: Models in a Manufactorum that are firing weapons with the Gets Hot special rule re-roll failed saving throws for Wounds inflicted upon themselves as a result of the Gets Hot special rule.
The Basilica Administratum is the cornerstone upon which the military might of the Imperium is built. Though the Adepts and autosavants that toil night and day within its alcoves are not heroes in the conventional sense, with a stroke of their quills they can send a battlefleet to new stars or doom a planet to a slow death. Without their ceaseless focus even the Adeptus Astartes would falter and the enemies of the Imperium thrive. It is the wish of many such a functionary that when fate finally takes him his skull will be interred in the Basilica’s walls. There, his spirit can continue his thankless task into eternity, guiding the Emperor’s armies in death as he did in life and ensuring no unwelcome surprises can mar their progress to victory.
Terrain type: Ruins Access Points & Fire Points: None. Weapons: None. Options: None. The Eternal Progress to Victory: A unit that identifies a Mysterious Objective that is in a Basilica Administratum can choose to re-roll the dice to determine what it is.
Though the Sanctum Imperialis appears as dark and gothic in construction as any of the Imperium’s hallowed buildings, it is in truth a beacon to the devout. Statues of saints adorn it in great number, and the holy eagle of the God-Emperor himself guards its walls and portals, against evil spirits and sorceries. In the tumult of battle, the spiritual light radiated by such a building becomes more literal. When the citizens of the Imperium need it most, a ghostly nimbus emanates not only from the autolumins at its gate, but also from the stone lanterns and censers borne by the figures in its walls. It is said that this is the light of the Emperor himself, and that it can drive away both physical and spiritual darkness.
Terrain type: Ruins Access Points & Fire Points: None. Weapons: None. Options: None. Benevolent Light: Models in a Sanctum Imperialis have the Adamantium Will and Night Vision special rules.
The Imperium is ravaged by war from end to end. To some it is little more than an impossibly vast cadaver-to-be, a galactic body cratered by the bite of artillery shells and choked by the soot of burning cities. Not one of its million worlds has escaped the vagaries of battle, and it is a common fate for once fertile agri-worlds and prosperous civilised planets to be reduced to barren ruin. The smoking hulls of tanks and the trunks of blasted trees dot these wastelands, arid deserts whose wind-cast dunes are formed as much from human bone as they are from tortured earth. Though a desperate soldier may consider the shelter afforded by such sites to be a great boon, to a saner man, they are symbolic of the morbid fate that Mankind has embraced so fully.
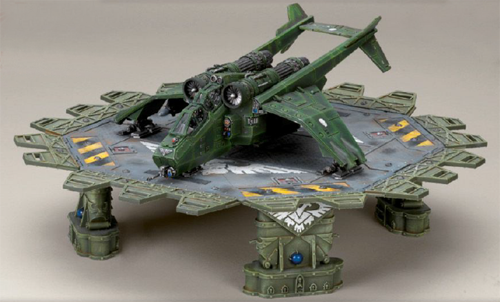
Terrain type: Dangerous terrain Access Points & Fire Points: None. Weapons: None. Options: None. Desperate Shelter: Models on the base of a battlescape model receive a 5+ cover save, regardless of whether or not they are 25% obscured. Every new dawn the skies of the Imperium are slashed by the contrails of fighter jets and bruised by the blossoming clouds of flak sent to slay them. When the foe has aerial supremacy, even the lightest craft can deliver sudden death and then disappear before its victims have a chance to retaliate. Because of this the armies of the 41st Millennium field anti-aircraft guns capable of destroying everything from a transport shuttle carrying precious supplies to armoured gunships modified with ancient and irreplaceable archeotech systems. The battleground stretching before such air-defences is often littered with the remains of those who thought their speed and altitude made them untouchable, only to be proved fatally wrong.
Terrain type: Difficult terrain (Mysterious) Access Points & Fire Points: None. Weapons: None. Options: None. Mysterious Wreckage: The first time a unit enters or deploys in base contact with a Crashed Imperial Aquila Lander roll a D6 and consult the following table:
The realm of the Emperor is a toxic place indeed. If some omniscient power were to perceive the Imperium as a whole, it might reach the conclusion that both Mankind and its enemies are hell-bent on eradicating all life forms beyond their own. Yet somehow nature clings on still. Though most of its mighty jungles and forests have been reduced to scattered tangles of trees and patches of scorched undergrowth by the deathly forces unleashed upon them, few have succumbed entirely. Be they decimated to feed the furnace of battle, discoloured by pollution, or host to parasitic organisms that gnaw them hollow, those copses and groves not yet shattered by the maniac grind of war still stand amongst endless acres of corpse-strewn mud.
Terrain type: Difficult terrain Access Points & Fire Points: None. Weapons: None. Options: None. Dense Thicket: Models on the base of a Citadel Wood model receive a 5+ cover save, regardless of whether or not they are 25% obscured. In a galactic empire as vast as the Imperium, the sheer variety of settled planets, colonised moons and tamed asteroid fields is bewildering. Not even the most talented geomystic can hope to learn of them all, for new worlds are settled even more frequently than they are purged by the scouring cataclysm of Exterminatus. One thing alone unites the Emperor’s domains – not the iron rule of the Imperium’s adepts, nor a willingness to further the destiny of Man as the true lords of the galaxy, but instead the scars of unbound violence. Even those worlds not cratered by astral detritus or scorched by celestial phenomena are disfigured by the relentless pounding of the Imperium’s guns and the heretical weapons of the traitor, the alien and the witch.
Terrain type: Battlefield debris (craters) Access Points & Fire Points: None. Weapons: None. Options: None. Foxholes: Models in Moonscape craters receive a 6+ cover save, regardless of whether or not they are 25% obscured. If a unit Goes to Ground, models from the unit gain +2 to their cover save if they are in Moonscape craters rather than +1. Aegis Defence Lines are barricades built from crenellated armoured sections that link together into a solid shield wall. Their simple design means that they can be built and deployed at great speed, lending them the nickname ‘instant fortresses’. Aegis Defence Lines are ideally suited for commanders wishing to hold ground in enemy territory or establish defensive perimeters until such a time when larger, more permanent fortifications can be constructed. In addition to providing cover for armed infantry units, an Aegis Defence Line can also add firepower of its own, with the capacity to include either an Icarus lascannon or a quad-gun in its construction. These weapons transform an otherwise passive but redoubtable fortification into a deadly obstacle that must be taken out of action before it can be cleared.
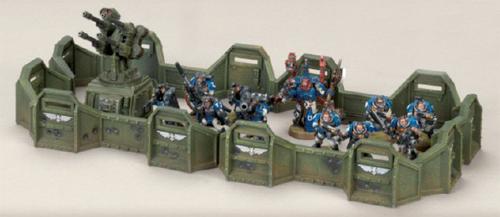 Terrain Type: Battlefield debris (defence line) A model in cover behind a defence line has a 4+ cover save. If a unit Goes to Ground, then models from the unit gain +2 to the cover save from the defence line rather than +1. Models that are in base contact with a defence line are treated as being in base contact with any enemy models who are directly opposite them and in base contact with the other side of that defence line. Units charging an enemy that is behind a defence line count as charging through difficult terrain. Options:
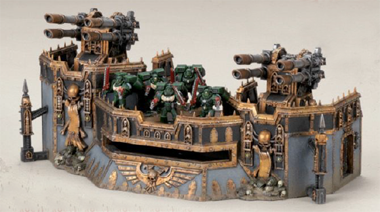
An Imperial Bastion is an imposing edifice built from foot-thick ferrocrete and the remains of faithful servants of the Imperium. As they are relatively easy to construct, some planets boast networks of Imperial Bastions that span entire continents. Built to withstand orbital strikes and artillery bombardments, there are few weapons capable of razing them in a single blow. It is with good reason that such fortresses often form the cornerstone of a planet’s defensive strategy. Bastions afford their defenders commanding fields of fire. A unit garrisoned within the protective walls can unleash murderous volleys with little fear of reprisal. Heavy bolters jut from every wall, spitting death at any foes that dare approach. Few who brave an Imperial Bastion’s guns ever reach its walls alive.
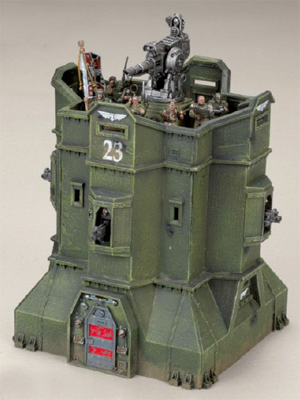 Terrain Type: Medium building (Armour Value 14 and 4 Hull Points) with battlements. Transport Capacity: An Imperial Bastion has a Transport Capacity of 20. Access Points & Fire Points: As per model. Weapons: Four emplaced heavy bolters. Options:
A single Imperial Bastion is an imposing monolith of reinforced ferrocrete and ceramite plating, an edifice built to withstand sustained artillery barrages and shrug off all but the most powerful of siege weapons. An Imperial Strongpoint consists of not just one, but several such fortifications protected by an outer perimeter of Aegis Defence Lines. The fortifications’ already formidable firepower is typically bolstered by an array of Icarus pattern weapons to guard against enemy air threats, as effective at knocking aircraft out of the skies as the bastions’ heavy bolters are at cutting down infantry on the ground. When fully manned, an Imperial Strongpoint and its garrison have enough firepower to stop an opposing army dead in its tracks and there is no foe that can overcome its defences with a frontal assault without suffering horrendous losses.
Composition: Fortification Network consisting of:
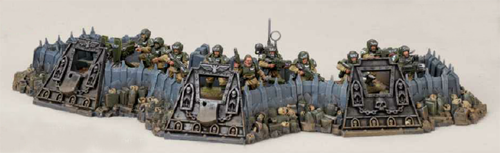
Across the length and breadth of the Imperium, Mankind must defend itself from the predations of aliens and heretics. The Wall of Martyrs Defence Line is very often the first line of defence, a proud bulwark that can be used to resist the onslaught of such foes. The bleached bones of long-dead warriors of the Imperium are literally built into the foundations of Wall of Martyrs Defence Lines, and the thrice-blessed blood of saintly heroes is often used by members of the Ecclesiarchy to sanctify their armoured shields. No wonder, then, that when the soldiers of the Imperium stand within these hallowed defence lines, their hearts are steeled against the worst horrors of the galaxy. So infused with righteousness, these troops stalwartly refuse to take a single step back whilst the Emperor’s enemies remain.
 Terrain Type: Battlefield debris (defence line). Options:
Stalwart Defence: Models have the Stubborn special rule whilst within a Wall of Martyrs Imperial Defence Line or Defence Emplacement section. Wall of Martyrs Imperial Defence Emplacements are constructed using the same hallowed materials as the Wall of Martyrs Defence Lines, but are built to accommodate infantry teams manning heavy weaponry in support of their battlefield comrades. Protected by the raised walls of the emplacement, those within are not easily daunted, and will stand against far more powerful foes without flinching or giving ground. With a large armoured firing port overlooking a wide angle of approach, no assailant can hope to charge a manned defence emplacement without being cut down by a hail of clattering autocannon and heavy bolter fire. Soon the ground in front of the emplacement is carpeted with the rent and bloody corpses of those foolhardy enough to approach too close.
 Terrain Type: Battlefield debris (defence line). Options:
Improved Arc of Fire: Any model within a Defence Emplacement section re-rolls failed To Hit rolls when resolving Overwatch if using a weapon with the Heavy type. Imperial Bunkers are built to protect troops as they defend strategic battlefield locations. These bulwarks can withstand an impressive amount of firepower, but they typically lack automated weapons systems of their own. As such, they must be garrisoned to provide effective defence, yet – as many enemy commanders have learned to their cost – a single fire team protected behind a bunker’s walls can reap a disproportionately heavy toll on approaching forces.
Many Imperial Bunkers are built as forward observation posts and are often equipped with extensive vox units and comms arrays. Typically constructed on sites with commanding views, the better to monitor the movement of enemy units, these bunkers are especially valued by frontline Imperial Guard officers who prefer to issue orders, direct artillery strikes and coordinate troop deployments from the relative safety of an armoured fortification.
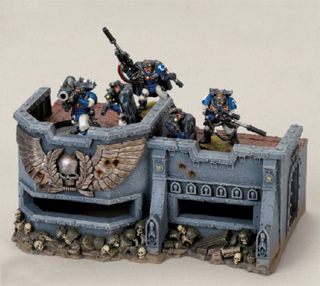 Terrain Type: Medium building (Armour Value 14 and 4 Hull Points) with battlements. Transport Capacity: A Wall of Martyrs Imperial Bunker has a Transport Capacity of 20. Access Points & Fire Points: As per model. Options:
Wide Fire Points: Up to four occupying models can fire out of each of this building’s fire points. Individual Firestorm Redoubts are primarily constructed to protect strategically important objectives from aerial attack and to provide a base for a garrison of troops. With its fully automated batteries of quad Icarus lascannons, objectives will be protected from sudden aerial bombardment until reinforcements arrive. The Firestorm Redoubt combines devastatingly effective armaments with a sturdy bunker complex. Whilst typically equipped to provide anti-aircraft support, some instead sport a range of heavy gatling guns and battle cannons to guard against more typical attacks. In either case, Firestorm Redoubts are usually constructed at regular intervals along Wall of Martyrs Imperial Defence Lines, providing an interlinking curtain of firepower that is next to impossible for enemy forces to get past.
 Terrain Type: Medium building (Armour Value 14 and 4 Hull Points) with battlements. Transport Capacity: A Wall of Martyrs Firestorm Redoubt has a Transport Capacity of 20. Access Points & Fire Points: As per model. Weapons: Two emplaced quad Icarus lascannons. Options:
Fully Automated: Emplaced weapons on a Firestorm Redoubt can only fire using the automated fire rule: models occupying a Firestorm Redoubt cannot use the manual fire rule to fire any of its emplaced weapons. Vengeance Weapon Batteries are heavily-armoured automated defence units. Each Vengeance Weapon Battery sports a powerful cannon in a rotating turret, which is controlled by a simple automated firing system. The thick plascrete walls of the battery make it invulnerable to all but the most powerful of weapons. Such is their durability that a Vengeance Weapon Battery will often remain operational long after any flesh and blood defenders have been killed or fled the battlefield. Vengeance Weapon Batteries are usually armed with either a battle cannon, capable of taking on heavily armoured targets, a punisher gatling cannon, capable of scything down entire units of infantry with a single volley, or a quad Icarus lascannon, punching aircraft out of the skies with every salvo.
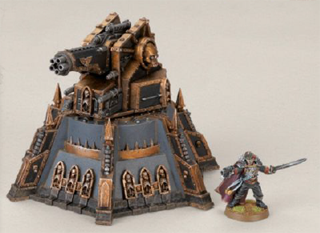 Terrain Type: Small Impassable Building (Armour Value 14 and 3 Hull Points). Weapons: One emplaced punisher gatling cannon. Options:
Sentry Defence System: A building with this special rule can use automated fire against enemy units, even if it is unoccupied. The weapons are emplaced and cannot be used as gun emplacements – another model may not fire them. In addition, enemy units can shoot at and charge a building with this special rule, even if it is unoccupied. A Wall of Martyrs Imperial Defence Network often forms the lynchpin of an army’s defensive strategy and is typically built to protect key battlefield objectives. Comprising several armoured fortifications and interconnected by arterial trenches, defence lines and weapon emplacements, it can take a fully equipped army several months of gruelling siege war to blast, bombard, dig and burn a truly determined opponent out from these defensive positions. At its heart will be a single fortification, typically an Imperial Bunker, which acts as a command post for the entire defensive network. Imperial generals can utilise the bunker to coordinate the deployment of reinforcements whilst simultaneously directing the firepower of heavy weapon emplacements to repulse the foe’s advance.
Composition: Fortification Network consisting of:
Macro-cannon Aquila Strongpoints are massive fortifications, often used as bastions in Imperial defensive battle lines. Each consists of a munitions silo topped with a large turret that houses the huge macro-cannon that gives the strongpoint its name. The munitions silo allows the Aquila macro-cannon to fire special quake shells, each of which measures several feet in length and has a powerful charge that causes it to reach hyper-sonic velocity when it is fired. Any skyborne machine caught in the path of this devastating weapon is brought crashing to the ground in short order, and flying xenos creatures are sent screeching from the skies as their flesh is torn apart by the sheer power of the sonic vibrations it emits.
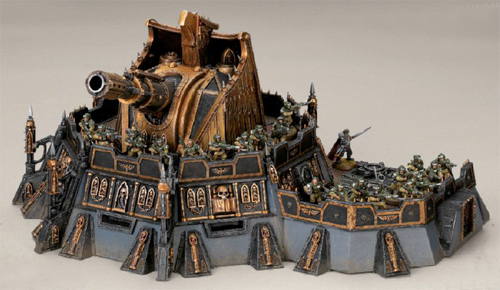 Terrain Type: Multiple part building. The main strongpoint is a large building (Armour Value 15 and 5 Hull Points). The bunker annex is a medium building (Armour Value 15 and 4 Hull Points). Both parts have the battlements. Transport Capacity: The main strongpoint has a Transport Capacity of 30. The bunker annex has a Transport Capacity of 20. Access Points & Fire Points: As per model. Weapons: The main strongpoint has one emplaced Aquila macro-cannon. Options:
Mighty Bulwark: When a building with this special rule suffers a penetrating hit, there is a -1 modifier to the roll on the Building Damage table. One of the most devastating and dreaded weapons in the Imperium’s vast armoury is the vortex missile. A Vortex Missile Strongpoint houses several of the fearsomely destructive warheads and is filled with complex targeting arrays to guide each vortex missile to its unfortunate target. When the missile strikes down, a large void is torn in the fabric of space-time, creating a swirling maelstrom that utterly destroys anything that lies within its radius of effect. A defence line or garrison fortified with one of these strongpoints is formidable indeed, and likely guarding a prize of immense value. Only the most audacious, ambitious or heartless general will order his troops to a battlefield where one of these has been constructed, for the cost in lives will surely be high.
 Terrain Type: Multiple part building. The main strongpoint is a large building (Armour Value 15 and 5 Hull Points). The bunker annex is a medium building (Armour Value 15 and 4 Hull Points). Both parts have battlements. Access Points & Fire Points: As per model. Transport Capacity: The main strongpoint has a Transport Capacity of 30. The bunker annex has a Transport Capacity of 20. Weapons: The main strongpoint has one emplaced vortex missile battery. Options:
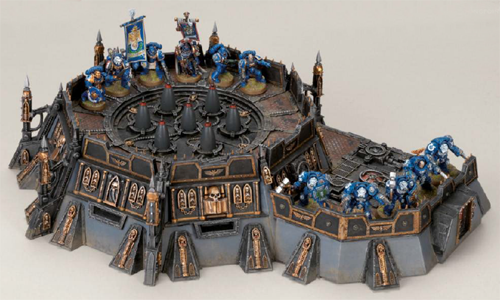
Mighty Bulwark: When a building with this special rule suffers a penetrating hit, there is a -1 modifier to the roll on the Building Damage table. A Fortress of Redemption is a towering bulwark against the ravages of planetary invasion. Each is virtually impervious to conventional firepower and the lower levels, bunker annexes and sub-crypts can house entire platoons of battle-ready warriors. First used by the Dark Angels Legion during the days of the Great Crusade, they have since been used by every military force in the Imperium and proven invaluable to its defence. The gothic grandeur of the unyielding edifice is matched only by its uncompromising and efficient lethality. Nestled within its armoured walls, a Fortress of Redemption houses an Icarus lascannon capable of destroying enemy ships in low orbit, a missile silo and a profusion of heavy bolters to repel groundbased invaders.
 Terrain Type: Multiple part building. The main tower is a medium building (Armour Value 14 and 4 Hull Points) with battlements. The bunker annexes are both small buildings (Armour Value 14 and 3 Hull Points) with battlements. The connecting walkway is a small building (Armour Value 14 and 3 Hull Points) with battlements. Transport Capacity: The main tower has a Transport Capacity of 20. Each bunker annex has a Transport Capacity of 10. The connecting walkway has a Transport Capacity of 20. Access Points & Fire Points: As per model. Weapons: One bunker annex has an emplaced missile silo with fragstorm missiles and the other bunker annex has an emplaced twin Icarus lascannon. Options:
Remote Fire: A Fortress of Redemption can be upgraded to have this special rule. If it is, any of the fortification’s emplaced weapons can be fired (using either automated or manual fire) by models occupying the main tower, even if the building housing the emplaced weapons itself is unoccupied. This rule cannot be used to fire emplaced weapons on any part of the fortification occupied by an enemy unit. Void shields are normally localised force fields reserved for protecting the monolithic Titans of the Adeptus Mechanicus, but static generators can be erected to serve as an aegis for other targets of vital import. The largest Void Shield Generators can even project an invisible bubble of power across a large area of the battlefield, sheltering both troops and strategically vital battlefield locations by absorbing or deflecting the energy of incoming munitions, whilst multiple layers of shielding often protect particularly valuable targets. An especially powerful attack can temporarily overload a void shield, but so long as the building housing the generator itself remains intact, it is rarely long before back-up systems restore power and the shield flares into life once more.
Terrain Type: Medium Impassable Building (Armour Value 13 and 4 Hull Points) with battlements. Options:
Projected Void Shields: A Void Shield Generator has a single projected void shield. It can be upgraded to include additional layers of void shielding. Each projected void shield has a 12" area of effect (measured from any point on the Void Shield Generator building) known as a Void Shield Zone. Any shooting attack that originates from outside a Void Shield Zone and hits a unit that is wholly within the Void Shield Zone instead hits the projected void shield. If a unit is wholly within 12" of multiple Void Shield Generators, and so within more than one Void Shield Zone when it is hit, randomly determine which of the buildings’ projected void shields is hit. Projected void shields have no effect against witchfire powers that do not have a Strength value (e.g. Psychic Shriek, Haemorrhage, Purge Soul etc.). Each projected void shield has an Armour Value of 12. A glancing or penetrating hit (or any hit from a Destroyer weapon) scored against a projected void shield causes it to collapse. If all the projected void shields have collapsed, further hits strike the original target instead. At the end of each of the controlling player’s turns, roll a dice for each projected void shield that has collapsed; each roll of 5+ instantly restores one shield. Areas of vital strategic importance and sites of deep spiritual significance are sometimes protected by not just one, but several void shield generators, their arcane technologies blanketing whole swathes of the area with overlapping force fields. Powering such a defence network requires a prodigious amount of energy and each generator building needs to be fed directly by an external power source. As a result, such a network can put an incredible strain on a planet’s local resources, siphoning resources from huge areas of its surface. However, the military gains of such an endeavour almost always outweigh the cost, and neither the Administratum nor the Ecclesiarchy are known for their compassion towards local economic considerations.
Composition: Fortification Network consisting of:
Please refer to each fortification’s individual datasheet for its Terrain Type, Fire & Access Points, Weapons, Special Rules, Options and Weapon Profiles. The Basilica Administratum is the cornerstone upon which the military might of the Imperium is built. Though the Adepts and autosavants that toil night and day within its alcoves are not heroes in the conventional sense, with a stroke of their quills they can send a battlefleet to new stars or doom a planet to a slow death. Without their ceaseless focus even the Adeptus Astartes would falter and the enemies of the Imperium thrive. It is the wish of many such a functionary that when fate finally takes him his skull will be interred in the Basilica’s walls. There, his spirit can continue his thankless task into eternity, guiding the Emperor’s armies in death as he did in life and ensuring no unwelcome surprises can mar their progress to victory.
Terrain type: Ruins The Eternal Progress to Victory: A unit that identifies a Mysterious Objective that is in a Basilica Administratum can choose to re-roll the dice to determine what it is.
The Manufactorums that stud the industrial zones of the Imperium are forbidding but functional buildings. They are so rugged in construction that even in the most war-torn district the shells of these once-thriving factories stand tall. The spirit of industry lingers within them still, and benediction lies close at hand for the Machine God’s blessed flock. When hopeful souls seek the grace of the Omnissiah near a Manufactorum’s walls, they find its embedded cog-skulls clicking and chattering a stream of sacred code that soothes troubled machine spirits and complements battlefield rituals of reconstruction. Some believe that merely to fight within the bounds of a Manufactorum is to protect one’s wargear against malfunction and mischance.
Terrain type: Ruins The Omnissiah’s Benediction: Models in a Manufactorum that are firing weapons with the Gets Hot special rule re-roll failed saving throws for Wounds inflicted upon themselves as a result of the Gets Hot special rule.
Though the Sanctum Imperialis appears as dark and gothic in construction as any of the Imperium’s hallowed buildings, it is in truth a beacon to the devout. Statues of saints adorn it in great number, and the holy eagle of the God-Emperor himself guards its walls and portals, against evil spirits and sorceries. In the tumult of battle, the spiritual light radiated by such a building becomes more literal. When the citizens of the Imperium need it most, a ghostly nimbus emanates not only from the autolumins at its gate, but also from the stone lanterns and censers borne by the figures in its walls. It is said that this is the light of the Emperor himself, and that it can drive away both physical and spiritual darkness.
Terrain type: Ruins Benevolent Light: Models in a Sanctum Imperialis have the Adamantium Will and Night Vision special rules.
Though it is a battle-torn relic of a more glorious age, the Shrine of the Aquila still bears the signature relief that gives the sacred building its name. Gazing impassively upon the tempest of battle is a stylised eagle, its metallic form cast from the molten remains of space-faring vessels that once defended humanity. Far more than mere statuary, the sacred symbol serves as an inspiration for those nearby. Those Imperial troops that fight under the Aquila’s ceaseless vigil find a new determination welling in their hearts, knowing that they are the last in a line of heroes that stretches across the stars. Conversely heretics, iconoclasts and foul xenos alike fight all the harder to spill the blood of the faithful in its shadow.
Terrain type: Ruins The Eagle’s Gaze: If a unit from the Armies of the Imperium has any of its models within a Shrine of the Aquila, it re-rolls failed Morale checks. Any other model that is in a Shrine of the Aquila has the Hatred (Armies of the Imperium) special rule.
Whether dropped in from orbit, delivered by ships and low-atmosphere aircraft or hauled in great land trains, Munitorum Armoured Containers are the most efficient way to get ammunition and equipment to the forces of the Imperium and a ubiquitous sight across the war zones of the 41st Millennium. Each container can be fitted with two storm bolters to keep away hostile forces attempting to steal the precious cargo inside, and the thick armoured walls offer protection to infantry under fire. Ammunition crates provide vital resources to a dug-in force, while fuel drums filled with volatile promethium give flamer weapons increased potency. Some containers carry additional equipment, but caution should always be exercised when opening them, in case there is something far more deadly lurking inside…
Terrain Type: Munitorum Armoured Containers are Battlefield Debris (Armoured Container). Munitorum Supply Crates are Battlefield Debris (Ammunition Dump). Munitorum Promethium Barrels are Battlefield Debris (Fuel Drums). All parts of a Munitorum Armoured Container Cache must be placed wholly within 12" of each other. Fuel Drums: A model in cover behind a fuel drum has a 5+ cover save. However, each time a unit successfully makes this cover save on the roll of a 6, immediately roll another D6. If the result of this roll is a 1, the unit that made the cover save immediately suffers an additional D3 Strength 4 AP5 hits with the Ignores Cover special rule. These additional hits use Random Allocation, and vehicles are hit on the armour facing nearest to the Fuel Drum. Any Flamer weapon (as defined in Warhammer 40,000: The Rules) fired by a non-vehicle model within 2" of a fuel drum in the Shooting phase can change its weapon type from Assault to Heavy, or from Pistol to Heavy. If it does so, the weapon gains the Torrent special rule until the end of that phase. Armoured Container: A model in cover behind an armoured container has a 4+ cover save. One non-vehicle model in base contact with an armoured container can fire all of the container’s storm bolters instead of firing their own weapon, following the normal rules for shooting. The armoured container can be shot at and attacked in close combat. It is hit automatically in close combat and has the following profile:
Ammunition Dump: A model in cover behind an ammunition dump has a 5+ cover save. Any model within 2" of an ammunition dump re-rolls failed To Hit rolls of 1 in the Shooting phase. Weapons: An armoured container can be equipped with up to two storm bolters at no additional points cost. Mysterious Containers: The first time a unit moves or deploys in base contact with a Munitorum Armoured Container, roll a D6 and consult the following table to discover its contents. You can use Munitorum Armoured Containers to represent Objective Markers. If you do so, this table replaces the Mysterious Objectives in Warhammer 40,000: The Rules:
The realm of the Emperor is a toxic place indeed. If some omniscient power were to perceive the Imperium as a whole, it might reach the conclusion that both Mankind and its enemies are hell-bent on eradicating all life forms beyond their own. Yet somehow nature clings on still. Though most of its mighty jungles and forests have been reduced to scattered tangles of trees and patches of scorched undergrowth by the deathly forces unleashed upon them, few have succumbed entirely. Be they decimated to feed the furnace of battle, discoloured by pollution, or host to parasitic organisms that gnaw them hollow, those copses and groves not yet shattered by the maniac grind of war still stand amongst endless acres of corpse-strewn mud.
Terrain type: Difficult terrain Dense Thicket: With the exception of vehicles and monstrous creatures, a model on the base of a Citadel Wood model receives a 5+ cover save, regardless of whether or not it is 25% obscured. Landing pads are used to protect aircraft as they unload supplies or evacuate troops to or from the front lines. The Skyshield Landing Pad used by the Imperial Navy was originally purpose-built to accommodate Valkyrie and Vendetta gunships. However, it has proven robust enough to serve the larger Stormravens and Thunderhawks used by the Adeptus Astartes. With its armoured sides unfurled, Skyshields activate a series of locator beacons that guide incoming aircraft as they make their final approach. Once the craft touches down, the Skyshield’s armour plating transforms into a protective configuration and force field generators shimmer to life, protecting the vulnerable gunship from incoming fire as it refuels, rearms or deploys its passengers.
 Terrain Type: Unusual. The top surface of the Skyshield Landing Pad is open ground. To move onto or off of the landing pad counts as moving through difficult terrain. Options:
Landing Pad Configuration: A Skyshield Landing Pad has certain rules depending on its current configuration, shielded or unfurled, as described below. At the beginning of the Movement phase, before rolling for Reserves, a model in base contact with a Skyshield Landing Pad can change the structure’s configuration from Shielded to Unfurled (or vice versa). If there are models from both sides in base contact with the landing pad, its configuration cannot be changed.
The history of the Imperium is replete with heroic warriors – individuals whose noble deeds and sacrifice on the battlefield are the stuff of legends. A few of these heroes have even been declared saints, with great statues and buildings raised in their honour. Millennia of war have reduced many of these edifices to cratered ruins, artillery shells transforming marble sculpture to shattered rubble. Sometimes, however, remnants of ancient statuary remain more or less intact amidst the devastation, their survival seen as a blessing from the Emperor. No citizen of the Imperium who looks upon these honoured monuments is not moved by their holy provenance, and soldiers fighting in the shadow of these memorials are inspired to near-insane levels of courage as they endeavour to emulate the heroes’ legendary deeds.
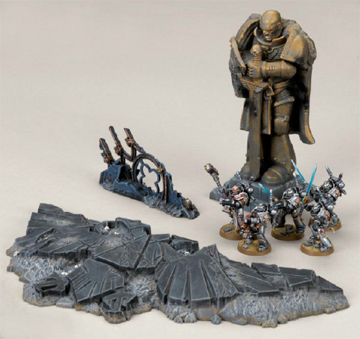 Terrain Type: The Imperial Statue is battlefield debris (Imperial statuary). Both pieces of Imperial Rubble are battlefield debris (rubble). The three pieces of battlefield debris must be placed wholly within 12" of each other. Options:
Sacred Ground: All models from the Armies of the Imperium (as defined in Warhammer 40,000: The Rules) have the Stubborn special rule whilst within 2" of Imperial Rubble. The vast manufactorums found on most worlds of the Imperium require enormous quantities of power to feed their industrial hearts. Of all the many fuels that supply these relentless complexes across the galaxy, promethium remains the most commonly utilised, often channelled and pumped to its destination via heavily armoured relay pipes. Promethium relay pipes are such a common sight in the 41st Millennium that weapon-specialists have long since learned how to tap into their release valves and siphon off a fraction of unrefined fuel to intensify the fury of their flame-throwers. Promethium relay pipes can also serve as effective cover from incoming weapons fire, though sheltering behind pipes filled with highly flammable liquids can sometimes have unfortunate side effects…
Terrain Type: Battlefield debris (fuel pipes). Options:
Fuel Siphon: Any flamer weapon fired by a non-vehicle model within 2" of a Promethium Relay Pipe in the Shooting phase can change its weapon type from Assault to Heavy, or from Pistol to Heavy. If it does so, the weapon gains the Torrent special rule until the end of that phase. In a prolonged campaign, one or both sides will usually build defensive lines to shelter their troops. As the war grinds on, what started as simple trenches will grow into a massive defensive fortification known as a Grand Redoubt. Each Grand Redoubt is ringed by lines of trenches, and studded with massive bastions and gun emplacements. At its heart lies an enormous fortification that shelters reserves of ammunition in vast underground barracks. This subterranean complex also protects the troops from enemy bombardment - then, when the enemy launch their assault, the reserves pour forth to occupy the Grand Redoubt's bunkers and trench lines,fresh and ready to repel the attack. Such positions can only be taken by the application of devastating firepower and huge numbers of troops.
Composition: Fortification Network consisting of:
Restrictions: Must comprise at least 6 structures from the above list. Defend to the Last Man: Any unit with a model occupying any part of the Grand Redoubt has the Stubborn special rule. Some fortifications can purchase upgrades by paying an additional points cost. The fortifications that can purchase upgrades, and the types of upgrades they can access, are stated on that fortification’s datasheet.
Extra crates of ammunition have been stockpiled within this fortification, ready to be distributed to garrisoning troops. A unit occupying this building re-rolls To Hit rolls of a 1 when firing out of the building’s Fire Points. Note this does not apply to a model manually firing an emplaced weapon.This fortification has been rigged with a surprise for the first unwitting patrol to stumble across it. The first unit to occupy this building (friend of foe) immediately suffers 2D6 Strength 4 AP5 hits with the Ignores Cover special rule.This fortification maintains a concealed escape route. When this building is first occupied, the owning player can place an escape hatch marker anywhere within 12" of the building that is not impassable terrain or within another building. The escape hatch marker is an additional Access Point for the building, but models using it cannot use the Repel the Enemy special rule. The escape hatch has no other effect during the game (it cannot be targeted, assaulted etc.).The fortification itself is semi-intelligent, imbued with a machine spirit with an improved control over its arsenal. This building’s automated fire is resolved using BS3.Searchlights are often fitted to fortifications to spot approaching enemies who lurk in the dark. A building’s searchlights follow the same rules as vehicle searchlights, as detailed in the Warhammer 40,000 rulebook.The fortification houses an ancient device that can generate a localised void shield. Whilst a building has a void shield, any hits scored by shooting attacks against the building, models embarked within it or upon its battlements will instead hit the void shield. A void shield has an Armour Value of 12. A glancing or penetrating hit (or any hit from a Destroyer weapon) scored against a void shield causes it to collapse. After this, further hits strike the original target instead. At the end of each of the controlling player’s turns, roll a dice for the collapsed void shield; a roll of 5+ instantly restores it.Makeshift barricades can provide a vital outer perimeter. Obstacle upgrades are small sections (each up to 6" in length) of battlefield debris. A fortification can purchase up to six sections of obstacles, in any combination, from the list below. These are placed at the same time as the fortifications they were brought alongside and must be placed wholly within 6" of their fortification.
Weapons and wargear litter the battlefields of the 41st Millennium. Battlement & Battlefield upgrades are single pieces of battlefield debris. Each fortification can purchase a single Battlement & Battlefield upgrade from the list below. These are placed either on the fortification’s battlements (if it is a building with battlements) or anywhere on the tabletop that is wholly within 6" of their fortification.
FAQTerrain
| ||||||||||||||||||||||||||||||||||||||||||||||||||||||||||||||||||||||||||||||||||||||||||||||||||||||||||||||||||||||||||||||||||||||||||||||||||||||||||||||||||||||||||||||||||||||||||||||||||||||||||||||||||||||||||||||||||||||||||||||||||||||||||||||||||||||||||
Appendix >


