Iyanden, greatest worldship of the Eldar empire that was, drifts through the stars of the eastern rim. Once, its halls were busy and vibrant with life, but no longer. Now, it is but a shadow of its former glory, a sombre and desolate vessel where the dead walk and the living dwindle.
How This Supplement WorksThis supplement to Codex: Eldar allows you transform your collection of Citadel miniatures into a warhost worthy of Iyanden Craftworld.Books
Iyanden Special RulesAn Iyanden army is chosen using the army list presented in Codex: Eldar. It also has a series of supplemental rules (presented below) that can be used in addition to the material found in Codex: Eldar. Note that you can only use the options from one codex supplement when choosing your army.Heroes of IyandenIf you are fielding an Iyanden detachment, you may select a single Wraithlord or Wraithknight in that detachment to be your Warlord. If you do so, the selected model is a character and receives a Warlord Trait.Shadow CouncilAn Iyanden detachment may take up to 5 Spiritseers as a single HQ choice, rather than 1.Spirit MarkAt any point during your Movement phase, nominate a single enemy unit within 12" of the Spiritseer - place a counter next to it to show it has been spirit-marked. All Wraithguards, Wraithblades, Wraithlords, Wraithknights and Hemlock Wraithfighters can re-roll To Hit rolls of 1 against spirit-marked units. At the end of your turn, remove all spirit-mark counters from play.Spiritseer Psychic PowersAny Iyanden Spiritseer that generates his psychic powers from the Runes of Battle discipline treats Voice of Twilight as the discipline’s Primaris Power, rather than Conceal/Reveal.VOICE OF TWILIGHT Warp Charge: 2
Special RulesImpactThe Melee profile given above is only used during a Assault phase in which the wielder made a successful charge. In all other Assault phases, the Celestial Lance is treated as a close combat weapon.Spirit ShatterWhen a Character or Monstrous Creature is reduced to 0 Wounds by an Attack from this weapon, during a turn in which the wielder charges, centre the large blast marker over the victim before removing the model as a casualty. All models under the blast marker (friend or foe, but not the bearer of the Celestial Lance), suffer a single hit with a Strength equal to the victim’s Toughness characteristic and АР-.SpiritstealerAdd 1 to Soulshrive’s Strength for each unsaved Wound it has caused earlier in the game. Soulshrive’s Strength cannot exceed 10.Warlord TraitsWhen generating his Warlord Trait, an Iyanden Warlord may roll on the Warlord Traits table below, instead of those in the Warhammer 40,000 rulebook or Codex: Eldar.
Gifts of Asuryan are items of incredible rarity and power. Only one each of the following Gifts of Asuryan may be chosen per army - there is only one of each in the galaxy. Any character in Iyanden detachment that may select Remnants of Glory may instead select from the Gifts of Asuryan, at the points cost shown. A character cannot choose items from both lists. Note that The Wraithforge Stone and The Guardian Helm of Xellethon do not replace a weapon.
2 Psyker only.
Altar of War: Iyanden Missions
It is very straightforward to use an Altar of War mission — these can be selected at The Mission step described in Preparing for Battle in Warhammer 40,000: The Rules. Like the missions presented there, Altar of War missions are ‘pick up and play' missions - it is not necessary to know which of these missions you will be playing before selecting an army, only the agreed points value of the two armies. If you (or your opponent) have a Warlord with the Eldar Faction that is from a Iyanden you can select one of these missions just as you would any other, as explained in the Preparing for Battle section in Warhammer 40,000: The Rules. 1-2
ALTAR OF WAR
:
Webway AssaultThe Eldar make extensive use of the webway to travel across the galaxy, and wherever possible will use portals to transport their warriors to a planet’s surface. Many worlds have webway portals, some of which are known by the inhabitants, and others whose original purpose are now remembered only by the Eldar themselves. Iyanden Craftworld is no exception, and its Farseers will use their ancient knowledge of the webway to unleash a surprise assault upon the enemy, opening a hidden portal on a planet’s surface from which will pour forth a host of Eldar warriors. More often than not, the enemy will be caught unawares, and attacked from such an unexpected quarter they will be quickly overwhelmed. At other times the enemy will rally and fight back, and a brutal battle will erupt.
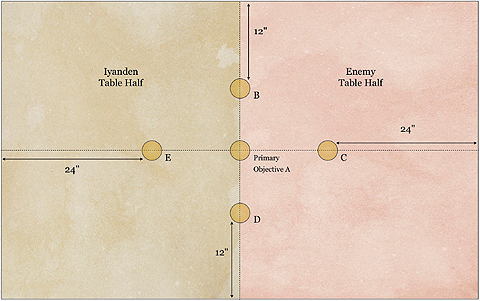 Choose armies. The Iyanden player must choose a primary detachment from Codex: Eldar, and can use the additional rules in this volume. THE BATTLEFIELD Use the Deployment Map included with this mission. Set up terrain. Place Primary Objectives Place one Primary Objective at the centre of the table, and four more Primary Objectives half-way between the central objective and each table edge, as shown in the deployment map. If a marker cannot be placed on the stated location because it is occupied by impassable terrain, a building or ruin, then the enemy player must place it in a valid location as close to the stated location as possible. DEPLOYMENT Players should first roll for Warlord Traits, and then the enemy deploys first, anywhere on the table that is more than 12" from a table edge. The enemy may place up to half his units in reserve. The Iyanden player must then deploy a suitable piece of impassable terrain to represent the Webway Portal. It must be 6-12" in length and 2-4" wide, be placed on open ground, and be completely within 12" of a table edge. If a suitable piece of terrain is not available, mark the corners of the Webway Portal with suitable markers - coins are ideal. The Iyanden player must then split his army into two groups, with as close to half the total number of units in each group as possible. All units from one group, including any Flyers, enter play on the first turn either by Deep Strike or via the Webway Portal (see below). All units in the other group are placed in reserve and are rolled for normally. FIRST TURN The Iyanden player goes first. GAME LENGTH The mission uses Variable Game Length. VICTORY CONDITIONS At the end of the game, the player that has scored the most Victory Points wins the battle. If the players have the same number of Victory Points, the game is a draw. Primary Objectives At the end of the game, each Primary Objective is worth 3 Victory Points to the player that controls it. In addition, each player receives 1 Victory Point for each opposing unit that has been completely destroyed. Units that are falling back or are not on the board at the end of the game, count as destroyed for the purposes of this mission. Remember that Independent Characters and Dedicated Transports are individual units and award Victory Points if they are destroyed. Secondary Objectives First Blood, Slay the Warlord. Mysterious Objectives, Night Fighting, Reserves. 3-4
ALTAR OF WAR
:
Feints and PhantomsEven amongst a dwindling race, the people of Iyanden are few. Though their ranks are bolstered by ghost warriors, their destruction is if anything even more deeply mourned, for upon their second death Iyanden loses a fraction of its history forever. So it is that Iyanden’s warhosts seek a path to victory with the minimum loss of Eldar life. There
are many tools of war employed to this end, but misdirection remains amongst the most powerful. Iyanden’s commanders will oft launch a feint on one flank, its sole purpose to draw the enemy’s reinforcements away from the Eldar’s true target. Once the enemy has committed his reserves, the Eldar assault evaporates - warriors peeling away before launching a fresh assault against the now vulnerable target. Attempting to outguess the Eldar or divine their true goals will drive the most strategically-minded commander to exasperation, for the Eldar are as enigmatic as phantoms, their intentions hidden in plain sight and veiled behind a labyrinthine series of smoke and mirrors at the same time. 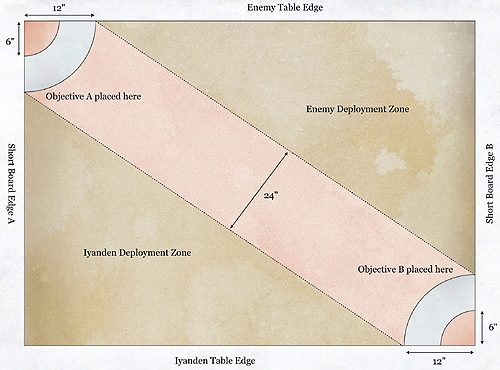 Choose armies. The Iyanden player must choose a primary detachment from Codex: Eldar, and can use the additional rules in this volume. THE BATTLEFIELD Use the Deployment Map included with this mission. Then, set up terrain. Place Primary Objectives Set-up 2 Primary Objective markers before either side deploys. The Iyanden player sets up the first Primary Objective, then the enemy player sets up the second. The Primary Objectives are placed on opposite corners of the board (each must be set up so that they are between 6" and 12" from their respective corners). The Iyanden player then secretly writes down which of the two Primary Objectives is the ‘true target’. DEPLOYMENT Players should first roll for Warlord Traits. Both players must split their army into two groups, with as close to half the total number of units in each group as possible. Each player chooses one of their own two groups; all the units in the first group will start the game deployed on the table - all the units in the second group must start the game in Reserves (note that units such as Flyers, which cannot start the game deployed on the table, must be placed in a player’s second group). The Iyanden player then deploys his first group, and then the enemy player does likewise. FIRST TURN The Iyanden player goes first unless his opponent can Seize the Initiative. GAME LENGTH The mission uses Variable Game Length. VICTORY CONDITIONS At the end of the game, the player that has scored the most Victory Points wins the battle. If the players have the same number of Victory Points, the game is a draw. Primary Objective At the end of the game, the Iyanden player reveals which of the two objectives is the true target (see above). The player that controls the true target objective scores 3 Victory Points. The other objective is worth no Victory Points in this mission. Secondary Objectives First Blood, Linebreaker, Slay the Warlord. Mysterious Objectives, Night Fighting, Reserves. Models that are arriving by Deep Strike or Outflank deploy using their special rules instead. 5-6
ALTAR OF WAR
:
The Web of FateSince the terrible days of the Fall, the Eldar craftworlds have fought an endless struggle for the survival of their race. Never ones to let fate simply take its course, their every effort is guided by mystics gifted with incredible foresight known as Farseers, the infinite strands of possible futures laid bare to their all-seeing gaze. It is with this clairvoyant knowledge that the Farseers guide their kin. In the case of the dying craftworld of Iyanden, such a responsibility is especially grave, for its people can ill afford further tragedy.
THE ARMIESShould the Farseers decree that the Eldar must go to war, it is often with some purpose incalculable to their enemies that they do so. Their goal may at first seem atypical, inconsequential even, to those they fight, yet the actions of the Eldar always have a purpose. The death of one enemy may be ordered to preemptively rid themselves of a mortal foe in the years to come. Alternatively, a Farseer may deem it essential to defend their commander, lest his destiny on some distant battlefield be denied to them. Whatever task is asked of them by their Farseers, the Eldar fight hard to ensure their will is carried out, for failure may one day see their beloved craftworld fall. Choose armies. The Iyanden player must choose a primary detachment from Codex: Eldar, and can use the additional rules in this volume. THE BATTLEFIELD Next, determine your Deployment Map, then set up terrain and objectives. Place Primary Objectives After setting up terrain, the players take it in turns to place a single Primary Objective marker in their own table half. Normal restrictions for placing markers apply. DEPLOYMENT Players should then roll for Warlord Traits, before deploying. FIRST TURN The player who deployed his army first goes first, unless his opponent can Seize the Initiative. GAME LENGTH The mission uses Variable Game Length. VICTORY CONDITIONS At the end of the game, the player that has scored the most Victory Points wins the battle. If the players have the same number of Victory Points, the game is a draw. Primary Objective* At the end of the game, each Primary Objective is worth 3 Victory Points to the player that controls it. Secondary Objectives* First Blood, Linebreaker, Slay the Warlord. * See also the Iyanden Secret Objectives. Mysterious Objectives, Night Fighting, Reserves. The effect of the dice roll is shown on the following table. The dice is revealed when Victory Points are scored, if it has not been revealed earlier.
Echoes of War: Iyanden MissionsHere you will find a selection of Echoes of War missions, which represent key historical battles inspired by the battles fought by the Iyanden Craftworld. The Armies section of each of these missions provides guidance on the forces present so that you can replay the pivotal events using the armies, characters and war machines described in this book. Similarly, each Echoes of War mission includes a map that depicts the battlefield on which these vital conflicts were fought.For those with a mind to historical accuracy, you’ll notice certain restrictions and rules that we use to replicate the conditions of the battle in question. However, whilst the Echoes of War missions have been inspired by specific events, with a little imagination they can easily be repurposed to recreate battles of your own invention. If you choose to go down this route, you can modify these missions so that they can be fought using any combination of forces and terrain in your collection. №1
ECHOES OF WAR
:
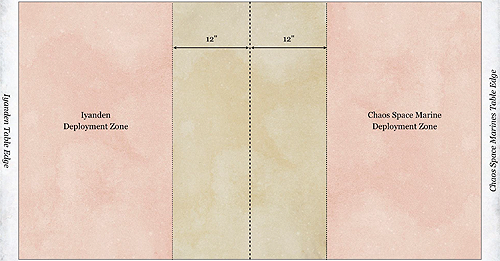
Dark AlliesIyanden Craftworld and the Dark Angels Space Marine Chapter have both separately been striving to defeat the Chaos Warlord known as Zhemon. He was once a member of the Dark Angels Chapter, but has succumbed to the siren calls of the Chaos Gods, and has been fomenting rebellion on a massive scale ever since.
Only the joint efforts of the Imperium and the Eldar have been able to curb his ambitions, purging worlds that his followers had overrun and thwarting any further conquests. Zhemon is finally cornered in his stronghold on Ishasta, and the Eldar and Imperial forces have come together, intent on destroying this foul agent of the ruinous powers. Wraithlords and Wraithguard lead the Eldar attack, smashing through the entrance to Zhemon’s palace, and preparing to battle through a horde of Maulerfiends in order to get their revenge on the Chaos Warlord. Meanwhile, Ravenwing attack formations are ready to burst through the rear walls of the stronghold, catching Zhemon in a deadly trap. 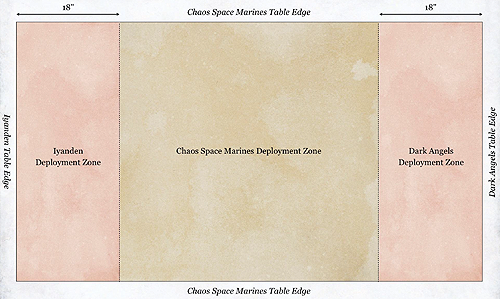 One player commands a primary detachment of attackers from Iyanden, chosen from Codex: Eldar and using the additional rules in this volume, along with an allied detachment chosen from Codex: Dark Angels. The other player commands Zhemon’s bodyguard, chosen from Codex: Chaos Space Marines. Both players select forces to an agreed points limit. The Iyanden player must take at least one unit of Wraithguard, at least one Wraithlord, and at least one Ravenwing Attack Squadron. All Wraithguard, Wraithlords and Ravenwing Attack Squadron are troops choices in this mission, and a Wraithlord must be taken as the army’s Warlord. The Chaos Space Marines player must take a Chaos Lord to represent Zhemon, and at least one Maulerfiend. Zhemon must be the Warlord of the Chaos Space Marine army. Neither side is allowed to take Flyers or Drop Pods in this battle. THE BATTLEFIELD Set up terrain using the deployment map provided. DEPLOYMENT The players must first determine their Warlord Traits. Then, the Iyanden player deploys his Eldar units in the Iyanden deployment zone (see map). The Chaos Space Marines player then deploys his entire army in the Chaos Space Marine zone, more than 12" away from any Eldar models. Finally the Iyanden player deploys his Dark Angels units in the Dark Angels zone, more than 6" away from any Chaos Space Marine models. The Chaos Space Marine player must deploy all of his units on the battlefield. The Iyanden player may place up to half of his units in Reserves, but Eldar units that enter from reserve on a table edge must use the Eldar table edge, and Dark Angels units that enter from reserve on a table age must use the Dark Angels table edge. FIRST TURN Roll-off to see which player has the first turn. Neither side may attempt to Seize the Initiative in this mission. GAME LENGTH The mission uses Variable Game Length. VICTORY CONDITIONS If, at the end of the game, the model representing Zhemon is anywhere on the battlefield and has at least one Wound remaining, then the Chaos Space Marine player is the winner. In any other circumstances, at the end of the game, the player who has scored the most Victory Points is the winner. If Zhemon is not on the table and both players have scored the same number of Victory Points, the game is a draw. Primary Objectives At the end of the game, each player receives l Victory Point for each enemy unit that has been completely destroyed. Units that are falling back, or are not on the board, at the end of the game, count as destroyed for the purposes of this mission. Remember that Independent Characters and Dedicated Transports are individual units and award Victory Points if they are destroyed. Secondary Objectives First Blood, Slay the Warlord. Night Fighting, Reserves.
№2
ECHOES OF WAR
:
The Cleansing of MenimshemashThe Exodite world known to the Eldar as Menimshemash has been befouled and besmirched by the daemonic legions of the Chaos God Tzeentch. Using devious stratagems and cunningly evil plans, the Great Deceiver’s forces have all but overrun the once fair planet, and now only a small enclave of Eldar Exodites survive. The only hope for the survivors, and their planet, is to cleanse its world spirit of the corruption it has suffered, so that the
Daemons can be hurled back into the Warp from which they came. Answering the Exodites’ call for help, Craftworld Iyanden sends forth its Spiritseers and Bonesingers, who alone have the ability to purify the world spirit by performing an intricate psychic ceremony. Desperate to stop the Eldar from saving Menimshemash, Tzeentch hurls his daemonic hosts forward in a desperate all-out attack. If the Daemons can break through the Eldar’s defences and disrupt the ceremony, the planet will fall to Tzeentch and become his for all time. 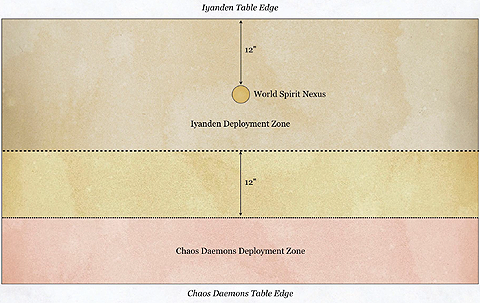 One player commands the Eldar defenders, chosen from Codex: Eldar and using the additional rules found in this volume. The other player exerts his influence over the Daemon host, chosen from Codex: Chaos Daemons. Both players select forces to an agreed points limit. The Iyanden player must include a Shadow Council and at least two units of Wraithguard in their army. At least two-thirds of the units in the Chaos Daemons army must have the Daemon of Tzeentch special rule. THE BATTLEFIELD Set up terrain using the deployment map provided. Place World Spirit Nexus Marker A marker, such as small coin, must be set up to represent the nexus point of the world spirit. The nexus is located halfway between the two narrow table edges, 6" away from the Eldar player’s table edge, as shown on the deployment map opposite. DEPLOYMENT The players must first determine their Warlord Traits. The Chaos Daemons player deploys first and the Iyanden player second, using the rules from the Warhammer 40,000 rulebook and the deployment map opposite. The Chaos Daemons player may deploy anywhere in his deployment zone that is more than 12" from the centre line. The Iyanden player must deploy the Shadow Council so that all of its models are within 6" of the world spirit nexus. Any remaining Eldar units may deploy anywhere in the Iyanden deployment zone. The Shadow Council aside, both sides may place up to half of the units in their army in reserve. FIRST TURN The Chaos Daemons player goes first unless the Iyanden player can Seize the Initiative. GAME LENGTH The mission continues until the Shadow Council is destroyed or the world spirit is healed. VICTORY CONDITIONS If, at the end of any turn, all models in the Shadow Council have been slain or are no longer within 6" of the world spirit nexus point, the Chaos Daemons player wins. If the world spirit is healed, the Iyanden player wins. The battle continues until one side wins. Night Fighting, Reserves. №3
ECHOES OF WAR
:
The Battle of the Burning MoonIt is the height of the Battle of the Burning Moon. Prince Yriel, his fleet outnumbered and his craftworld imperilled, seeks to end the battle by destroying Kallorax’s flagship, the Riot Hunger. Unwilling to remain safe whilst his kinsmen fight and die, Yriel leads the boarding action himself, fighting deck by blood-slicked deck. Kallorax, incapable of resisting the Eldar prince’s challenge, personally spearheads the counter-attack. Soon, the battle aboard the Riot Hunger becomes a contest of supremacy between Yriel and Kallorax. Yet as the tally of dead and wounded creeps ever higher, tragedy looms for Iyanden itself.
 One player commands Yriel’s boarding party, chosen from Codex: Eldar and using the additional rules in this volume. The other commands Kallorax’s Shadow Guard, chosen from Codex: Chaos Space Marines. Both players select forces to an agreed points limit. The Iyanden player must include Prince Yriel as the Warlord of his army. As this battle takes place in one of the Riot Hunger’s hangar bays, the Iyanden player cannot choose fortifications. The Chaos Space Marines player must include a Chaos Lord (to represent Commodore Kallorax) as the Warlord of his army. THE BATTLEFIELD Set up terrain using the deployment map provided. Place Primary Objectives After setting up the terrain, the Chaos Space Marines player places 3 Primary Objectives, representing Kallorax’s last line of defence. DEPLOYMENT The Chaos Space Marines player must first determine his Warlord Trait. He then deploys first and the Iyanden player deploys second, using the rules from the Warhammer 40,000 rulebook and the deployment map opposite. Any unit that cannot be deployed starts the game in reserve. FIRST TURN The Chaos Space Marines player goes first unless the Iyanden player can Seize the Initiative. GAME LENGTH The mission uses Variable Game Length. In addition, if at the end of any phase, Kallorax has been removed as a casualty and the Iyanden player controls 2 or more objectives, the game ends immediately. VICTORY CONDITIONS If the game ends on Turn 4 or earlier, the Iyanden player wins. Otherwise, at the end of the game, the player who has scored the most Victory Points is the winner. If both players have the same number of Victory Points, the game is a draw. Primary Objective At the end of the game, each player scores 5 Victory Points for each Primary Objective they control. In addition, the Iyanden player scores 1 Victory Point for each unsaved Wound inflicted by Prince Yriel, and the Chaos Space Marines player scores 1 Victory Point for each unsaved Wound inflicted by Kallorax (keep a note of these tallies during the game). Furthermore, if the game ends on Turn 5 or earlier, the Iyanden player scores 3 Victory Points, whilst if the game ends on Turn 7, the Chaos Space Marines player scores 3 Victory Points. Secondary Objectives First Blood, Linebreaker, Slay the Warlord* * In this mission, players score 3 Victory Points for Slay the Warlord, rather than just 1. Reserves. Blade of Whispering Death
* Power lances have two profiles for both Strength and AP. The first is used only on a turn in which a model charges; the second is used at all other times. №4
ECHOES OF WAR
:
Yriel’s ReturnIyanden stands on the brink of oblivion. The Tyranids of Hive Fleet Kraken have swarmed across the craftworld, reducing the once-glorious star-borne civilisation to a scorched and smoke-wreathed charnel house. Millions are dead, and those who yet live will soon join them, unless a miracle materialises. The Spiritseer Iyanna Arienal, in a moment of desperation, gathers to her the remaining ghost warriors, and forms a last line of defence against the onslaught, hoping that their sacrifice will somehow grant the living time to escape. It is in this hour that Prince Yriel, scion of the House of Ulthanash and exile of Iyanden, comes home seeking vengeance for his kin. Now, there will be a reckoning.
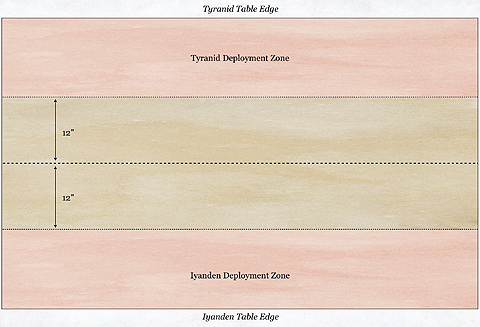 One player commands the Eldar defenders, chosen from Codex: Eldar and using the additional rules in this volume. The other exerts his alien influence over the Tyranid swarm, chosen from Codex: Tyranids. Both players select forces to an agreed points limit. The Iyanden player must include Prince Yriel. The Tyranid player must include a Hive Tyrant (to represent the Devourer of Hope) as the Warlord of his army. He may not choose additional Hive Tyrants. As this battle takes place in Iyanden itself, the Tyranid player cannot choose fortifications. THE BATTLEFIELD Set up terrain using the deployment map provided. DEPLOYMENT The players must first determine their Warlord Traits. When this has been done, the Iyanden player divides his army into two halves, with each half, if possible, containing an equal number of units. If the Iyanden army includes Iyanna Arienal (see the Mission Special Rules) she must be taken as part of the first half. The second half must contain Prince Yriel. The Iyanden player then deploys first. The first half is deployed on the battlefield, using the rules from the Warhammer 40,000 rulebook and the deployment map opposite. All units from the second half are placed in reserve. The Tyranid player deploys next, using the rules from the Warhammer 40,000 rulebook and the deployment map opposite. Any unit that cannot be deployed on the table (for either side) starts the game in reserve, even if this means that a player has more than half of their army in reserve. FIRST TURN The Iyanden player goes first unless the Tyranids player can Seize the Initiative. GAME LENGTH The mission uses Variable Game Length. VICTORY CONDITIONS At the end of the game, the player who has scored the most Victory Points is the winner. If both players have the same number of Victory Points, the game is a draw. Primary Objective At the end of the game, each player scores l Victory Point for each enemy unit that has been completely destroyed. Units that are falling back, or not on the board, at the end of the game, count as destroyed for the purposes of this mission. In addition, the Iyanden player scores 5 Victory Points if the Hive Tyrant has been slain, whilst the Tyranids player scores 5 Victory Points if Prince Yriel has been slain (in addition to any earned for Slay the Warlord). Secondary Objectives First Blood, Linebreaker, Slay the Warlord Reserves. №5
ECHOES OF WAR
:
Rekkfist’s DownfallIyanden’s path has taken it through the Ork-infested Antellas system, and once more, the craftworld’s people are forced to fight for their survival. While Yriel engages the Ork fleet, Iyanna Arienal leads an expedition to Antellas Prime in an attempt to kill Warlord Rekkfist. The initial battles go exceedingly well, but when an Ork-controlled space hulk appears without warning to engage Iyanden itself, Yriel is forced to leave Iyanna’s forces stranded in order to save the craftworld.
Ultimately, Iyanden is saved by Yriel’s intervention, and by the unexpected aid of the Dark Eldar. But the battle for Antellas is not over yet; though badly outnumbered, Iyanna Arienal’s forces still fight for survival on Antellas Prime. Before the last greenskin perishes aboard Iyanden, Yriel’s fleet is in motion again, carrying desperately-needed reinforcements to Iyanna’s aid. Here, under skies riven by the screaming engines of Ork fighter-craft, the final battle for Antellas will be decided...  One player commands the Eldar defenders, chosen from Codex: Eldar and using the additional rules in this volume. He may also take an Allied Detachment chosen from Codex: Dark Eldar, if he wishes. The other player bosses Waaagh! Rekkfist, chosen from Codex: Orks. Both players select forces to an agreed points limit. The Iyanden player must include Prince Yriel. The Ork player may include a single Stompa. THE BATTLEFIELD Set up terrain using the deployment map provided. Place Primary Objectives After setting up the terrain, the players take it in turns to place a total of D3+2 Primary Objectives. DEPLOYMENT The players must first determine their Warlord Traits. When this has been done, the Ork player divides his army into two halves, with each half, if possible, containing an equal number of units. He deploys one half in Deployment Zone A, and the other half in Deployment Zone B, using the rules from the Warhammer 40,000 rulebook and the deployment map provided. The Iyanden player then deploys using the rules from the Warhammer 40,000 rulebook and the deployment map opposite. The Dark Eldar units (if any) must start the game in reserve. Any unit that cannot be deployed on the table (for either side) starts the game in reserve. FIRST TURN The Iyanden player goes first unless the Ork player can Seize the Initiative. GAME LENGTH The mission uses Variable Game Length. VICTORY CONDITIONS At the end of the game, the player who has scored the most Victory Points is the winner. If both players have the same number of Victory Points, the game is a draw. Primary Objectives At the end of the game, each player scores 5 Victory Points for each Primary Objective he controls. Secondary Objectives First Blood, Slay the Warlord. Night Fighting, Reserves. |
Factions > Eldar Craftworlds >

