The following missions illustrate the different sorts of strategies used by Tau Empire, and they will provide new tests of your tactical ability as a commander.
War Zone Damocles: Kauyon CampaignThis section includes several Warhammer 40,000 missions inspired by the pivotal battles that took place on Prefectia. These missions provide players with new ways to use their armies and a wealth of new tactical options to master - you can even play them sequentially as part of a campaign using the rules at the end of the section.
There are two main ways in which you can use the Echoes of War missions in War Zone Damocles: Kauyon the most straightforward is to simply choose a mission you want to play. Alternatively, you can fight a campaign by playing the missions in order using the campaign rules. If you do so, then players should stick to the same side for each mission. Keep a note of the players’ victories and defeats the winner is the player with most victories once all of the missions have been played. In the case of a draw, the player that wins the final battle wins the campaign!There’s nothing to stop you from playing the missions using different armies from those in the story of War Zone Damocles: Kauyon. With a little imagination and some minor changes, you can easily fight similar battles with any combination of miniatures and terrain you have in your collection. Kauyon Campaign ChartThe Echoes of War missions recreate the pivotal battles of the war for Prefectia. You can play through these missions in sequence to аight a thrilling campaign. If you do so, the victor of each mission will receive a bonus in the next mission of the campaign, as detailed on these pages. If a game is a draw, neither player receives a bonus in the next mission.№1
ECHOES OF WAR
:
The Martyr’s ChargeAs the Raven Guard bide their time for an opportune moment to strike, the White Scars boldly throw themselves headlong into the Tau defences. Despite Kor’sarro Khan’s warriors attacking from multiple angles in a bid to prevent the Tau from utilising their famed fire support, the cunning aliens are not without tricks of their own...
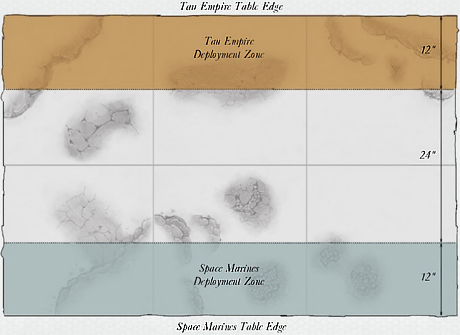
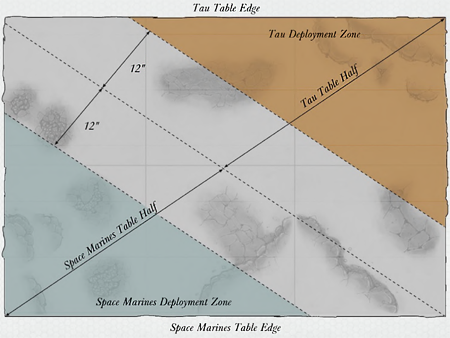
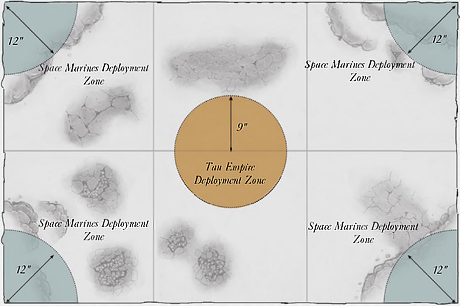 Select armies as described in the Choosing Your Army section. One player is the Space Marines player, and his opponent is the Tau Empire player. All units in the Space Marines player’s army must have the Space Marines Faction and be drawn from the White Scars Chapter. He must include Kor’sarro Khan to be his army’s Warlord if the model is available. All units in the Tau Empire player’s army must have the Tau Empire Faction. The Tau Empire player must include a Tidewall Defence Network in his army if the models are available, though this does not cost any points, and he must include Commander Shadowsun to be his army’s Warlord if the model is available. THE BATTLEFIELD First of all, the Tau Empire player places his Tidewall Defence Network anywhere in his deployment zone (see the deployment map included with this mission). Players then set up terrain. Objective Markers After terrain has been set up, the Tau Empire player places a total of 5 Objective Markers in his deployment zone - 1 in each of the platforms at the end of the 4 Tidewall Shieldlines and 1 in the Tidewall Gunrig or Droneport of his Tidewall Defence Network, if the models are available. If these Fortifications move, the Objective Markers will move with them. DEPLOYMENT The Tau Empire player deploys first, placing up to half of his units anywhere in his deployment zone. All other units must be held in Reserve. Commander Shadowsun must be held in Reserve. The Space Marines player deploys second, placing units anywhere in at least two of his deployment zones. FIRST TURN The Space Marines player has the first turn unless the Tau Empire player can Seize the Initiative. GAME LENGTH The mission uses Variable Game Length. VICTORY CONDITIONS At the end of the game, the player who has scored the most Victory Points is the winner. If both players have the same number of Victory Points, the game is a draw. Primary Objective At the end of the game, each Objective Marker is worth 3 Victory Points to the player that controls it. Secondary Objectives First Blood, Slay the Warlord. Night Fighting, Reserves. №2
ECHOES OF WAR
:
Ploys and RusesUnable to find a flaw in Shadowsun’s strategy, the Raven Guard trigger the trap that the Tau have set for them with disposable assets in the hope of revealing an unseen weakness. Yet the Tau meet this ruse with a counter-ploy of their own, and the main Raven Guard assault force soon finds itself under heavy attack by Tau reinforcements.
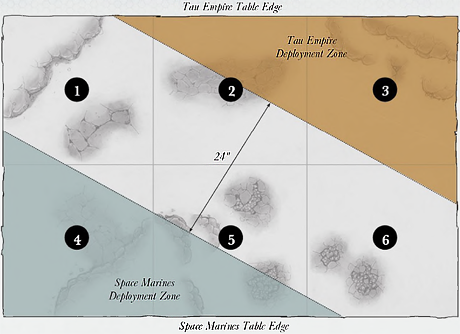
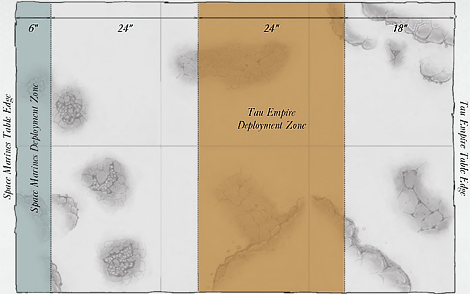 Select armies as described in the Choosing Your Army section. One player is the Space Marines player, and his opponent is the Tau Empire player. All units in the Space Marines player’s army must have the Space Marines Faction and be drawn from the Raven Guard Chapter. The Space Marines player must include at least 3 Rhinos and/or Razorbacks in any combination, though these do not cost any points, and a Chaplain, representing Laefin Torovac, to be his army’s Warlord if the model is available. All units in the Tau Empire player’s army must have the Tau Empire Faction. The Tau Empire player must include a Tidewall Defence Network in his army, though this does not cost any points. He must also include a Commander representing Commander Swiftflame to be his army’s Warlord if the model is available. THE BATTLEFIELD First of all, the Tau Empire player places his Tidewall Defence Network anywhere in his deployment zone (see the deployment map included with this mission). Players then set up terrain. Objective Markers After terrain has been set up, the Tau Empire player places a total of 5 Objective Markers in his deployment zone - 1 in each of the platforms at the end of the 4 Tidewall Shieldlines and 1 in the Tidewall Gunrig or Droneport of his Tidewall Defence Network, if the models are available. If these Fortifications move, the Objective Markers will move with them. DEPLOYMENT The Tau Empire player deploys first, placing up to half of his units anywhere in his deployment zone. All other units must be held in Reserve. The Space Marines player deploys second, placing all of his Rhinos and Razorbacks anywhere in his deployment zone. One unit must begin the game embarked upon one of these transport vehicles (secretly note down which one); his other Rhinos and Razorbacks all have a Transport Capacity of 0 for this mission. All other units must be held in Reserve or Deep Strike Reserve. FIRST TURN The Space Marines player has the first turn. GAME LENGTH The mission uses Variable Game Length. VICTORY CONDITIONS At the end of the game, the player who has scored the most Victory Points is the winner. If both players have the same number of Victory Points, the game is a draw. Primary Objective At the end of the game, each Objective Marker is worth 3 Victory Points to the player that controls it. Secondary Objectives First Blood, Slay the Warlord. Night Fighting, Reserves. №3
ECHOES OF WAR
:
Bringing the StormBloodily repelled in their first attack, the White Scars are more determined than ever to bring the Tau to battle. By order of Shadowsun herself, Commander Sternshield has the dubious honour of whetting their appetite for death. But can the stubborn conviction of the White Scars overcome Sternshield’s calculated countermeasures?
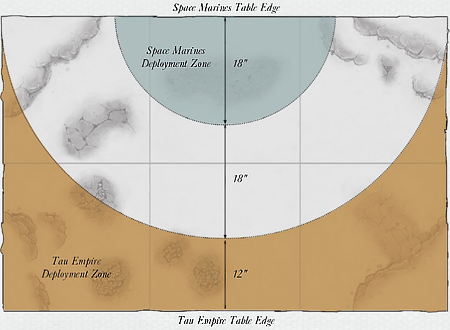 Select armies as described in the Choosing Your Army section. One player is the Space Marines player, and his opponent is the Tau Empire player. All units in the Space Marines player’s army must have the Space Marines Faction and be drawn from the White Scars Chapter. He must include a Hunting Force and at least one Stormraven Gunship in his army if the models are available. All units in the Tau Empire player’s army must have the Tau Empire Faction. The Tau Empire player must include a Commander equipped with an XV86 Coldstar battlesuit (Commander Sternshield) to be his army’s Warlord if the model is available. THE BATTLEFIELD Set up terrain using the deployment map included in this mission. DEPLOYMENT The Tau Empire player deploys first, anywhere in his deployment zone. The Space Marines player deploys second, anywhere in his deployment zone. FIRST TURN The Space Marines player has the first turn unless the Tau Empire player can Seize the Initiative. GAME LENGTH The mission uses Variable Game Length. VICTORY CONDITIONS At the end of the game, the player who has scored the most Victory Points is the winner. If both players have the same number of Victory Points, the game is a draw. Primary Objective At the end of the game, each player receives 1 Victory Point for each enemy unit that has been completely destroyed. Units that are Falling Back at the end of the game, and units that are not on the board at the end of the game, count as destroyed for the purposes of this mission. Remember that Independent Characters and Dedicated Transports are individual units and award Victory Points if they are destroyed. Secondary Objectives First Blood, Linebreaker, Slay the Warlord. Night Fighting, Reserves. №4
ECHOES OF WAR
:
Death RunRaven Guard gunships engage the Tau Air caste in an aerial battle, but their initial success is thrown into jeopardy when the xenos launch a fierce Kauyon counter-attack. Within moments, the Raven Guard craft are heavily outnumbered and are soon forced to seek the dubious shelter of a nearby canyon to evade pursuit.
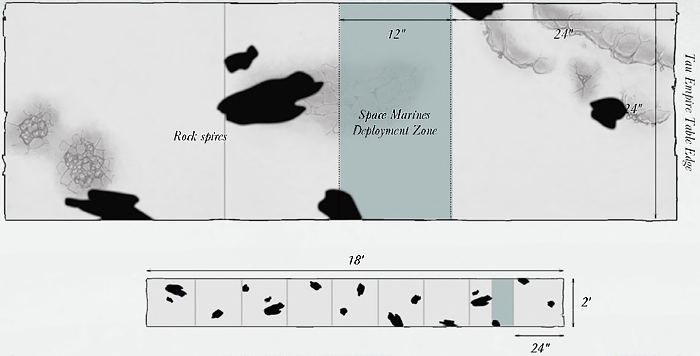 Select armies as described in the Choosing Your Army section. One player is the Space Marines player, and his opponent is the Tau Empire player. All units in both players’ armies must have the Flying Monstrous Creature, Flyer or Super-heavy Flyer unit type. All units in the Space Marines player’s army must have the Space Marines Faction and be drawn from the Raven Guard Chapter. All units in the Tau Empire player’s army must have the Tau Empire Faction. The Tau Empire player must include an Air Caste Support Cadre in his army if the models are available. THE BATTLEFIELD This aerial battle takes place in a narrow canyon. Set up the battlefield so that it is 2' wide and 6' long. The battlefield should be littered with rocky outcrops, which represent tall spires of rock. These are Impassable Terrain (even to Flyers). DEPLOYMENT The Space Marines player deploys first, anywhere in his deployment zone (see Mission Special Rules). All of the Tau Empire player’s forces must begin the game in Reserve. FIRST TURN The Tau Empire player has the first turn. GAME LENGTH The mission ends when the Space Marines player has either moved one of his models off the western table edge or has no models remaining on the battlefield. VICTORY CONDITIONS If the Space Marine player manages to leave combat airspace with any of his models via the western table edge at the canyon’s end (see Mission Special Rules), then he wins the game. Any other result is a victory to the Tau Empire player. Night Fighting, Reserves. №5
ECHOES OF WAR
:
To Sever the HeadCorvin Severax is on the hunt. Gathering a powerful strike force of his Chapter’s finest killers, the Master of the Raven Guard leads them to ensure the death of Commander Shadowsun and rob the xenos forces of her tactical brilliance. Yet O’Shaserra enacts a bold plan, using herself as bait to turn the hunters into the hunted.
 Select armies as described in the Choosing Your Army section. One player is the Space Marines player, and his opponent is the Tau Empire player. All units in the Space Marines player’s army must have the Space Marines Faction and be drawn from the Raven Guard Chapter. The Space Marines player must include a Chapter Master (Corvin Severax) to be his army’s Warlord if the model is available. All units in the Tau Empire player’s army must have the Tau Empire Faction. The Tau Empire player must include at least one XV95 Ghostkeel Battlesuit model in his army, as well as Commander Shadowsun to be his army’s Warlord if the models are available. THE BATTLEFIELD Set up terrain using the deployment map included in this mission. DEPLOYMENT The Tau Empire player deploys first, anywhere in his deployment zone. However, all units of XV95 Ghostkeel Battlesuits and XV25 Stealth Battlesuits must be placed in Deep Strike Reserve. The Space Marines player deploys second, anywhere in his deployment zone. FIRST TURN The Space Marines player has the first turn unless the Tau Empire player can Seize the Initiative. GAME LENGTH The mission uses Variable Game Length. VICTORY CONDITIONS At the end of the game, the player who has scored the most Victory Points is the winner. If both players have the same number of Victory Points, the game is a draw. Primary Objective At the end of the game, if the enemy Warlord has been removed as a casualty, you score 5 Victory Points. Note that, for the purposes of this mission, the Commander Shadowsun model does not count as the Tau Empire player’s Warlord for achieving this objective (see Mission Special Rules). In addition, at the end of the game, each player receives 1 Victory Point for each enemy unit that has been completely destroyed. Units that are Falling Back at the end of the game, and units that are not on the board at the end of the game, count as destroyed for the purposes of this mission. Remember that Independent Characters and Dedicated Transports are individual units and award Victory Points if they are destroyed. Secondary Objectives First Blood, Linebreaker. Night Fighting, Reserves. №6
ECHOES OF WAR
:
The Khan and the RavenUnited in purpose by the tragic death of Corvin Severax, the White Scars and Raven Guard are at last ready to fight as one and bring the wrath of the Imperium to the Tau. Using their own tactics against them, the Raven Guard work to lure the Tau from their defensive positions so that the White Scars can deliver the killing blow.
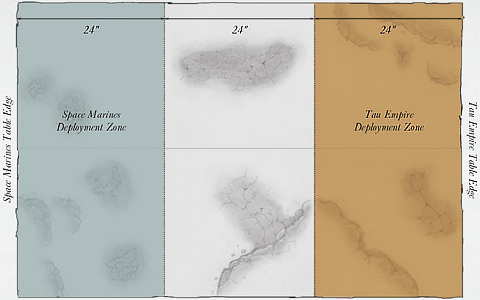 Select armies as described in the Choosing Your Army section. One player is the Space Marines player, and his opponent is the Tau Empire player. All units in the Space Marines player’s army must have the Space Marines Faction and he must divide his forces as evenly as possible between units drawn from the White Scars and Raven Guard Chapters. The Space Marines player must also include Kor’sarro Khan, as well as Shadow Captain Shrike to be his army’s Warlord, if the models are available. All units in the Tau Empire player’s army must have the Tau Empire Faction. THE BATTLEFIELD Set up terrain using the deployment map included in this mission. DEPLOYMENT The Space Marines player deploys first, placing his Raven Guard units anywhere in his deployment zone. All his White Scars units must be held in Reserve. The Tau Empire player deploys second, anywhere in his deployment zone. FIRST TURN The Tau Empire player has the first turn unless the Space Marines player can Seize the Initiative. GAME LENGTH The mission uses Variable Game Length. VICTORY CONDITIONS At the end of the game, the player who has scored the most Victory Points is the winner. If both players have the same number of Victory Points, the game is a draw. Primary Objective At the end of the game, each player receives 1 Victory Point for each enemy unit that has been completely destroyed. Units that are Falling Back at the end of the game, and units that are not on the board at the end of the game, count as destroyed for the purposes of this mission. Remember that Independent Characters and Dedicated Transports are individual units and award Victory Points if they are destroyed. Secondary Objectives First Blood, Linebreaker, Slay the Warlord. Night Fighting, Reserves. №7
ECHOES OF WAR
:
The Surging StormThe Knights of House Terryn have entered the fray, and their might treatens to turn the tide of war on Prefectia. Yet even this turn of events does not perturb the wily Shadowsun, for she also has a trump card that she has yet to reveal, over which even the indomitable Imperial Knights may not have the strength to prevail.
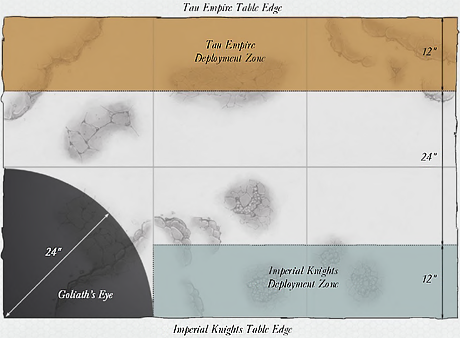 Select armies as described in the Choosing Your Army section. One player is the Imperial Knights player, and his opponent is the Tau Empire player. All units in the Imperial Knights player’s army must have the Imperial Knights Faction. The Imperial Knights player must include an Exalted Court and a Knight Paladin (the Obsidian Knight) if the models are available. The Formation’s High King (Tybalt) must be the army’s Warlord. All units in the Tau Empire player’s army must have the Tau Empire Faction. The Tau Empire player must include at least one KV128 Stormsurge if the model is available, and all other units in his army must either be vehicles or comprised entirely of battlesuits. THE BATTLEFIELD Set up terrain using the deployment map included in this mission. DEPLOYMENT The Imperial Knights player deploys first, placing his units anywhere in his deployment zone. The Obsidian Knight must be held in Reserve. The Tau Empire player deploys second, anywhere in his deployment zone. Any KV128 Stormsurges must be held in Reserve. FIRST TURN The Imperial Knights player has the first turn unless the Tau Empire player can Seize the Initiative. GAME LENGTH The mission uses Variable Game Length. VICTORY CONDITIONS At the end of the game, the Tau Empire player wins if he has completely destroyed all of the Imperial Knights player’s forces. If there are any models belonging to the Imperial Knights player remaining, the Imperial Knights player wins. Units that are not on the board at the end of the game count as destroyed for the purposes of this mission. Night Fighting, Reserves. №8
ECHOES OF WAR
:
Blood and VengeanceAfter many long months of bloody war, the stage is set for a final showdown to decide the fate of Prefectia. The armies of the Imperium have gathered their strength and the Tau Empire have at last revealed their deadly new innovations and mightiest machines of war. The future of the Gilded Worlds hangs in the balance...
 Select armies as described in the Choosing Your Army section. One player is the Space Marines player, and his opponent is the Tau Empire player. All units in the Space Marines player’s army must have the Space Marines Faction or Imperial Knights Faction. All Space Marines units must be drawn from the White Scars and Raven Guard Chapters. The Space Marines player must also include a Knight Warden (High King Tybalt) and Kor’sarro Khan, as well as Shadow Captain Shrike to be his army’s Warlord if the models are available. All units in the Tau Empire player’s army must have the Tau Empire Faction. The Tau Empire player must include a Commander (Commander Swiftflame), a Commander equipped with an XV86 Coldstar battlesuit (Commander Sternshield), as well as Commander Shadowsun to be his army’s Warlord if the models are available. THE BATTLEFIELD Set up terrain using the deployment map included in this mission. Objective Markers No Objective Markers are placed at this stage, but up to six can be generated over the course of the battle (see Mission Special Rules). DEPLOYMENT The Tau Empire player deploys first, placing his units anywhere in his deployment zone. The Space Marines player deploys second, anywhere in his deployment zone. FIRST TURN The Space Marines player has the first turn unless the Tau Empire player can Seize the Initiative. GAME LENGTH The mission uses Variable Game Length. VICTORY CONDITIONS At the end of the game, the player who has scored the most Victory Points is the winner. If both players have the same number of Victory Points, the game is a draw. Primary Objective At the end of the game, each Objective Marker (see Mission Special Rules) is worth 3 Victory Points to the player that controls it. In addition, the Space Marines player scores 1 Victory Point each time one of the following models is removed as a casualty: Commander Swiftflame, Commander Sternshield, Commander Shadowsun. The Tau Empire player scores 1 Victory Point each time one of the following models is removed as a casualty: High King Tybalt, Kor’sarro Khan, Shadow Captain Shrike. Secondary Objective First Blood, Linebreaker, Slay the Warlord*. * This means that 2 Victory Points are scored for slaying Commander Shadowsun or Shadow Captain Shrike. Night Fighting, Reserves. War Zone Damocles: Mont’ka CampaignThis section includes several Warhammer 40,000 missions inspired by the pivotal battles that took place on Mu’gulath Bay. These missions provide players with new ways to use their armies and a wealth of new tactical options to master - you can even play them sequentially as part of a campaign using the rules at the end of the section.
There are two main ways in which you can use the missions in War Zone Damocles: Mont’ka the most straightforward is to simply choose a mission you want to play. Alternatively, you can fight a campaign by playing the missions in order using the campaign rules. If you do so, then players should stick to the same side for each mission. Keep a note of the players’ victories and defeats the winner is the player with most victories once all of the missions have been played. In the case of a draw, the player that wins the final battle wins the campaign!There’s nothing to stop you from playing the missions using different armies from those in the story of War Zone Damocles: Mont’ka. With a little imagination and some minor changes, you can easily fight similar battles with any combination of miniatures and terrain you have in your collection. Mont’ka Campaign ChartThe Echoes of War missions recreate the pivotal battles of the war for Mu’gulath Bay. You can play through these missions in sequence to аight a thrilling campaign. If you do so, the victor of each mission will receive a bonus in the next mission of the campaign, as detailed on these pages. If a game is a draw, neither player receives a bonus in the next mission.If you wish, you can combine the campaigns from War Zone Damocles: Mont’ka and War Zone Damocles: Kauyon into one massive campaign! If you do so, the winner of the Kauyon campaign is allowed to add 100 points to their force in Echoes of War: Death in the Void. In addition, add together the number of missions won in both campaigns when working out the winner’s rating at the conclusion of the Mont’ka campaign. №1
ECHOES OF WAR
:
Death in the VoidThe Imperial campaign to recapture Mu’gulath Bay began in space above the planet. The Tau had built a network of defence satellites that would spell doom for Imperial forces attempting planetfall. Raven Guard and White Scars strike forces were despatched to destroy the networks before the invasion began.
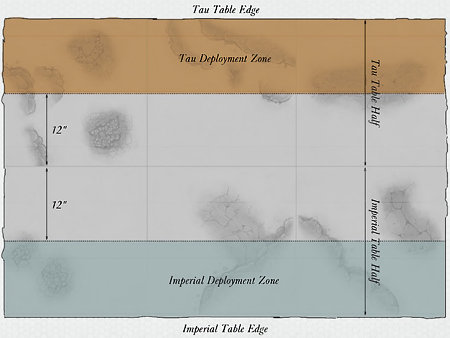
 Select armies as described in the Choosing Your Army section. One player is the Space Marines player, and his opponent is the Tau Empire player. All units in the Space Marines player’s army must have the Space Marines Faction and be drawn from the Raven Guard or White Scars Chapters. All units in the Tau player’s army must have the Tau Empire Faction. The army must include a Tidewall Shieldline and two Tidewall Gunrigs if they are available, though these models do not cost any points. THE BATTLEFIELD First of all, the Tau player places his Tidewall Shieldline and Tidewall Gunrigs in his deployment zone. Players then set up terrain. Objective Markers The Tau player must set up three Objective Markers in his deployment zone. One must be placed on the Tidewall Shieldline and one on each Tidewall Gunrig (if they have been used), and will move with them. DEPLOYMENT The Tau player deploys first. He must deploy all Troops units and up to two other units of his choice in his deployment zone. All other units must be held in Reserve. The Space Marines player deploys second, in his deployment zone. FIRST TURN The Space Marines player has the first turn unless the Tau player can Seize the Initiative. GAME LENGTH The mission uses Variable Game Length. VICTORY CONDITIONS At the end of the game, the player who has scored the most Victory Points is the winner. If both players have the same number of Victory Points, the game is a draw. Primary Objective At the end of the game, each Objective Marker on a Tidewall Gunrig is worth three Victory Points to the player that controls it - the Objective Marker on the Tidewall Shieldline is instead worth 6 Victory Points. Secondary Objectives Slay the Warlord. Reserves.
№2
ECHOES OF WAR
:
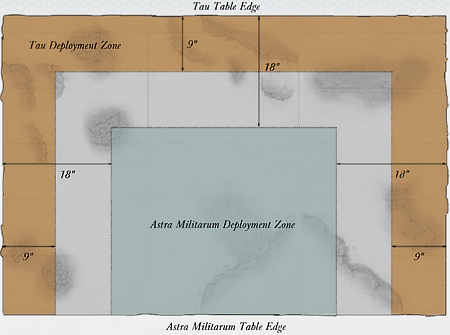
Armoured OnslaughtKnight Commander Pask was amongst the first to land on Mu’gulath Bay. Quickly organising the armoured forces under his command, he led a fast moving tank column against the Tau’s Armoured Interdiction Cadres. Caught badly off guard, the Tau attempted to fall back, but found themselves under attack from all sides.
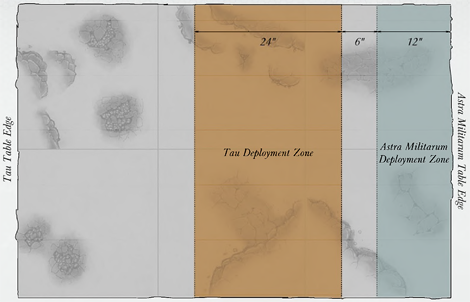 Select armies as described in the Choosing Your Army section. One player is the Astra Militarum player, and his opponent is the Tau Empire player. All units in the Astra Militarum player’s army must have the Astra Militarum Faction. The army must include Knight Commander Pask if his model is available. All units in the Tau player’s army must have the Tau Empire Faction. THE BATTLEFIELD Set up terrain. DEPLOYMENT The Tau player deploys first, in his deployment zone; he cannot voluntarily place units in Reserve. The Astra Militarum player deploys second, placing up to half of his units in his deployment zone. All other units must be held in Reserve. If his army includes Knight Commander Pask, he must be held in Reserve. FIRST TURN The Astra Militarum player has the first turn unless the Tau player can Seize the Initiative. GAME LENGTH The mission uses Variable Game Length. VICTORY CONDITIONS At the end of the game, the player who has scored the most Victory Points is the winner. If both players have the same number of Victory Points, the game is a draw. Primary Objective At the end of the game, each player earns a number of Victory Points equal to the Hull Points characteristic of each enemy Vehicle that has been completely destroyed. Secondary Objectives Slay the Warlord. Attacked From All Sides: Astra Militarum units in Reserve enter from either long table edge. The Astra Militarum player can choose which for each unit.
№3
ECHOES OF WAR
:
Conflicting AgendasAs the Imperium’s invasion progressed, Astra Militarum formations attacking Tau defence in stallations were joined by detachments from the Adeptus Mechanicus. However, the Martian Priesthood were primarily interested in retrieving Tau technology, even if this meant that their Imperial Guard allies suffered heavy casualties.
 This mission is intended for three players. One player commands a Tau Empire army, while the other two players command a combined army, with one player taking an Astra Militarum force and the other an Adeptus Mechanicus force. Choose armies. The combined army receives the same number of points as the Tau army, with each of the players receiving half of the points that are available for their combined force. All units in the Astra Militarum player’s force must have the Astra Militarum Faction, and all units in the Adeptus Mechanicus player’s force must have the Cult Mechanicus and/or Skitarii Faction. Each player is allowed to pick a Warlord for their force (see the Combined Forces special rule below). All units in the Tau Empire army must have the Tau Empire Faction. THE BATTLEFIELD Set up terrain. Objective Markers The Tau player must set up three Objective Markers in his deployment zone, using the rules for Placing Objective been placed, randomly select one of the three Objective Markers - this is the Technocache that the Adeptus Mechanicus player needs to capture. DEPLOYMENT The Tau player deploys first, in his deployment zone. The Imperial players deploy second in their deployment zone. FIRST TURN The combined Imperial army has the first turn unless the Tau player can Seize the Initiative. GAME LENGTH The mission uses Variable Game Length. VICTORY CONDITIONS At the end of the game, the player who has scored the most Victory Points is the winner. If all two or three players are tied with the most Victory Points, the game is a draw. Primary Objectives At the end of the game, the Astra Militarum and Tau players score 3 Victory Points for each Objective Marker they control. The Adeptus Mechanicus player scores 4 Victory Points if he controls the Technocache Objective Marker. Secondary Objectives (Adeptus Mechanicus only) The Adeptus Mechanicus are interested in examining Tau technology. The Adeptus Mechanicus player receives 1 Victory Point for each wrecked Tau vehicle that they control, up to a maximum of 3 Victory Points for controlling three wrecks. Tau vehicle wrecks are controlled in the same way as an Objective Marker. Night Fighting, Reserves. Astra Militarum units and Adeptus Mechanicus units cannot both control the same Objective Marker. Should this happen, the Objective Marker is contested and neither player controls it. №4
ECHOES OF WAR
:
The Unforeseen StrikeThings were going from bad to worse for the beleaguered Tau forces, who had been trapped in a few heavily fortified positions. Then, like a bolt from the blue, Commander Farsight arrived at the head of the Eight. Carving through the surprised Imperial defenders, the Eight struck at the Cadian army’s command HQ.
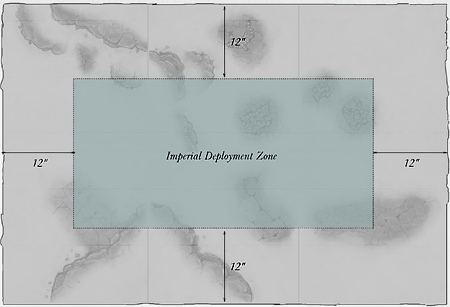 Points are not used for this battle. Instead one player commands The Eight Formation, and the other player takes a Cadian Battle Group Detachment consisting of 1 Core choice, 1 Command choice and 3 Auxiliary choices. If a player is not able to field their army in full, they should simply take as many units from the army as they have available. These units still count as being part of their respective Formations and/or Detachments, and receive the associated benefits for them. Expanded Game If the players agree, they can expand this game by adding one or more Retaliation Cadres to the Tau Empire army. The Cadian Battle Group can include an extra Auxiliary choice for each Retaliation Cadre that is added to the Tau army. THE BATTLEFIELD Set up terrain. DEPLOYMENT The Cadian player deploys first, anywhere on the battlefield that is more than 12" from a table edge. The Tau player does not deploy any units at the start of the battle - they arrive on the first turn as described below. Neither side can place units in Reserve. FIRST TURN The Tau player has the first turn, and must deploy his entire army at the start of the turn. Tau units can either be deployed within 3" of a table edge, or can enter play using the Deep Strike rule on the first turn. Models may deploy alongside different table edges if desired. GAME LENGTH The mission uses Variable Game Length. VICTORY CONDITIONS The Tau player wins immediately if all models in the Cadian Battle Group Command choice are destroyed or have Fallen Back off the battlefield. The Cadian player wins if the battle ends before this has happened. Lines of Retreat: Any units that Fall Back do so towards the nearest table edge. №5
ECHOES OF WAR
:
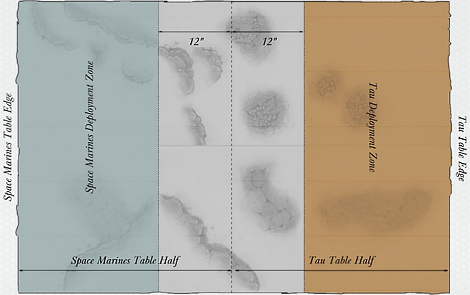
The Eye of the StormKnight Commander Pask and the tanks he led had caused terrible damage to the Tau defenders. Farsight knew he must neutralise the threat posed by the Imperium’s armoured forces, so he launched a devastating surprise attack on Pask’s squadron as they strove through an electrical dust storm.
 Select armies as described in the Choosing Your Army section. One player is the Astra Militarum player, and his opponent is the Tau Empire player. All units in the Astra Militarum player’s army must have the Astra Militarum Faction. The army must include Knight Commander Pask if a model is available for him. All units in the Tau player’s army must have the Tau Empire Faction. The army must include Commander Farsight if a model is available for him. THE BATTLEFIELD Set up terrain with the exception that no scenery can be set up in the Astra Militarum deployment zone. DEPLOYMENT The Astra Militarum player deploys first, in his deployment zone. No units apart from Flyers can be placed in Reserve. The Tau player deploys second, in his deployment zone. FIRST TURN The Tau player has the first turn unless the Astra Militarum player can Seize the Initiative. GAME LENGTH The mission uses Variable Game Length. VICTORY CONDITIONS At the end of the game, the players count up Victory Points to determine the winner. The Tau player wins if he has at least twice as many Victory Points as the Astra Militarum player. The battle is a draw if the Tau player has more Victory Points but not twice as many. The Astra Militarum player wins if the scores are tied or if he has more Victory Points. Primary Objective Each player receives 1 Victory Point for each enemy unit that has been completely destroyed or that is Falling Back at the end of the game (including any units or models destroyed by the electrical dust storm - see below). Independent Characters and Dedicated Transports are individual units and award Victory Points if destroyed. Secondary Objectives Slay the Warlord, First Blood, Linebreaker. Night Fighting, Reserves. To represent this, roll on the following table for each unit in the Astra Militarum army after deployment is complete but before the first turn. The Astra Militarum player does not have to take Morale checks for units that suffer casualties as a result of lightning strikes.
№6
ECHOES OF WAR
:
The Killing BlowPredicting that the Space Marines would enact a swift and sudden strike, Farsight made plans to use holographic decoys to lure them into an elaborate trap before dealing his final blow. But the White Scars and Raven Guard are themselves masters of battlefield tactics, and would not so easily succumb to the Tau’s deceptive ploys.
 Select armies as described in the Choosing Your Army section. One player is the Space Marines player, and his opponent is the Tau Empire player. All units in the Space Marines player’s army must have the Space Marines Faction and be drawn from the White Scars or Raven Guard Chapters. All units in the Tau player’s army must have the Tau Empire Faction. The army must include Commander Farsight if his model is available, and all models in the army must be equipped with battlesuits. THE BATTLEFIELD Set up terrain. DEPLOYMENT The Tau player deploys first, in his deployment zone. The Space Marines player deploys second, in his deployment zone. Only Space Marine units can be held in Reserve; the Tau player cannot voluntarily place units in Reserve. FIRST TURN The Space Marines player has the first turn. GAME LENGTH The mission uses Variable Game Length. VICTORY CONDITIONS At the end of the game, the player who has scored the most Victory Points is the winner. If both players have the same number of Victory Points, the game is a draw. Primary Objective Each player receives 1 Victory Point for each enemy unit that has been completely destroyed or that is Falling Back at the end of the game. Independent Characters and Dedicated Transports are individual units and award Victory Points if they are destroyed. Secondary Objectives Slay the Warlord, First Blood, Linebreaker. Reserves. №7
ECHOES OF WAR
:
Return of the Obsidian KnightThe Tau had believed the Obsidian Knight destroyed during the war for Prefectia, but the revered Freeblade returned as if from the grave to seek his revenge on Mu’gulath Bay. Supported by a company of Super-heavy Imperial tanks, the black-armoured Knight once again met the Tau Empire forces in furious battle.
 Select armies as described in the Choosing Your Army section. One player is the Imperial player, and his opponent is the Tau player. All units in the Imperial player’s army must have either the Astra Militarum or the Imperial Knights Faction. In addition, all units in the army must be Super-heavy Vehicles and/or Super-heavy Walkers. All units in the Tau player’s army must have the Tau Empire Faction. In addition, all units in the army must be Monstrous and/or Gargantuan Creatures. THE BATTLEFIELD Set up terrain. DEPLOYMENT Deploy using the Standard Deployment Method. If the Imperial player takes the Obsidian Knight (see the Mission Special Rules below), it must start the battle held in Reserve. FIRST TURN The player that set up first can choose to take the first or second turn. If they decide to take the first turn, their opponent can attempt to Seize the Initiative. GAME LENGTH The mission uses Variable Game Length. VICTORY CONDITIONS At the end of the game, the player who has scored the most Victory Points is the winner. If both players have the same number of Victory Points, the game is a draw. Primary Objective At the end of the game, each player earns a number of Victory Points equal to the Hull Points or Wounds characteristic of each enemy model that has been completely destroyed. Secondary Objectives Slay the Warlord, First Blood, Linebreaker. Reserves.
№8
ECHOES OF WAR
:
The Assassins StrikeThwarted by the skilled commanders of the Tau army, the Imperium deployed one of its feared Assassinorum Execution Forces, ordering them to remove the Tau leadership using any means necessary. It was quickly apparent, however, that the xenos leaders would not be easy targets, even for the Imperium’s deadliest killers.
 Points are not used for this battle. One player commands a Tau army consisting of one HQ choice with the Tau Empire Faction, protected by a single Tau Empire or Farsight Enclaves Formation. The other player commands an army consisting of an Imperial Assassin with the Officio Assassinorum Faction, supported by a single Astra Militarum or Space Marine Formation. Any Space Marines must be drawn from the Raven Guard or White Scars Chapters. Flyers, Super-heavy units and Monstrous or Gargantuan Creatures cannot be used by either side. If a player is not able to field a Formation in full, they should simply take as many units from the Formation as they have available. These units still count as being part of their Formation, and receive the benefits for it. THE BATTLEFIELD Set up terrain. DEPLOYMENT The Tau player deploys first, anywhere on the battlefield that is wholly within 12" of the centre of the battlefield. The Imperial player does not deploy any units at the start of the battle - they arrive on the first turn as described below. Neither side can place units in Reserve. FIRST TURN The Imperial player has the first turn, and must deploy his entire army at the start of the turn. Imperial models move on from any table edge. They can move and fight normally on the turn that they are deployed. GAME LENGTH The mission uses Variable Game Length. VICTORY CONDITIONS At the end of the game, the player who has scored the most Victory Points is the winner. If both players have the same number of Victory Points, the game is a draw. Primary Objective At the end of the game, each player receives a number of Victory Points equal to the number of Wounds and Hull Points of damage they have inflicted upon the enemy army. Each Wound inflicted on the Tau HQ choice or the Imperial Assassin is worth 10 Victory Points rather than 1. Lines of Retreat: Any units that Fall Back do so towards the nearest table edge.
|
Factions > Tau Empire >

