1
KILL TEAM
:
Forward PushYour Kill Team has been tasked with pushing back the forward elements of the enemy army from a strategically important location, so that vanguard units can follow up and secure the area.
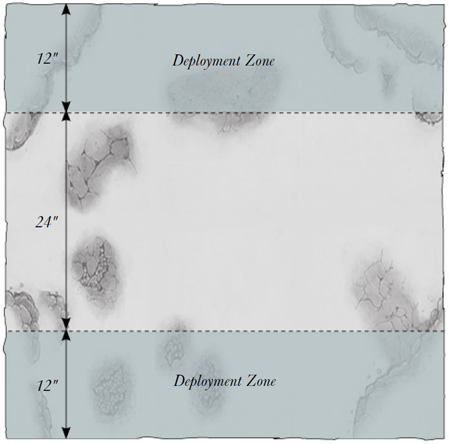 Choose armies as described in the Choosing Your Kill Team section. THE BATTLEFIELD Use the deployment map included with this mission. Set up terrain. Objective Markers After terrain has been set up, but before determining table halves, the players must place 3 Objective Markers, using the rules for Placing Objective Markers. DEPLOYMENT Before any models are deployed, both players must roll to determine their Leader Traits. Both players then deploy forces. FIRST TURN The player that deployed first has the first turn unless their opponent can Seize the Initiative. GAME LENGTH This mission uses Variable Game Length. VICTORY CONDITIONS At the end of the game, the player that has scored the most Victory Points wins the battle. If the players have the same number of Victory Points, the game is a draw. Primary Objectives At the end of the game, each Objective Marker is worth 1 Victory Point to the player that controls it. Secondary Objectives Break the Enemy, First Blood, Linebreaker, Slay the Leader. Mysterious Objectives, Night Fighting 2
KILL TEAM
:
Alone in the DarkYou are undertaking a dangerous mission under cover of darkness. Enemy patrols were spotted in this location before night fell, and you have been charged with driving them from the area and holding your ground until dawn.
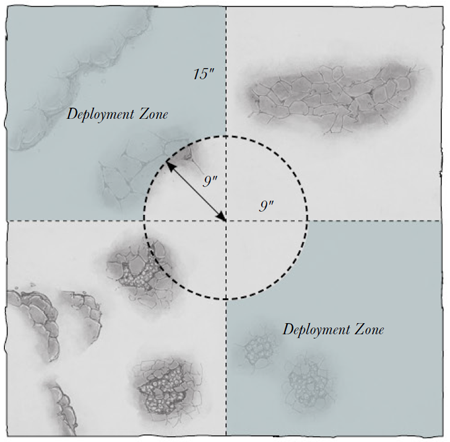
Choose armies as described in the Choosing Your Kill Team section. THE BATTLEFIELD Use the deployment map included with this mission. Set up terrain. Objective Markers After terrain has been set up, but before determining table halves, the players must place 3 Objective Markers, using the rules for Placing Objective Markers. DEPLOYMENT Before any models are deployed, both players must roll to determine their Leader Traits. Both players then deploy forces as described in the Search Pattern mission special rule (see below). FIRST TURN The player that deployed first has the first turn unless their opponent can Seize the Initiative. GAME LENGTH This mission uses Variable Game Length. VICTORY CONDITIONS At the end of the game, the player that has scored the most Victory Points wins the battle. If the players have the same number of Victory Points, the game is a draw. Primary Objectives At the end of the game, each Objective Marker is worth 1 Victory Point to the player that controls it. Secondary Objectives Break the Enemy, First Blood, Linebreaker, Slay the Leader. Mysterious Objectives. 3
KILL TEAM
:
Head HuntYour army’s scouts have tracked a dangerous enemy leader to this location. In a bid to make a name for yourself, you are leading a handpicked team of warriors to take his head.
 Choose armies as described in the Choosing Your Kill Team section. THE BATTLEFIELD Use the deployment map included with this mission. Set up terrain. DEPLOYMENT Before any models are deployed, both players must roll to determine their Leader Traits. Both players then deploy forces. FIRST TURN The player that deployed first has the first turn unless their opponent can Seize the Initiative. GAME LENGTH This mission uses Variable Game Length. VICTORY CONDITIONS At the end of the game, the player who has scored the most Victory Points wins the battle. If the players have the same number of Victory Points, the game is a draw. Primary Objectives If, at the end of the game, the enemy’s Leader has been slain, you score 3 Victory Points. You also score 1 Victory Point at the end of the game for each enemy Specialist that has been slain. No Victory Points are earned for enemy models that fled the battlefield as a result of failed Break tests. Secondary Objectives Break the Enemy, First Blood, Linebreaker. Night Fighting 4
KILL TEAM
:
Infiltrate the CampYour scouts have located a forward enemy command post, cunningly concealed – or so they think – in no man’s land. You have been tasked with fighting your way past the scouting parties prowling its perimeter and planting explosives within the compound.
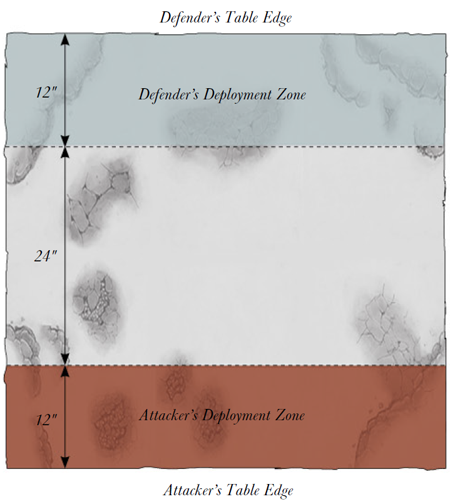 Choose armies as described in the Choosing Your Kill Team section. Either agree with your opponent which player will be the Attacker or Defender, or roll-off; the player who wins the roll-off can choose to be the Attacker or Defender. THE BATTLEFIELD Use the deployment map included with this mission. Set up terrain. DEPLOYMENT Before any models are deployed, both players must roll to determine their Leader Traits. The Attacker deploys first, placing all of his models anywhere within the Attacker’s Deployment Zone (see map). The Defender then deploys all of his models anywhere within the Defender’s Deployment Zone (see map). FIRST TURN The Attacker has the first turn unless the Defender can Seize the Initiative. GAME LENGTH This mission uses Variable Game Length. VICTORY CONDITIONS At the end of the game, the player that has scored the most Victory Points wins the battle. If the players have the same number of Victory Points, the game is a draw. Primary Objectives At the end of the game, the Attacker scores 1 Victory Point for each of their models that leaves the battlefield via the Defender’s table edge (see the Breakthrough mission special rule below). The Defender scores 1 Victory Point for every three enemy models that they kill or completely destroy. However, the Defender earns no Victory Points for enemy models that flee the battlefield as a result of failed Break tests. Secondary Objectives Break the Enemy, First Blood, Slay the Leader. Night Fighting. 5
KILL TEAM
:
Secure the High GroundEnemy forward units have been spotted near a crucial site that offers a strategically important view of the valley beyond. Take the hill and get rid of the enemy threat in the area.
 Choose armies as described in the Choosing Your Kill Team section. THE BATTLEFIELD Place the tallest piece of terrain in your collection in the centre of the battlefield to represent the high ground, then set up terrain. DEPLOYMENT Before any models are deployed, both players must roll to determine their Leader Traits. Both players then deploy forces. FIRST TURN The player that deployed first has the first turn unless their opponent can Seize the Initiative. GAME LENGTH This mission uses Variable Game Length. VICTORY CONDITIONS At the end of the game, the player who has scored the most Victory Points wins the battle. If the players have the same number of Victory Points, the game is a draw. Primary Objectives At the end of the game, you score 1 Victory Point for each non-vehicle model whose entire base is within the boundaries of the central terrain piece. Secondary Objectives Break the Enemy, First Blood, Linebreaker, Slay the Leader. Night Fighting 6
KILL TEAM
:
Supply DropYour Kill Team desperately needs supplies. An essential airdrop lies ahead, but enemy scouts are trying to intercept you. Most of the crates will contain rations, but your focus is getting to the munitions before the foe.
Choose armies as described in the Choosing Your Kill Team section. THE BATTLEFIELD Use the deployment map included with this mission. Set up terrain. Objective Markers After terrain has been set up, but before determining table halves, the players must place 6 Objective Markers, using the rules for Placing Objective Markers. After all the Objective Markers have been placed, roll to scatter each marker and move it accordingly. If the Objective Marker would scatter off the table or into impassable terrain, move it as far as you can in the direction indicated by the scatter dice, but place it no closer than 1" to the table edge or terrain. DEPLOYMENT Before any models are deployed, both players must roll to determine their Leader Traits. Both players then deploy forces. FIRST TURN The player that deployed first has the first turn unless their opponent can Seize the Initiative. GAME LENGTH This mission uses Variable Game Length. VICTORY CONDITIONS At the end of the game, the player that has scored the most Victory Points wins the battle. If the players have the same number of Victory Points, the game is a draw. Primary Objectives At the end of the game, the Primary Drop (see Mission Special Rules, below) is worth 3 Victory Points to the player that controls it. Secondary Objectives Break the Enemy, First Blood, Linebreaker, Slay the Leader. Night Fighting.
|
Expansions > Kill Team >

