So, you’ve read the rules and are now thirsting for the opportunity to win glory. It is time to prepare for battle…
This section will guide you through the seven steps of preparing for battle; these apply whether you’re using an existing mission or creating your own, and cover everything from picking your armies to determining the winner at the end of the game.
The first thing you need to do when preparing for a battle is to decide if you wish to use a Warhammer 40,000 mission from a Games Workshop publication. If so, you need to choose which one, and if not, you and your opponent can create your own mission by deciding for yourselves what to do for each step of the Preparing for Battle sequence.
| Mission Format |
Every Warhammer 40,000 mission has the following sections:
The Armies: Any restrictions or requirements on what may be taken in either player’s army will be described here. The Battlefield: Any restrictions or requirements about how the battlefield is set up will be described here. Deployment: How the armies must deploy will be described here. Most missions also include a deployment map which accompanies the deployment instructions to describe how and where each of the armies deploys. First Turn: How to select the player that has the first turn of the battle is described here. Game Length: How long the mission will last is listed here. Victory Conditions: How the winner of the mission will be determined is described here. Mission Special Rules: Any special rules that must be used in the mission are listed here. A list of common mission special rules can be found at the end of this section. |
Creating Your Own Missions
Warhammer 40,000 is a very flexible game, designed to allow you to recreate any of the battles that take place in the 41st Millennium. Because of this, when you prepare to fight a Warhammer 40,000 battle using a mission of your own devising, you and your opponent will need to discuss how you will set up the battlefield, pick the models you will use in the game, and decide how to determine the winner. If you take this approach, simply work through the following six steps – the description of each includes guidance for those creating their own missions.
Using a Warhammer 40,000 Mission
Games Workshop publishes a large and growing range of
Warhammer 40,000 missions. Each one provides all the information you need to prepare for a Warhammer 40,000 battle, and they have been carefully designed to provide exciting and challenging games. We have included two sets of missions to choose from in this book (see below), but these are far from the only options available, however, and other publications present
Altars of War (mission sets designed to represent the fighting styles of particular factions) and
Echoes of War (narrative missions that reconstruct battles from the history of the Warhammer 40,000 universe).
If you play an existing mission, the mission will include instructions for each of the
Preparing for Battle steps. Many of the published missions also refer back to some of the suggested rules included for each step here.
If a particular mission instructs players to Prepare for Battle using a different sequence, or otherwise modifies the rules in this section, always follow the sequence and rules presented in that mission.
Some mission sets have a Mission table to roll on. If the winner of the Choose a Mission
roll-off wants to use such a mission set, then the players can either agree which mission to play from those in the set, or can select the mission
randomly by rolling on the Mission table provided with the set.
Eternal War & Maelstrom of War Missions
This book includes two sets of missions:
Eternal War and
Maelstrom of War. These missions are specifically designed for games where the armies are of roughly the same size and the situation gives neither side a particular advantage. As a result, it is not necessary to know which of these missions you will be playing before selecting an army, only the agreed points value of the two battling armies. Once you know that, and you have selected your force, simply turn up and play.
If you and your opponent want to play a mission from either of the two sets presented in this section,
roll-off against each other. The winner can decide which mission table to use.
Then, if you are playing Eternal War, you and your opponent can either pick which mission to play from those on the Eternal War mission table to the right, or select the mission
randomly by rolling on the table. If you are playing Maelstrom of War, you and your opponent can either pick which mission to play from the mission table below, or select the mission randomly by rolling on the table.
| Eternal War Mission Table |
|
| Maelstrom of War Mission Table |
|
The Altar of War missions (included in numerous codex supplements) are designed to provide players with games that will really challenge their tactical ability. We’ve gone to some pains to make sure that each mission is as balanced as possible, and that they provide both sides with a new set of tactical challenges to overcome.
This means that, in order to win, you will need to be prepared to think on your feet and quickly adapt to the new circumstances the missions will throw at you. You may be called upon to spearhead an attack or fight to hold a defensive position deep behind enemy lines. Tried and trusted tactics will need to be re-thought in the face of these new challenges, and you will need to be ready to think outside the box in order to win.
It is very straightforward to use an Altar of War mission – it only requires a handful of minor modifications to the rules for fighting a battle in the Warhammer 40,000 rulebook. These changes are explained in detail next, but they boil down to:
roll-off if you want to use an Altar of War mission; if you win, you can roll on an Altar of War mission table instead of the
Eternal War mission table. And that’s it!
The MissionIf either you or your opponent wish to use an Altar of War mission, then you must make a
roll-off at the start of
The Mission step of Prepearing for Battle. The winner of the roll-off can choose to either roll on the
Eternal War mission table, or instead roll on the Altar of War mission table for their army. Other supplements also have new types of mission tables, and the winner of the dice roll-off could choose to roll on one of those, if they prefer and are allowed to do so.
These rolls will determine which mission is used for the battle. Note that each set of Altar of War missions is linked to an army chosen from a specific codex; in order to use Altar of War missions, an army chosen from the appropriate codex must be the
primary detachment. For example in the case of Altar of War: Crimson Slaughter, the missions are linked to armies chosen from Codex:
Chaos Space Marines using the additional rules found elsewhere in appropriate book.
For example, Jeremy and Mark have arranged to play a game of Warhammer 40,000. Jeremy has brought along his Crimson Slaughter army and this book, while Mark is using his Dark Eldar and has Eternal War missions from the Warhammer 40,000 rulebook. They roll-off and Jeremy wins. He decides to roll on the Crimson Slaughter Mission table in this book. If Mark had won, he would have rolled on the Eternal War Mission table instead.The BattlefieldThe deployment map, deployment zones and deployment instructions for each Altar of War mission are included in the mission itself; unless otherwise stated, do not use the deployment maps in the Warhammer 40,000 rulebook.
The EnemyThe player that won the roll-off and rolled on the Altar of War Mission table is known as ‘the Appropriate Codex player’ in the rules and missions that follow, and their opponent is known as ‘the enemy player’. Note that the player that loses the roll-off counts as ‘the enemy’ for the purposes of an Altar of War mission, even if he have same army.
ReservesAltar of War missions follow all of the rules for
Reserves; however, some specify different limits on how many units may (or must) be placed in reserve rather than deployed at the start of the game.
Carry On As NormalThese three changes aside, all of the rules for
Preparing for Battle are used as normal.
Selected MissionsAs an alternative to rolling on a mission table, the players can agree to choose the mission they wish to fight. Picking missions is a great way to try out a particular mission you haven’t fought before or to hone your skills at missions you have previously fought.
Echoes of War missions represent key historical battles inspired by the violent struggles within the history of the Appropriate Codex. The Armies section of each of these missions provides guidance on the forces present so that you can replay the pivotal events using the armies, characters and war machines described in supplement. Many of the Echoes of War missions include a map that depicts the battlefield on which the conflicts were fought. For those with a mind to historical accuracy, you’ll notice certain restrictions and rules that we use to replicate the conditions of the battle in question. Whilst the Echoes of War missions have been inspired by specific events, with a little imagination they can easily be repurposed to recreate battles of your own invention. If you choose to go this route, you can modify these missions so that they can be fought using any combination of forces and terrain in your collection.
The MissionHowever you use these missions, it only requires a handful of changes to the
Preparing for Battle rules in Warhammer 40,000: The Rules, which are detailed below.
The ArmiesEach mission recommends which armies and units should be used if you want to fight the battle according to the story. If players are using different armies, then it is up to them to choose sides.
Unique CharactersModels noted as being Unique in their
Army List Entry represent legendary characters of the 41st Millennium. If you want to play a mission according to the story, then these characters should only be used if they are listed in
The Armies section of that mission they were either at the battle, or they were not!
The Battlefield and DeploymentThe deployment map, zones and instructions for an Echoes of War mission are included with the mission itself; don't use those in Warhammer 40,000: The Rules.
Victory Conditions and Mission Special RulesSome
mission special rules and
victory conditions only apply to specific units. If that unit isn't present at your version of the battle, then the associated special rule or victory condition is simply ignored.
There are many ways you can pick an army, and these are discussed in detail in the
Choosing Your Army section. Both players will need to agree whether they will use a points limit, and any other restrictions they will place upon their army selection. In some cases, the mission may also specify certain restrictions or requirements.
The battlefield over which your game is played must be set up before the game begins. This step is split into two parts: creating the battlefield itself, and placing scenery upon it.
The battlefield is usually a flat surface on which scenery models are placed and over which the armies fight. The battlefield can be of any size from 2' by 2' upwards. We recommend that it not be more than 6’ wide at any point, as tables that are wider than this can limit the ability of players to reach models in the centre of the battlefield. Battlefields are most often rectangular in shape, but can be square, round, L-shaped, or whatever other configuration is agreed upon. A Realm of Battle board makes an excellent battlefield, but a typical dining table will suffice.
The battlefield is considered to be ‘
open ground’ for all rules purposes. A unit cannot voluntarily move or be placed beyond the table edge unless it, or the mission you are playing, has rules that specifically say it can choose to leave the battlefield.
Every battlefield looks better if it includes at least some terrain, be it woods, hills or buildings. Games Workshop manufactures a range of Citadel scenery models for just this purpose. These models are specifically designed to provide an evocative and tactically challenging landscape over which the models in your army can fight. Many pieces of Citadel scenery have a terrain datasheet that describes how they are used in the game.
Exactly how you set up Citadel scenery models is purely a matter of personal taste, and they can be placed upon the battlefield in any way the players find agreeable. In general, we have found that the more scenery you can place on the battlefield, the better the game will be. That aside, placing the scenery so as to create an interesting and inspiring looking landscape should be your primary goal.
Some pieces of scenery are called fortifications. These can be included in a player’s army or used as pieces of ‘neutral’ scenery controlled by neither side. If a fortification is taken as part of an army, then it is set up with the rest of the units in the army using the same
deployment rules as the other models. If you decide to use a fortification as a piece of neutral scenery, then it is set up during this step. Each fortification has a
fortification datasheet that describes how it is used in the game.
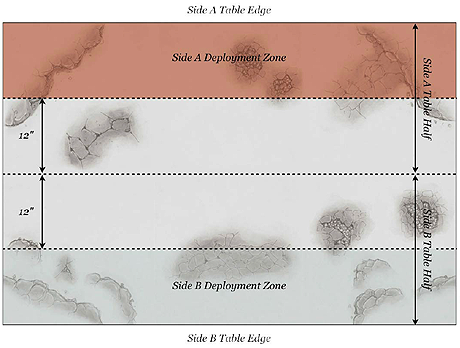
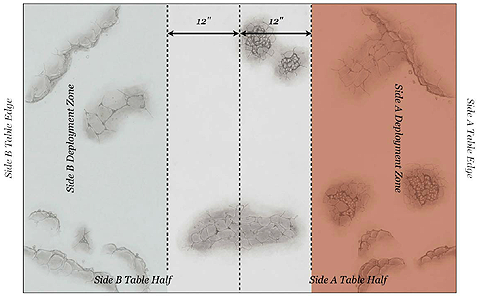
Once the armies are chosen, the areas where they can be set up, or rather deployed, must be decided. If you are using a mission, it will have a deployment map that will show you each player’s deployment zone. If you are not using a published mission, we recommend you simply divide the table in half down its length, and deploy the armies in the opposite halves of the table. Alternatively, you could divide the table in half across its width, or diagonally, or use
Random Deployment Zones (below).
In addition, it is usual to say that units from the two sides must set up a certain distance away from each other. This is not strictly necessary, but it stops the armies from starting too close together, and allows for a certain amount of manoeuvring at the start of the battle before units can charge each other. The easiest way of achieving this is to say that no unit may set up within a certain distance of the centre line between the two sides’ deployment zones. We’ve found that 12" away from the centre line works best; this ensures that the armies will start at least 24" apart, which makes first turn charges hard to achieve while still giving you enough space on a typical table to deploy your army.
As well as deciding on each player’s
deployment zone, you must select a table edge for each player. When models
Fall Back, they will head for their table edge, and it is also where
Reserve units will arrive from. The deployment map included with a Warhammer 40,000 mission will usually show each player’s table edge. If it does not, or you are using a mission you have made yourselves, you will need to decide where each player’s table edge is before the battle. In general, the players’ table edges will be opposite one another.
Games Workshop manufactures a range of Realm of Battle boards that can be used to create a battlefield. Each Realm of Battle board section is 2' by 2', and they can be joined together to create the surface on which your battle is fought. Some Realm of Battle board sections include hills and raised areas to make the landscape more attractive and convincing in appearance. These raised areas and the slopes leading up to them are considered to be
open ground as far as the game rules are concerned.
Many Warhammer 40,000 missions use the following method for randomly determining the armies’ deployment zones and the players’ table edges. To use this method, roll a D6 and consult the table to the right to see which deployment map you will use.
If you are using Dawn of War deployment zones, the board is divided into two equal halves across its length.
For Dawn of War, a player’s board edge is the long board edge touching his own deployment zone.
If you are using Hammer and Anvil deployment zones, the board is divided into two equal halves across its width.
For Hammer and Anvil, a player’s board edge is the short board edge touching his own deployment zone.
If you are using Vanguard Strike deployment zones, the board is divided into two equal halves across its diagonal. Agree with your opponent which diagonal to play across, or determine it randomly.
For Vanguard Strike, a player’s board edge is the long board edge touching his own deployment zone.
The only thing that remains to be done is the deployment of the two armies. If you are using a Warhammer 40,000 mission, it will tell you how to deploy the armies taking part in the battle. You will need to agree on the method you will use in your own games.
We’ve included rules for the most common method used to deploy here. This is often referred to as the ‘
Standard Deployment Method’ and is the method used in the majority of Warhammer 40,000
missions. You should feel free to devise other methods for your own game if you prefer. For example, some players like to place a screen across the centre of the table so that their armies can deploy in secret; others draw a map showing where they plan to deploy their units, and so on.
Whichever method you use, models must either deploy within their
deployment zone, or be held back in
Reserve. Models can be deployed ‘inside’
buildings,
fortifications, or
Transport vehicles in their deployment zone, subject to their
Transport Capacity. Units may not be deployed in
impassable terrain. Note that models must be deployed fully within their deployment zone: you can’t have part of a model inside the deployment zone and part of the model outside it!
Standard Deployment Method
The following sequence is used in most Warhammer 40,000
missions:
1. The players
roll-off. The winner of the roll-off decides who will
deploy first and who will deploy second.
2. The side deploying first must set up all the units in their army.
3. Then the other side sets up all the units in their army.
4. The player that deployed first can choose to take the first or second turn. If they decide to take the
first turn, their opponent can attempt to
Seize the Initiative.
Some pieces of scenery can be purchased as upgrades for a fortification. For example, a
Comms Relay can be purchased as an upgrade for an
Imperial Bastion. When this is the case, the upgrade can either be placed on top of the
building’s battlements (if it is a building with battlements), or set up as a separate model within 6" of the model taking the option.
It’s not uncommon to find that you can’t fit all of the models in your army into your
deployment zone. When this happens, any units that can’t fit into your deployment zone must be held back as
Reserves, and will enter play later during the battle, hopefully when there is room for them to fit onto the battlefield.
This being said, a far better solution is to increase the size of the battlefield and/or the size of the deployment zones being used. With experience, you will learn roughly how much space your army needs to deploy in, and will be able to tailor deployment zones appropriately. You might also want to reduce the amount of scenery in a deployment zone, or shuffle it around slightly in order to give models the space they need to deploy.
You and your opponent now need to decide who will have the first turn. If you are using a Warhammer 40,000
mission, then this information will be included with it, but if you are not using a mission, you and your opponent must decide the starting player for yourselves.
In general, we’ve found it best if the player who set up first also has the first turn. This avoids situations where the player that deploys second is able to deploy units in a perfect shooting position, secure in the knowledge that their opponent can do nothing about it! Sometimes, though, it will be more appropriate to
roll-off to see who gets the first turn, or say that the player that set up second gets the first turn (if they are ambushing the first player, for example).
Most Warhammer 40,000
missions use the following rule for
Seizing the Initiative to determine who has the first turn. You can use this rule for games of your own devising too.
If the player who is due to go second wishes to Seize the Initiative, he can roll a D6 before beginning the first game turn. On a roll of 6, he successfully seizes the initiative and goes first instead.
For most games, the length of the game will be a certain number of game turns. If you are using a Warhammer 40,000
mission, it will include this information, but if you are creating a mission of your own, we have found that five to six game turns is usually about the right length – remember that the larger the game is, the more time you’ll need.
Alternatively you can play to a time limit, in which case an hour or two is long enough for a small game with a few dozen models, and two or three hours is long enough for a larger game with a hundred or so models. Very large battles can take considerably longer, but by the time you are ready to fight such battles, you should have enough experience to judge how long they will probably last.
Most Warhammer 40,000
missions use the following rule for
Variable Game Length to determine how long a battle lasts. You can use this rule for games of your own devising too.
At the end of game turn 5, one of the players must roll a D6. On a roll of 3+ the game continues, otherwise the game is over. If another turn is played, another D6 must be rolled at the end of game turn 6, and this time, the game only continues on a roll of 4+. The battle automatically ends at the close of game turn 7.
Next you will need to decide how the winner of the battle will be determined. Although fighting until one player concedes or their army is destroyed is a perfectly viable method of determining who has won a battle, more commonly ‘
Victory Points’ (see below) are used to decide the winner. Alternatively, you might wish to say that one side or the other must achieve a specific objective; if they have achieved this when the game ends, they win the battle, and if not the other side wins. Victory conditions like this are most appropriate when you are refighting a battle based on the background for Warhammer 40,000, where each side will have certain very specific goals.
Most of the
Warhammer 40,000 missions that we publish use Victory Points. Such games are referred to as ‘Victory Point games’. Victory Points are acquired by securing
Primary and
Secondary Objectives, and the winner is the army with the most Victory Points at the end of the game. If the winner has twice the Victory Points of his opponent, it can be considered a crushing victory! If both armies have the same number of Victory Points, the game is a tactical draw.
Generally a
Victory Point game will not finish before the agreed turn limit. However, it is possible to achieve a ‘sudden death victory’ in a Victory Point game in the following circumstances:
- If one player concedes the battle, the game ends and a crushing victory goes to the opponent.
- If at the end of any game turn, one player has no models on the battlefield his opponent automatically wins. Units occupying a building or embarked on a vehicle still count as being on the battlefield, but units that are in Reserve (including Ongoing Reserve) do not.
Primary Objectives define your army’s main goal on the battlefield. This goal usually involves achieving the objectives in question – by controlling one or more vital sites or simply destroying parts of your enemy’s force. Unless otherwise stated, both sides share a mission’s Primary Objectives. If you are playing a published Warhammer 40,000 mission, it will tell you how to determine your game’s Primary Objectives.
Secondary Objectives are less important than
Primary Objectives, but can still mean the difference between victory and defeat. Most
Victory Point games have three Secondary Objectives shared by both players:
Slay the Warlord,
First Blood and
Linebreaker.
If the enemy army has a
Warlord, and at the end of the game the Warlord has been removed as a casualty, you score 1
Victory Point.
The first unit, of any kind, to be completely destroyed during the game is worth 1
Victory Point to the
opposing player at the end of the game.
If two or more units from opposing forces are destroyed simultaneously (for example, at the same
Initiative step in an
Assault phase) then both players get 1 Victory Point (in addition to any Victory Points from the mission).
If, at the end of the game, you have at least one model from one or more
scoring units completely within 12" of the enemy’s table edge, you score 1
Victory Point.
Terrain & Victory Conditions
Do not include any
Citadel scenery models when awarding
Victory Points or determining if a player has any units ‘on the battlefield’.
Conjured Units & Victory Conditions
Certain
psychic powers or special rules will allow you to ‘conjure’ a model or unit and make it appear on the battlefield. Conjured units count as part of the army of the player that has conjured them as far as
Victory Conditions and the rules for
Victory Points are concerned. If a model is conjured several times (i.e. it is re-used after being removed as a casualty), then it counts as a different unit for victory point purposes each time it is used.
Some
Warhammer 40,000 missions require the use of Objective Markers. An Objective Marker is usually a point on the battlefield of particular importance to one or both of the armies. These points are designated by using specially modeled markers, coins or counters around 1 to 2 inches in diameter.
Placing Objective Markers
Missions that use
Objective Markers will contain details on how many need to be placed and any special instructions for how to place them on the battlefield. Unless instructed otherwise in the mission, take it in turns to set up Objective Markers according to the following rules:
- Roll-off to see who places the first marker.
- No Objective Marker can be placed within 6" of any battlefield edge or within 12" of another Objective Marker.
- No Objective Marker can be placed on impassable terrain.
- No Objective Marker may be placed inside a building, though it can be placed upon it. (Should a building with an objective upon it be removed, place the Objective Marker on the ground below the point it occupied).
These restrictions aside, you can place Objective Markers anywhere on the battlefield. If there are a lot of Objective Markers, or a lot of terrain, you may sometimes find that the last few are impossible to place using the above rules. When this occurs, simply nudge the other Objective Markers by the smallest distance necessary to allow the last ones to be placed.
Controlling Objective Markers
You control an
Objective Marker if there is at least one model from one of your
scoring units (see below), and no models from enemy scoring units, within 3" of it. As different Objective Markers vary in shape and size, it is important to agree at the beginning of the game exactly from where this distance will be measured. Any unit that is in a
building is considered to be within 3" of any Objective Markers that are on or within 3" of the building.
A unit can only control one Objective Marker at a time. If a unit moves into a position where it could control two Objective Markers, you must make it clear to your opponent which objective the unit is controlling.
Any unit can be a scoring unit, unless:
Special rules can be added to a game to cover unique situations, tactics or abilities that you feel need to be represented in your battle. For example, if you were fighting a battle set on a frozen ice-world, you might include special rules for snow-drifts or the occasional blizzard sweeping the table. It is for you and your opponent to decide if any special rules apply in your games. One of the strengths of Warhammer 40,000 is that it is both easy and fun to devise your own special rules. They are especially useful when fighting a battle based on a story from the Warhammer 40,000 background, or which has a strong theme for another reason. Just take care not to get carried away – a couple of mission special rules can add much to a game, but having too many special rules will only bog the game down.
| Hostile Environments |
| War Zone Fenris: Curse of the Wulfen brings new mission rules for fighting in hostile environments. You can use these in any combination you choose to recreate some of the more esoteric battlefields of the 41st Millennium, such as a Haunted Shrine World or an Abandoned Ice Planet. They are designed to be used in any game of Warhammer 40,000, not just the missions in this book. Any Maelstrom of War, Eternal War or Altar of War mission could take place in such an environment, as could games of Planetstrike, Cities of Death or Apocalypse. Why not add an exciting new dimension to your favourite missions by adding these rules into the mix? |
Some of the
Warhammer 40,000 missions available use unique special rules which confer extra abilities, restrictions or effects onto your games. The Warhammer 40,000 missions included in this book mostly make use of the more common mission special rules presented here; many other missions will use these alongside their own special rules.
| Battlezone: Empyric Storms |
Battlezone rules are designed to be used in any game of Warhammer 40,000 to represent all manner of otherworldly environments. Agree with your opponent which, if any, Battlezone rules will be used when you are setting up the battlefield, before deployment.
On this page you will find Battlezone rules for fighting amidst turbulent empyric storms unleashed by the Warp. These rules can be used to recreate the effects of the ebb and flow of the Immaterium, granting both powerful boons and debilitating burdens to those battling in the maelstrom.
Many of the missions that follow have the Empyric Storms mission special rule to represent the fluctuating Warp tides at work during the events they depict, but you can use the Battlezone: Empyric Storms rules in any of your games. |
When a mission uses the Mysterious Objectives special rule, any unit that moves within 3" of an objective, or is within 3" of an objective at the start of the
first turn, must identify the nature of it. To do so, the identifying unit’s
controlling player must roll a D6 and consult the following table.
| D6 | Result | | 1 | Sabotaged! At the end of the turn in which the objective was identified, and at the end of every turn thereafter, roll a D6. On a roll of 1 all units within 3" of the Objective Marker suffer D6 Strength 4 AP- hits. | | 2 | Nothing of Note. This has no additional affect. | | 3 | Skyfire Nexus. A unit that controls this objective can choose whether or not all of the models in it have the Skyfire special rule each time they shoot. | | 4 | Targeting Relay. A unit controlling this objective re-rolls failed To Hit rolls of 1 when shooting. | | 5 | Scatterfield. A unit that controls this objective counts its cover saves as being 1 point better than normal (so a unit in the open would have a 6+ cover save). This bonus is cumulative with the Stealth and Shrouded special rules. | | 6 | Grav Wave Generator. Any unit attempting to charge a unit in control of this objective subtracts 2 from its charge range (to a minimum of 0). This is cumulative with the penalty for charging through Difficult Terrain, if applicable. |
|
If a mission has the Night Fighting special rule, either player can declare that they wish to fight the battle at night. If either player does so, roll a D6 before
deployment: on a roll of 4+, the Night Fighting special rule is in effect during game turn 1.
While the Night Fighting mission special rule is in effect, all units have the
Stealth special rule.
Reserves are forces that can be called upon to reinforce a battle at short notice, or to conceal your true strength from the foe.
When deploying their armies, players can choose not to deploy some of their units, keeping them as Reserves to arrive later. In addition, if it impossible to deploy a unit for any reason, it must be placed in Reserve. The only exception to this are units that cannot move after they have been deployed. Such units are removed as casualties if it is impossible to deploy them during the
Deployment step of Preparing for Battle.
During
deployment, when deciding which units are kept as
Reserves, you must specify if any of the
Independent Characters in Reserve are joining a unit, in which case they must arrive together. Similarly, you must specify if any units in Reserve are embarked upon any
Transport vehicles in Reserve, in which case they will arrive together. In either case, when making a
Reserve Roll (see below) for a combined unit, roll a single dice for the unit and/or its Independent Character/Transport vehicle.
At the start of your second turn, you must roll a D6 for each unit in your army that is being held in
Reserve – these are known as
Reserve Rolls. If the roll is a 3 or more, that unit arrives this turn. If the roll is less than 3 it remains in Reserve and is rolled for again next turn.
At the start of your third turn, roll for any units remaining in Reserve. If the roll is a 3 or more, that unit arrives this turn. If the roll is less than 3, it remains in Reserve and automatically arrives at the start of your fourth turn.
Some special rules can modify the roll required for a unit to arrive from Reserve. Regardless of the modifier(s), a natural roll of a 1 always means that the unit in question remains in Reserve.
When Reserves arrive, pick one of your arriving units and deploy it, moving it onto the table as described below. Then pick another arriving unit and deploy it, and so on until all arriving units are on the table. The player can then proceed to move his other units as normal. Note that you must first roll for all Reserves, and then move any arriving Reserves, before any other units can move.
When a
Reserves unit arrives, it must move onto the table from the
controlling player’s table edge. Measure the model’s move from the edge of the table, as if they had been positioned just off the board in the previous turn. A unit cannot charge, or use any abilities or special rules that must be used at the start of the turn, in the turn it
arrives from Reserve.
If for some reason a model’s maximum move is insufficient to fit the entire model onto the board, or it becomes
Immobilised whilst moving onto the board, place the model as far onto the table as you can. If this leaves the model in a position where it may fall off the table, then mark the position the model is meant to be occupying in some manner, and then position it more safely – we don’t want any models to get damaged in the battles that we fight!
If a unit enters Reserve part way through the game, such as a
Flyer leaving the battlefield, this is referred to as entering Ongoing Reserves. Units in Ongoing Reserve always re-enter play at the start of their
controlling player’s following turn, but otherwise follow the normal rules for
Reserves.
War is unpredictable and fluid. Strategic objectives and tactical priorities can change at a moment’s notice, and targets of military insignificance can transform into ones of vital importance without warning. A good battlefield commander must be dynamic and flexible, prepared to take advantage of an opportunistic objective and ever-able to adapt his entire battle-plan to react to a change of orders from above.
Using Tactical Objectives
If a mission has the
Tactical Objectives special rule, you will need 6
Objective Markers that are individually numbered 1 through 6. Unless instructed otherwise, the players should place all 6 Objective Markers on the battlefield, using the rules for
Placing Objective Markers. These Objective markers are controlled using the rules for
Controlling Objective Markers. Each Objective Marker may also be a
Mysterious Objective if this mission special rule is also in use.
Generating Tactical Objectives
At the beginning of each of your turns, you will need to generate a number of
Tactical Objectives. If you are playing a mission, it will state how many you should generate, otherwise you will need to agree how many to generate at the start of each turn.
To generate a Tactical Objective, roll a D66, consult the table below and write the result down. Note that unless the mission itself states otherwise, these rolls are not secret; both players should be able to see what Tactical Objectives each other has.
Note that whilst there are several Tactical Objectives with the same name, they are all uniquely numbered. When generating Tactical Objectives, keep a note of the numbers you rolled during the game – if you roll the same numbered Tactical Objective during the same game, roll again until a differently numbered one is generated. Only roll again if you have already generated that Tactical Objective yourself during the game – if your opponent has generated a particular Tactical Objective that you have not yet generated, you can still generate that Tactical Objective. Tactical Objectives that have been generated are said to be Active until they are either
achieved or
discarded (see below).
Achieving Tactical Objectives
You score
Victory Points for achieving
Tactical Objectives at the end of your turn. Any Victory Points awarded from Tactical Objectives are added to any Victory Points awarded from any other source (from
Secondary Objectives, for example). At the end of your turn, you must check to see if you have achieved any of your Active Tactical Objectives – the descriptions will tell you how they are achieved and how many Victory Points are scored for completing them. If you can achieve a Tactical Objective at the end of your turn you must immediately score Victory Points for it – you cannot choose not to achieve a Tactical Objective at the end of your turn. Note that a player can achieve any number of his Active Tactical Objectives in the same turn (including multiples of the same named Tactical Objective).
For example, if Robin’s opponent’s Warlord is a Psyker, and Robin has both the Kingslayer and Witch Hunter Tactical Objectives, he will achieve both objectives in the same turn that he kills his opponent’s Psyker Warlord, scoring in this instance D3+1 Victory Points. If the mission also uses the Slay the Warlord secondary objective, Robin will also score 1 additional Victory Point at the end of the game for having killed his opponent’s Warlord (making his death worth a grand total of D3+2 Victory Points – a very worthwhile target indeed!).
Discarding Tactical Objectives
Once a
Tactical Objective has been
achieved, it is discarded. After all Tactical Objectives that have been achieved are discarded, the player whose turn it is can select one of his remaining Active Tactical Objectives (if any) and choose to discard it – this scores no
Victory Points. Discarded Tactical Objectives cease being Active and you cannot
generate or
achieve these objectives for the remainder of the game.
| Designer’s Note – Tactical Objectives Card Deck |
| If you own a deck of Tactical Objective Cards, you can generate your Tactical Objectives by shuffling the deck and drawing the top card instead of rolling a D66. These should be kept face up, so your opponent can see which Tactical Objectives you have generated, unless the mission you are playing instructs you otherwise. |
Tactical Objectives Table
This section describes the
Tactical Objectives that you can use in your games of Warhammer 40,000. Each Tactical Objective details a specific task that your forces must accomplish, the conditions that must be met in order to achieve it, and how many
Victory Points you will score for doing so. The number next to the Tactical Objective’s title corresponds to the
D66 result rolled to
generate it. For more details on generating and using Tactical Objectives, see the
Tactical Objectives mission special rule above.
| D66 | Result | Type | Description | | 11 | Secure Objective 1 | Capture & Control | Score 1 Victory Point if you control Objective Marker 1 at the end of your turn. | | 12 | Secure Objective 2 | Score 1 Victory Point if you control Objective Marker 2 at the end of your turn. | | 13 | Secure Objective 3 | Score 1 Victory Point if you control Objective Marker 3 at the end of your turn. | | 14 | Secure Objective 4 | Score 1 Victory Point if you control Objective Marker 4 at the end of your turn. | | 15 | Secure Objective 5 | Score 1 Victory Point if you control Objective Marker 5 at the end of your turn. | | 16 | Secure Objective 6 | Score 1 Victory Point if you control Objective Marker 6 at the end of your turn. | | 21 | Secure Objective 1 | Take & Hold | Score 1 Victory Point if you control Objective Marker 1 at the end of your turn. | | 22 | Secure Objective 2 | Score 1 Victory Point if you control Objective Marker 2 at the end of your turn. | | 23 | Secure Objective 3 | Score 1 Victory Point if you control Objective Marker 3 at the end of your turn. | | 24 | Secure Objective 4 | Score 1 Victory Point if you control Objective Marker 4 at the end of your turn. | | 25 | Secure Objective 5 | Score 1 Victory Point if you control Objective Marker 5 at the end of your turn. | | 26 | Secure Objective 6 | Score 1 Victory Point if you control Objective Marker 6 at the end of your turn. | | 31 | Secure Objective 1 | Storm & Defend | Score 1 Victory Point if you control Objective Marker 1 at the end of your turn. | | 32 | Secure Objective 2 | Score 1 Victory Point if you control Objective Marker 2 at the end of your turn. | | 33 | Secure Objective 3 | Score 1 Victory Point if you control Objective Marker 3 at the end of your turn. | | 34 | Secure Objective 4 | Score 1 Victory Point if you control Objective Marker 4 at the end of your turn. | | 35 | Secure Objective 5 | Score 1 Victory Point if you control Objective Marker 5 at the end of your turn. | | 36 | Secure Objective 6 | Score 1 Victory Point if you control Objective Marker 6 at the end of your turn. | | 41 | Recon | Seize Ground | If the mission has the Mysterious Objectives mission special rule, score 1 Victory point if every objective on the battlefield has been identified at the end of this, or any previous turn. | | 42 | Behind Enemy Lines | Score 1 Victory Point if one of your scoring units is within 12" of your opponent’s table edge at the end of your turn. If 3 or more of your scoring units are within 12" of your opponent’s table edge at the end of your turn, score D3 Victory Points instead. | | 43 | Hold The Line | Score 1 Victory Point if at least 3 of your scoring units and none of your opponent’s scoring units are within 12" of your own table edge at the end of your turn. | | 44 | Ascendency | Score D3 Victory Points if you control any three Objective Markers at the end of your turn. | | 45 | Supremacy | Score D3 Victory Points if you control at least two Objective Markers and at least twice as many Objective Markers as your opponent controls at the end of your turn. | | 46 | Domination | Score D3+3 Victory Points if you control every Objective Marker on the table at the end of your turn. | | 51 | Overwhelming Firepower | Purge | Score 1 Victory Point if an enemy unit was completely destroyed during the Shooting phase of your turn. If you completely destroyed 3 or more enemy units during the Shooting phase of your turn, score D3 Victory Points instead. | | 52 | Blood and Guts | Score 1 Victory Point if an enemy unit was completely destroyed during the Assault phase of your turn. If you completely destroyed 3 or more enemy units during the Assault phase of your turn, score D3 Victory Points instead. | | 53 | No Prisoners | Score 1 Victory Point if an enemy unit was completely destroyed during your turn. If you completely destroyed between 3 and 5 enemy units during your turn, score D3 Victory Points instead. If you completely destroyed 6 or more enemy units during your turn, score D3+3 Victory Points instead. | | 54 | Hungry for Glory | Score 1 Victory Point if you issued a challenge during your turn. If you issued 3 or more challenges during your turn, score D3 Victory Points instead. | | 55 | Psychological Warfare | Score 1 Victory Point if your opponent failed a Morale, Pinning or Fear test during this turn. If your opponent failed 3 or more Morale, Pinning or Fear tests, score D3 Victory Points instead. | | 56 | Harness the Warp | Score 1 Victory Point if you successfully manifested a Psychic Power during your turn. If you successfully manifested 3 or more Psychic Powers, score D3 Victory Points instead. | | 61 | Kingslayer | Annihilation | Score D3 Victory Points at the end of your turn if your opponent’s Warlord has been removed as a casualty during this, or any previous turn. | | 62 | Witch Hunter | Score 1 Victory Point at the end of your turn if at least one enemy unit with the Psyker, Psychic Pilot or Brotherhood of Psykers/Sorcerers special rule was completely destroyed during your turn. | | 63 | Scour the Skies | Score 1 Victory Point at the end of your turn if at least one enemy Flyer or Flying Monstrous Creature was removed as a casualty during your turn. | | 64 | Assassinate | Score 1 Victory Point at the end of your turn if at least one enemy character was removed as a casualty during your turn. If 3 or more enemy characters were removed as casualties during your turn, score D3 Victory Points instead. | | 65 | Demolitions | Score 1 Victory Point at the end of your turn if at least one gun emplacement or enemy building was destroyed during your turn. If at least one enemy building with the Mighty Bulwark special rule was destroyed during your turn, score D3 Victory Points instead. | | 66 | Big Game Hunter | Score 1 Victory Point at the end of your turn if at least one enemy Vehicle or Monstrous Creature was destroyed during your turn. If at least one enemy Super-heavy vehicle or Gargantuan Creature was destroyed during your turn, score D3 Victory Points instead. |
|
")
| On a haunted planet, the barrier between the physical realm and the immaterial madness of the Warp is wafer-thin. The leakage between the two planes leads to frequent supernatural events, ranging from strange ectoplasmic banks of mist to wholesale vanishings. |
When fighting a battle on a Haunted Planet, the following rules apply for the duration of the game:
The friction between the physical world and the Warp causes thick banks of ectoplasmic mist to roll across the planet, blocking sight and baffling scans, be they technological or telepathic.
The mists make it hard to acquire distant targets. Psychic powers and weapons used by an attacking unit cannot target units more than 24" away – the unit is completely hidden by the ectoplasmic mists. Roll a dice when a unit targets a unit more than 12" away; on a roll of 1-4 the target is hidden by the mists and the attack is not made. Targets between 6" and 12" away cannot be attacked on a roll of 1 or 2. Units less than 6" away can be targeted normally.
In addition, roll a dice before a unit fires
Overwatch; on a roll of 1-3 the target is hidden by the mists and the Overwatch attack cannot be made. A unit that is not able to attack cannot pick a new target – the attack has been wasted.
Buildings on a haunted planet are infested with the residual spiritenergy of the creatures that lived and died there. These spirit forms are extremely unsettling to be near, and cause electronic equipment to stutter and glitch.
Units within 3" of a
building,
ruin or
fortification on a Haunted Planet must subtract 1 from their Leadership and Ballistic Skill characteristics.
Stories of haunted planets abound with tales of people mysteriously vanishing. Usually such disappearances only affect individuals, but sometimes entire families or whole communities will simply go missing, leaving no evidence as to how or where they have gone.
When playing a mission with the
Mysterious Objectives special rule on a
Haunted Planet, replace any rolls of a 1 (
Sabotaged!) on the Mysterious Objectives table with the following:
Vanishing. Roll a dice when the objective is discovered. On a roll of 3-6, one model from the unit that identified the objective vanishes. On a roll of 2, D6 models from the unit vanish, and on a roll of 1 the entire unit vanishes.
Randomly select the models from the unit that vanish; they are removed from play and count as having been destroyed.
Abandoned Defence Network
| Many planets have an elaborate system of defensive fortifications to protect against invasion. These defence networks are often fully automated, and can continue to function for centuries after being abandoned. Unfortunately, the protocols that identify friend from foe will have long been lost… |
The following rules apply to all
fortifications, even fortifications that are included in a player’s army, and replace the rules for
dilapidated buildings in the case of ‘neutral’ fortifications:
Determining the identification protocols for the automated defence network can take time. Until they are discovered, the network’s automated weapons will fire at any troops that draw too close.
The first time during the battle that a unit from your army is selected as a target by an automated weapon system (as described in ‘
Automated Fire’, below), roll a dice. If the roll is a 6, you have identified the protocols and the weapon system will not shoot you.
Assuming you didn’t roll a 6, then at the start of each of your subsequent turns you can roll the dice again. However, the second time you roll, use two dice; the third time you roll, use three dice, and so on. You are able to identify the protocols if any of the dice has a result of 6. Once you have identified the protocols you know them for the rest of the battle and do not need to roll again.
Unless the identification protocols can be rediscovered, a defence network’s automated systems will attack anybody that draws near.
Emplaced weapons can only be manually fired by units that know the protocols. In addition, emplaced weapons will use
automated fire in each player’s
Shooting phase. They will always shoot at the closest unit that does not know the protocols. If one side knows the protocols and the other does not, then the weapons only attack in the shooting phase of the side that knows the protocols. If both sides know the protocols, then the normal rules for emplaced weapons apply for the rest of the battle.
The defence network is linked to a set of long-dormant orbital defence batteries that lie beneath the surface of the planet. Once the security protocols have been breached, the defence network can be hacked and the batteries activated to target enemy reserves.
If one side knows the network’s protocols and the other does not, then the side that does not know the protocols must subtract 1 from their dice rolls made to see if their units held in
Reserve arrive. If neither or both sides know the network’s protocols, this rule has no effect.
| Either as a result of freezing temperatures or deadly storms, ice worlds will readily kill those ill-prepared for such extreme weather conditions. Even those accustomed to living amid such dangers must still treat the environment with a wary respect lest complacency leads to their demise. |
When fighting a battle on an Ice World, the following rules apply for the duration of the game:
As the raging battle tortures the frozen ground with pounding artillery and seismic explosions, glacial fissures begin to open up beneath the snow, swallowing unwary combatants.
Whenever a non-vehicle model at ground level (or a model moving to or from ground level) fails a
Dangerous Terrain test, it does not suffer a Wound. Instead, that model must pass an
Initiative test; if the test is failed, the model falls to its doom and is removed from play.
A seemingly harmless blizzard can escalate into a deadly icestorm within moments, flensing the skin of those exposed to its wrath. Mercifully, however, these deadly storms can dissipate just as swiftly, leaving only shredded bodies in their wake.
At the start of each game turn, both players roll a dice. If the result is a double, a fearsome tempest has swept in to scour the battlefield with razor-sharp shards of ice. For the duration of that game turn, models cannot
Run,
Turbo-boost or
Swoop (and must therefore change flight mode).
In addition, roll a dice for each non-vehicle unit on the battlefield. On the roll of a 1, that unit immediately suffers D6 Strength 4 AP5 hits with the
Shred special rule. Any Wounds are
Randomly Allocated.
On an ice world, heavy snowstorms are a part of everyday life. To warring armies fighting for dominance, however, such challenging conditions hamper essential visibility, causing distant enemies to fade into the whiteness of the blinding snow.
Units that are more than 12" away from the attacking unit have the
Stealth special rule. Units that are more than 24" away from the attacking unit have the
Shrouded special rule instead. Units cannot target enemy units that are more than 36" away from them.
| During the Imperium’s bloody reign as the galaxy’s dominant power for the last ten millennia, countless martyrs have arisen to turn back the darkness that ever threatens to engulf the empire of Mankind. Many of these holy men and women are buried with all due ceremony upon Ministorum worlds, the entire surface of these holy planets given over to monolithic cathedra and the hallowed crypts of the sainted. |
When fighting a battle on a Ministorum Shrine World, the following rules apply for the duration of the game:
To Mankind’s many enemies, a Ministorum shrine world represents the epitome of Humanity’s blind devotion to a carrion god. To be surrounded by such ostentatious splendour in the name of a misguided belief is enough to enrage even the most enlightened of xenos, and they will fight all the harder to punish the Imperium’s warriors for their folly.
All units with a
Faction other than those belonging to the
Armies of the Imperium have the
Hatred (
Armies of the Imperium) special rule.
To every loyal warrior and citizen of the Imperium, a shrine world is sacred ground. For an enemy to walk upon its hallowed surface is an affront to the Emperor himself, and the Imperium’s soldiery will yield no ground until any heathen presence is cleansed.
All units with a
Faction belonging to the
Armies of the Imperium have the
Stubborn special rule.
The Ecclesiarchy claims that the spirits of martyred saints watch over their resting places, ready to strike down the enemies of Mankind. Whether this is indeed the case, or if it is by the Emperor’s divine grace that their remains are protected, none can truly say, but there are countless reports of those who threaten the sanctity of these worlds being struck down by an unseen hand.
When playing a mission with the
Mysterious Objectives special rule on a
Ministorum Shrine World, replace any rolls of a 2 (
Nothing of Note) on the Mysterious Objectives table with the following:
Saintly Presence. At the end of the turn in which the objective was discovered, and at the end of every turn thereafter, any units within 3" of the Objective Marker with a
Faction other than those belonging to the
Armies of the Imperium suffer D6 Strength 5 AP4 hits with the
Soul Blaze special rule.
")
As Warp storms rage across the galaxy, armies waging war beneath them – especially those attuned to the Immaterium – find themselves alternately empowered by raw energy and wracked by fluctuating empyric events.
| Designer's Note – Battlezone: Empyric Storms Card Deck |
| If you own a deck of Battlezone: Empyric Storms cards, you can generate your Empyric Storms event by shuffling the deck and drawing the top card instead of rolling a D66. These should be kept face up so that you and your opponent can both see what events are currently in play. |
If you are playing a mission that uses the Empyric Storms mission special rule, or you have chosen to use these Battlezone rules in your game, then the raging Warp tides will have an effect on your army and their surroundings. Each player must generate a single Empyric Storms event at the start of each of their turns.
Some Empyric Storms events are ‘
Instantaneous’ – these are resolved as soon as they are generated. Other events are ‘
Persistent’. If you generate a Persistent event, the effects listed for that event apply to both players until the start of your next turn, at which point they will cease to have any effect and you will then generate a new event. If a Persistent event that is already in effect is generated, then a new event should be generated instead.
To generate an Empyric Storms event,
roll a D66 and consult the table below. This simply means you roll two dice, one after the other, counting the first dice as ‘tens’ and the second dice as ‘units’. For example, if you roll a 3 on the first dice and a 5 on the second, you would get a D66 result of 35.
| D66 | Result | Type | Description | | 11 | Psychic Interference | Persistent | Increase the Warp Charge cost of all psychic powers by 1. | | 12 | Psychic Boon | Persistent | Decrease the Warp Charge cost of all psychic powers by 1 (to a minimum of 1). | | 13 | Empyric Shield | Persistent | All models gain a 6+ invulnerable save. If a model already has an invulnerable save, you can instead add 1 to the roll when making that invulnerable save. Rolls of 1 (before applying modifiers) always fail. | | 14 | Null Tide | Persistent | Models cannot use invulnerable saves. | | 15 | Total Power | Persistent | If a Psyker rolls any doubles when taking a Psychic test, that power is automatically manifested and no attempts to Deny the Witch can be made to resist it. | | 16 | The Denizens Hunger | Persistent | If a Psyker rolls any doubles when taking a Psychic test, they suffer Perils of the Warp. | | 21 | Warp Surge | Persistent | The range of all psychic powers is doubled. | | 22 | Warp Ebb | Persistent | The range of all psychic powers is halved. | | 23 | Psychic Apotheosis | Instantaneous | Randomly select one non-Psyker Character in your army: that model immediately becomes a Psyker and remains one for the rest of the battle. This model can attempt to manifest the Smite psychic power once in each of your Psychic phases. However, this model suffers Perils of the Warp any time they fail a Psychic test. | | 24 | Warp Tunnel | Instantaneous | Select any friendly non-vehicle unit that is not locked in combat and remove it from the board. Then, set up that unit anywhere on the battlefield that is more than 9" from any enemy model. The unit cannot move in the Movement phase of the turn in which it arrives, and counts as having moved for any rules purposes (e.g. if firing Heavy weapons, etc.), but can otherwise act normally during the rest of its turn (i.e. it can shoot, charge, etc.). | | 25 | Reality Speeds | Persistent | All models can move an extra 1" during their Movement phase. Psykers and Daemons can move an extra 3" during their Movement phase. | | 26 | Reality Slows | Persistent | All models move 1" less during their Movement phase (to a minimum of 0"). Psykers and Daemons move 3" less during their Movement phase (to a minimum of 0"). | | 31 | Warp Shadows | Persistent | The Night Fighting special rule is in effect. | | 32 | Empyric Might | Persistent | All models add 1 to their Strength characteristic. Psykers and Daemons add 2 to their Strength characteristic instead. | | 33 | Empyric Resilience | Persistent | All models add 1 to their Toughness characteristic. Psykers and Daemons add 2 to their Toughness characteristic instead. | | 34 | Empyric Fury | Persistent | All models add 1 to their Attacks characteristic. Psykers and Daemons add 2 to their Attacks characteristic instead. | | 35 | Empyric Courage | Persistent | All models add 1 to their Leadership characteristic. Psykers and Daemons add 2 to their Leadership characteristic instead. | | 36 | Empyric Terror | Persistent | All models subtract 1 from their Leadership characteristic. Psykers and Daemons subtract 2 from their Leadership characteristic instead. | | 41 | Warp Regeneration | Instantaneous | Every model on the battlefield heals a single wound lost earlier in the battle. | | 42 | Empyric Foresight | Persistent | You can re-roll all hit rolls of 1. You can instead re-roll all failed hit rolls made for Daemons or Psykers. | | 43 | Empyric Feedback | Instantaneous | Roll a dice for each Psyker on the battlefield: on a 4+ that model immediately suffers a wound – no saves of any kind are allowed. | | 44 | Conduit of the Immaterium | Instantaneous | Randomly select a Psyker on the battlefield. That Psyker can immediately manifest and resolve one psychic power it knows as if it were its Psychic phase. No Psychic test is necessary and no attempt to Deny the Witch can be made. After resolving the psychic power, the Psyker automatically suffers Perils of the Warp. | | 45 | Warp Resurrection | Instantaneous | Select a friendly Infantry unit on the battlefield: you can immediately return one slain model to that unit. You can instead return D3 slain models if the unit chosen has the Troops Battlefield Role. | | 46 | Empyric Mastery | Persistent | Re-roll all failed Psychic tests and Deny the Witch tests. | | 51 | Overwhelming Power | Persistent | Randomly select a Psyker on the battlefield. Double that model’s Strength, Toughness and Attacks characteristics. | | 52 | The Warp Becalmed | Persistent | Psykers cannot suffer Perils of the Warp. | | 53 | Psychic Devastation | Persistent | Each time a psychic power is manifested and not resisted by a Deny the Witch test, resolve its effects, then resolve its effects again. If the psychic power allows you to target a unit, you can choose to select a different target for the second set of effects, or you can inflict double the damage, bestow twice the bonuses or inflict twice the penalties on the same unit. No additional Psychic test is required, and no Deny the Witch test can be taken to attempt to nullify the second set of effects. | | 54 | Empyric Invulnerability | Persistent | Select a Psyker on the battlefield. Re-roll all failed saves for that model. | | 55 | Uncontrolled Mutation | Instantaneous | Randomly select a Psyker on the battlefield and roll two dice: if the result is equal to or greater than that model’s Leadership characteristic, it is slain. If there is a Chaos Spawn model available, then before removing that Psyker as a casualty, both players roll off. Whoever wins the roll-off takes control of the Chaos Spawn for the rest of the battle and sets it up anywhere within 6" of the Psyker and more than 1" from any enemy models. The Chaos Spawn can be given any upgrades and options normally available to it (but cannot add any additional Chaos Spawn models). The Chaos Spawn cannot move in the Movement phase of the turn in which it arrives, and counts as having moved for any rules purposes (e.g. if firing Heavy weapons, etc.), but can otherwise act normally during the rest of its turn (i.e. it can shoot, charge, etc.). | | 56 | Dark Possession | Instantaneous | Randomly select a Psyker on the battlefield and roll two dice: if the result is equal to or greater than that model’s Leadership characteristic, it is slain. If there is a Daemon Prince model available, then before removing that Psyker as a casualty, the player whose Psyker was slain takes control of the Daemon Prince for the rest of the battle and sets it up anywhere within 6” of the Psyker and more than 1” from any enemy models. The Daemon Prince can be given any upgrades and options normally available to it. The Daemon Prince cannot move in the Movement phase of the turn in which it arrives, and counts as having moved for any rules purposes (e.g. if firing Heavy weapons, etc.), but can otherwise act normally during the rest of its turn (i.e. it can shoot, charge, etc.). | | 61 | The Terrors of the Warp | Persistent | Each time a Psyker suffers Perils of the Warp, roll twice on the Perils of the Warp table and apply both results. | | 62 | Warp Blast | Instantaneous | Roll a dice for each unit on the battlefield. On a 1 that unit is struck by a Warp blast and suffers D3 Strength 6 hits with no armour saving throws allowed. Wounds are allocated by the controlling player. | | 63 | Unreality Reigns | Persistent | All dice rolls of 1 count as 6, and all dice rolls of 6 count as 1. | | 64 | Psychic Stun | Instantaneous | Roll a dice for each Psyker on the battlefield: on a 6 that Psyker immediately loses one randomly selected psychic power it knows. It cannot use this psychic power for the rest of the battle. | | 65 | Daemontide | Instantaneous | If the models are available, both players roll off and whoever wins the roll-off takes control of one unit of either 10 Bloodletters of Khorne, 10 Pink Horrors of Tzeentch, 10 Plaguebearers of Nurgle or 10 Daemonettes of Slaanesh for the rest of the battle, which they can set up anywhere on the battlefield that is more than 9” from any enemy models. The unit cannot include any additional models, but can otherwise be given any other upgrades or options normally available to it. The unit cannot move in the Movement phase of the turn in which it arrives, and counts as having moved for any rules purposes (e.g. if firing Heavy weapons, etc.), but can otherwise act normally during the rest of its turn (i.e. it can shoot, charge, etc.). | | 66 | Empyric Breach | Instantaneous | If the model is available, both players roll off and whoever wins the roll-off takes control of one Bloodthirster of Unfettered Fury, one Bloodthirster of Insensate Rage, one Wrath of Khorne Bloodthirster, one Lord of Change, one Great Unclean One or one Keeper of Secrets for the rest of the battle, which they can set up anywhere on the battlefield that is more than 9" from any enemy models. The model can be given any upgrades or options normally available to it. The model cannot move in the Movement phase of the turn in which it arrives, and counts as having moved for any rules purposes (e.g. if firing Heavy weapons, etc.), but can otherwise act normally during the rest of its turn (i.e. it can shoot, charge, etc.). |
|
FAQ
Missions
| Q: | Can a unit go back into Reserve the same player turn that it came onto the board from Reserve? |
| A: | No, unless the rules specifically state otherwise. |
| Q: | Mission rules question. We were playing the Maelstrom of War: Contact Lost mission, and you generate new Tactical Objectives for each objective you control at the start of a player’s turn. If I Deep Strike a unit onto an objective at the start of my turn, does it allow me to take an extra objective card? Both Deep Striking and objectives count as happening at the same time – am I correct in thinking that I can decide the sequence? |
| A: | |
| Q: | What books/codexes/supplements are the most current? |
| A: | The copyright date (which is usually beneath the contents) will let you know which book is the most recent. |
| Q: | Does Warhammer 40,000: The Rules (7th edition) override Codex: Stronghold Assault? |
| A: | Yes. This is an exception to the normal rules, in which expansions override the rulebook. |
| Q: | In a game of Carnage, can you shoot into a close combat which involves other players’ forces but none of yours? |
| A: | No. |
| Q: | In a game of Carnage, how many Warp Charges points do players get when it’s not their turn? |
| A: | |
| Q: | Do allies who are not Battle Brothers contest objectives? |
| A: | Yes, they will contest objectives against the enemy – but they will never stop your units from claiming objectives, regardless of the level of alliance. |
| Q: | If your Warlord is in Reserves, can you use their traits for re-rolling Reserves? |
| A: | Yes. |
| Q: | Do non-scoring and non-Victory Point units such as Spore Mines count as ‘units destroyed’ on Tactical Objective cards? |
| A: | Yes, unless specifically stated otherwise. |
| Q: | Since a player automatically loses at the end of any game turn in which he has no models on the table, does a player taking a Detachment that requires him to start all his models in Reserve (such as the Ravenwing Strike Force with Flyers) automatically lose every game he plays? |
| A: | A player who takes an army that consists entirely of units and/or Detachments which must be set up in Reserve, with no special rule that allows them to arrive in the first game turn, will automatically lose the game. We do not recommend choosing an army like this! |
| Q: | On deployment. Online and at our club, we tend to roll for who takes which side of the table first, then roll for who will deploy first. Is this ok? |
| A: | This is fine. |
| Q: | Can you clarify the term ‘deploy’? |
| A: | ‘Deploy’ is a word for setting up a unit on the battlefield – this is something you do during deployment, but also when units arrive from Reserve and so on. ‘Deployment’ is the stage in ‘ Preparing For Battle’ where the players set up their armies on the battlefield. |
| Q: | Does a unit always enter the game from Reserves when Deep Striking? The rules for Deep Striking seem to imply that being the case, even when a unit is already on the table. As an example, does a unit of Warp Talons that is using Gate of Infinity trigger its Warpflame Strike each time they use the psychic power? |
| A: | Not unless explicitly stated – in the example you use, Gate of Infinity has the unit arrive anywhere on the board using the rules for Deep Strike. This doesn’t mean that it goes into Deep Strike Reserve, or that you have to make a Reserve Roll for the unit and so on, and it means that you don’t get to use the Warpflame Strike each time you do this. |
| Q: | What points level do you suggest for a standard game? |
| A: | Games can be of any size – the larger the game, the longer it will take. We find it best to discuss the size of game you want to play with your opponent. |
| Q: | If a unit enters the battlefield using Outflank, are they considered to have moved for the purposes of firing heavy weapons? |
| A: | Units moving on from Reserve do so at the start of the Movement phase, before any other units can move. This means that they are always considered to have moved in the turn they arrive. |