As armies engage, guns thunder and shrapnel rains down from the sky. In a Warhammer 40,000 battle, a player’s army fires in the Shooting phase of his turn. During the Shooting phase, units armed with ranged weapons can fire at the enemy. You can choose any order for your units to shoot, but you must complete all the firing by one unit before you move on to the next.
The shooting process can be summarised in seven steps, as described below. Each step is explained in greater detail later in this section. Once you’ve completed this shooting sequence with one of your units, select another and repeat the sequence. Once you have completed steps 1 to 7 for each unit in your army that you wish to make a shooting attack, carry on to the
Assault phase.
| The Shooting Sequence |
1. Nominate Unit to Shoot. Choose one of your units that is able to shoot but has yet to do so this turn.
2. Choose a Target. The unit can shoot at an enemy unit that it can see.
3. Select a Weapon. Select a weapon the firing unit is equipped with. All models equipped with a weapon with the same name can now shoot that weapon at the target. Every model that wishes to shoot must be within range of at least one visible model in the target unit. Models that cannot see the target, or are not in range, cannot shoot.
4. Roll To Hit. Roll a D6 for each shot fired. A model’s Ballistic Skill determines what it must roll in order to hit the target.
5. Roll To Wound. For each shot that hit, roll again to see if it wounds the target. The result needed is determined by comparing the Strength of the firing weapon with the majority Toughness of the target unit.
6. Allocate Wounds & Remove Casualties. Any Wounds caused by the firing unit must now be allocated, one at a time, to the closest model in the target unit. A model with a Wound allocated to it can take a saving throw (if it has one) to avoid being wounded. If a model is reduced to 0 Wounds, it is removed as a casualty. Wounds are then allocated to the next closest model. Continue to allocate Wounds and take saving throws until all Wounds have been resolved.
7. Select Another Weapon. After resolving all shots from the currently selected weapon, if the firing unit is equipped with differently named weapons that have yet to fire, select another weapon and repeat steps 3 to 6. |
During the Shooting phase, a unit containing models armed with ranged weapons can be nominated to make shooting attacks.
Certain situations prevent a model from firing. The most common are:
This is not a comprehensive list. Other game rules or special rules can sometimes affect a unit’s ability to shoot – this is explained thoroughly when it occurs.
Once you have chosen the unit that you want to shoot with,
choose a single enemy unit for them to shoot at. To do so, you must check the range and
line of sight from your unit to the enemy unit you are targeting. Note that you may check the range and line of sight to multiple enemy units before deciding which one to shoot at and declaring it to your opponent. You cannot target a unit that is
locked in combat.
To target an enemy unit, at least one model must have
line of sight to at least one model in the target unit. If no model has line of sight, then a different target must be chosen.
Whilst some units are comprised entirely of models with the same weaponry, many units are equipped with a variety of different weapons or contain models that are themselves equipped with more than one gun. When firing with a unit, completely resolve all attacks from the same weapons at the same time before moving onto any differently named weapons (see
Select Another Weapon, below).
First, select a weapon that one or more models in your unit are equipped with. The selected weapon cannot be one that the unit has shot with during this phase.
All models in the unit that are equipped with the selected weapon can now shoot at the target unit with that weapon.If a weapon can fire in more than one mode, or can fire more than one type of ammo, select a weapon mode/ammo type – treat weapons firing different modes/ammo types as differently named weapons. If a model can shoot with more than one weapon in the same phase and it is equipped with two or more identically named weapons, it shoots with all the same named weapons when that weapon is selected.
A player can choose not to fire with certain models if he prefers. This must be declared before
rolling To Hit. If a model chooses not to shoot with the currently selected weapon now, it cannot fire that weapon later during the same phase (but it can shoot a differently named weapon it is equipped with).
All of the models in the unit that are firing the selected weapon shoot at the same time, regardless of whether or not all of the dice are rolled together.
For example, a Space Marine player nominates to shoot with his Space Marine Tactical Squad. The unit has 10 models; 8 models are equipped with boltguns, 1 is equipped with a plasma gun and 1 is equipped with a missile launcher. The Space Marine player selects ‘boltgun’ first. The 8 models with boltguns now shoot at the target unit.
After these shots have been completely resolved, the Space Marine player then nominates ‘plasma gun’, and completely resolves the shot with his plasma gun armed Space Marine before finally nominating ‘missile launcher’ and firing with his squad’s last remaining model.
All weapons have a maximum range, which is the furthest distance they can shoot. A weapon must be in range of the target unit to shoot. Here are examples of weapon ranges:
When checking range, simply measure from each firer to the nearest visible model in the target unit. Any weapon that is found to be out of range of all visible enemy models in the target unit cannot shoot.
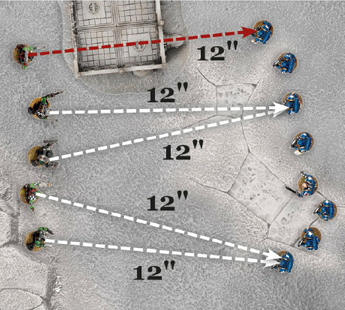
| Which Models Can Fire? |
In the example above, four Orks are found to have a target that is visible to them and is within the 12" range of their pistols (white lines). The remaining Ork cannot fire as he does not have line of sight to the only Space Marine in range (red line). |
If a model cannot shoot at the same target as the other models in its unit then it cannot shoot at all in that phase.
Typically, a model can only fire a single shooting weapon in the same phase, although some models, such as
vehicles or
monstrous creatures, can shoot two or more.
Once a model has fired its maximum number of weapons, it cannot fire again that phase.
To determine if the firing model has hit its target, roll a D6 for each shot that is in range. Most models only get to fire one shot, however, some weapons are capable of firing more than once, as we’ll explain in more detail later.
The dice roll needed To Hit will depend on how accurate the firers are, as shown by their Ballistic Skill (or BS). The chart below shows the minimum D6 roll needed to score a hit.| Firer’s BS | 1 | 2 | 3 | 4 | 5 | | Roll needed To Hit | 6 | 5+ | 4+ | 3+ | 2+ |
|
To Hit rolls are easy to remember if you just subtract the Ballistic Skill of the firing model from 7. This will give you the number you need; e.g. a model with BS 2 needs to roll a 5 or more (7-2=5).
Note that the minimum roll needed To Hit is always at least 2.
When rolling To Hit, there is no such thing as an automatic hit and a roll of a 1 always misses.
Whether a model has moved or not can make a big difference to its ability to fire. Some guns are so heavy that they can only be used effectively if their firer halts completely to brace himself or set up his weapon on the ground. This is explained in more detail in the
Weapons section. The most important thing to remember is that
the effect movement has on shooting is applied on a model-by-model basis.
Under specific circumstances, models must fire Snap Shots – opportunistic bursts of fire ‘snapped’ off in the general direction of the target. The most common occurrences of Snap Shots are when models with
Heavy weapons move and shoot in the same turn or when units make
Overwatch shots.
If a model is forced to make Snap Shots rather than shoot normally, then its Ballistic Skill is counted as being 1 for the purpose of those shots, unless it has a Ballistic Skill of 0 (in which case it may not shoot).
The Ballistic Skill of a model firing a Snap Shot can only be modified by special rules that specifically state that they affect Snap Shots, along with any other restrictions (some may only modify Ballistic Skill when firing Overwatch Snap Shots, for example). If a special rule doesn’t specifically state that it affects Snap Shots, then the Snap Shot is resolved at Ballistic Skill 1.
Some weapon types, such as
Template and
Ordnance, or those that have certain special rules, such as
Blast, cannot be fired as Snap Shots. In addition, any shooting attack that does not use Ballistic Skill cannot be ‘fired’ as a Snap Shot. These exceptions aside, Snap Shots are treated in the same manner as any other shooting attack made with a Ballistic Skill of 1.
Hitting your target is not always enough to put it out of action. The shot might result in nothing more than a superficial graze or flesh wound.
Ballistic Skill of 6 or Better
Very rarely, a model may have a Ballistic Skill of 6 or even more. If a model has BS 6 or higher, it gains a re-roll whenever it rolls a 1
To Hit with ranged attacks. The second roll usually has a lower chance of hitting, and the number needed is given in the chart below after the slash.
| Firer’s BS | 6 | 7 | 8 | 9 | 10 | | Roll needed To Hit | 2/6 | 2/5 | 2/4 | 2/3 | 2/2 |
|
If a model has a special rule that already confers it a re-roll To Hit (like a
Master-crafted weapon, for example), then that re-roll takes precedence and the chart above is not used. Instead, the chance of hitting with the re-roll is the same as the first shot, depending on the firer’s BS. Remember, a dice can only ever be re-rolled once!
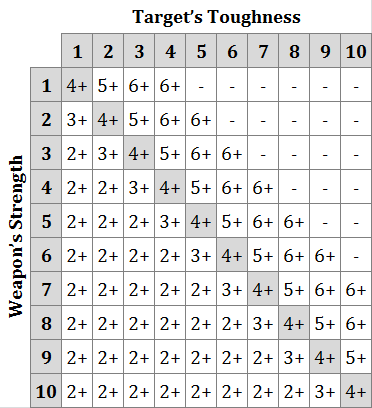
To determine whether a hit causes a telling amount of damage,
compare the weapon’s Strength characteristic with the target’s Toughness characteristic using the To Wound chart below. The number indicated on the chart is the minimum result on a D6 needed to convert the hit into a Wound. A value of ‘-’ indicates that the target cannot be wounded by the attack.
Note that the minimum roll needed To Wound is always at least 2.
When rolling To Wound, there is no such thing as an automatic Wound and a roll of a 1 always fails.Each weapon has its own Strength value, which is given in its profile or in the description of the weapon. Here are some examples of a few weapons and their Strength characteristics.
For example, a Space Marine with a boltgun shoots at an Ork and hits it. A boltgun has a Strength of 4 and the Ork has a Toughness of 4. Referring to the chart, a result of 4 or more is needed to convert the hit into damage. If the roll is 4 or more, the Ork takes a Wound.
Quite rarely, a unit will contain models with differing Toughness characteristics. When this occurs,
roll To Wound using the Toughness characteristic that is in the majority in the target unit. If two or more Toughness values are tied for majority, use the highest of these tied values.
For example, Nogg’s Grot Mob contains several Gretchin (Toughness 2) and an Ork Runtherd (Toughness 4), so the Gretchin’s Toughness of 2 is used for all models. If there are only two models in the unit (the Runtherd and a single Gretchin) when the rolls To Wound are made, the Ork’s Toughness of 4 is used for both models.
Total up the number of Wounds you have caused with the weapons that are firing. Keep the dice that have scored Wounds and create a ‘pool’, where each dice represents a Wound. Sometimes an attack will gain a bonus or special rule depending on the results rolled
To Hit or
To Wound (for example, due to the
Rending special rule).
If you caused any such Wounds, split them into separate Wound pools. All Wounds with exactly the same Strength, AP value and special rules must go into the same pool. If all the Wounds are the same, as will most often be the case, there will only be one Wound pool.
Allocate Wounds & Remove Casualties
To determine how many casualties are caused, you will need to allocate the Wounds from
the Wound pool and resolve any
saving throws the target is allowed. If several pools of Wounds need to be allocated, the player making the attacks decides the order in which they are allocated.
All of the Wounds from a single Wound pool must be allocated before moving on to the next Wounds pool.
First, allocate a Wound from the Wound pool to the enemy model closest to the firing unit, regardless of which model caused that Wound.
Sometimes it will be unclear which model in a target unit is closest to the firing unit because there is no discernible difference between the firing unit and several models in the target unit.
If two or more models are equidistant from the firing unit, the owning player chooses which model is attacked. That model is treated as being the closest model and remains so until either the firing unit’s attack ends or the model is slain.
On occasion, it will be impossible to determine which model is closest to an attack for
Wound allocation purposes, usually because the attack doesn’t originate from an enemy unit, but from a lethal environmental hazard such as man-eating forests or lightning bolts lancing down from the sky.
If you cannot determine the direction of an attack to work out which model in a unit is closest, or if a special rule refers to Random Allocation, do the following: randomly determine a model in the unit – that model is treated as being the closest model to the attack and remains so until either the attack ends or the model is slain. For the purposes of determining if the model is obscured, imagine the attack is coming from directly above its unit. If the model is slain and there are still Wounds left to allocate, simply randomise again if needs be.
If none of the firing models are in range of a particular model in the target unit, then Wounds cannot be allocated to it. Note that, when determining if a model is out of range, always use the firing weapon’s maximum range, even if it was a
Rapid Fire or
Salvo weapon that was shooting at half range (it can be imagined that whilst these weapons sacrificed accuracy or mobility to gain extra shots, their shots still travel their full range and have luckily hit another enemy).
If there are no models in the target unit that are in range, all remaining Wounds in the pool are lost.
If none of the firing models can draw a line of sight to a particular model in the target unit, then Wounds cannot be allocated to it, and must instead be allocated to the nearest visible model in the target unit.
If there are no visible models in the target unit, all remaining Wounds in the pool are lost.
Take Saves & Remove Casualties
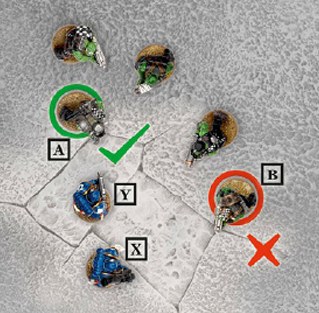
| Allocating Wounds |
In this example, two Space Marines are firing at a unit of Orks. Space Marine X has a missile launcher whilst Space Marine Y has a boltgun. The Space Marine player can choose which weapon to shoot first. The firing player selects to shoot all missile launchers in his unit first (in this case it is just Space Marine X). He chooses to fire a krak missile, and hits and wounds. This Wound must be allocated to Ork A, even though Ork B is closer to the Space Marine X, because Ork A is closest to the Space Marine unit. After completely resolving the missile launcher attack, the Space Marine player then selects boltguns, and fires with Space Marine Y. |
The model gets to make a saving throw, if it has one. If it fails, reduce that model’s Wounds by 1. If the model is reduced to 0 Wounds, remove it as a casualty.
Continue allocating Wounds to the closest model, taking saves and removing casualties until the Wound pool is empty or all models in the unit have been removed as casualties.
Even though a creature might have multiple Wounds, there are plenty of weapons in the 41st Millennium that are powerful enough to kill it instantly. It can be imagined that the attack vaporises the target, burns it to ash, blasts it apart limb from limb or otherwise mortally slays it in a suitably graphic fashion.
Any Wound allocated to a model has the Instant Death special rule if the Strength value of that attack is at least double the Toughness value (after modifiers)
of that model.
When
the Wound pool is empty, select a remaining pool and
allocate Wounds from it. Once all of the Wound pools for an attack are empty, attacks from the currently selected weapon have been completely resolved.
After the attacks from the currently selected weapon have been completely resolved,
if the firing unit is equipped with a differently named shooting weapon that has yet to fire, you can now select it and shoot with it at the same target unit. This is resolved in exactly the same way as the first weapon you selected, but
you may now find that due to the casualties you inflicted that there are now fewer models in the target unit in range. Remember, you can choose the order in which you fire and resolve the differently named weapons your unit is equipped with, so you may want to consider shooting the weapons with the shortest range first. Repeat this process until you have selected and resolved attacks from all the weapons in the firing unit. If a unit has no differently named weapons, or if it chooses not to fire any of them, you can choose another of your units to make your next shooting attack, or proceed to the
Assault phase.
Few warriors take to the battlefield without some form of protection, whether it is a suit of armour or an energy force field. Furthermore, the battlefield itself can also offer protection. All these forms of protection are represented by saving throws (sometimes called saves), as we’ll now discuss.
Most troops wear some sort of protective clothing or armour, even if it’s only a helmet! Some creatures may have a form of natural protection, such as chitinous exoskeletons or thick bony plates. If a model has an Armour Save characteristic of 6+ or better on its profile, it is allowed a further dice roll to see if the armour prevents the Wound. This is called an armour saving throw, or armour save, for short.
To take an armour save, roll a D6 and compare the result to the Armour Save characteristic of the model that has been allocated the Wound.
- If the dice result is equal to or higher than the model’s Armour Save characteristic, the Wound is stopped.
- If the result is lower than the Armour Save value, the armour fails to protect its wearer and it suffers a Wound. This means that, unlike most characteristics, an Armour Save is better if it is a lower number.
For example, a Space Marine wearing power armour is hit and wounded. Power armour grants an Armour Save of 3+, so a D6 is rolled resulting in a score of 5. The damage is therefore saved, and the Space Marine is unharmed – the shot bounces off his power armour.The following table shows how the minimum D6 score required varies between three types of armour:
Some powerful weapons are quite capable of punching through even the thickest armour. This is shown by a weapon having an Armour Piercing characteristic, usually referred to as AP. Nearly all weapons have an Armour Piercing value. Some sample AP values for different weapons are shown below:
The AP rating indicates the
Armour Save the weapon can ignore – so lower means more powerful. A weapon shown as ‘AP-’ has no Armour Piercing value and will never ignore a target’s Armour Save.
- If the weapon’s Armour Piercing value is equal to or lower than the model’s Armour Save, then it is sufficiently powerful to punch straight through the armour; the target gets no Armour Save at all. The armour is ineffective against the shot.
- If the weapon’s Armour Piercing value is higher than the armour, the target can take his save as normal.
For example, a boltgun (AP5) can pierce Armour Saves of 5+ or 6+. A heavy bolter (AP4) can pierce Armour Saves of 4+, 5+ or 6+.
Some warriors are protected by more than mere physical armour. They may be shielded by force fields, enveloped in mystical energies or have a constitution that can shrug off hits that would put holes in a battle tank. Models with wargear or abilities like these are allowed an invulnerable
saving throw.
Invulnerable saves are different to armour saves because they may always be taken whenever the model suffers a Wound or, in the case of vehicles, suffers a penetrating or glancing hit – the Armour Piercing value of attacking weapons has no effect on an invulnerable save. Even if a Wound, penetrating hit or glancing hit ignores all armour saves, an invulnerable saving throw can still be taken.
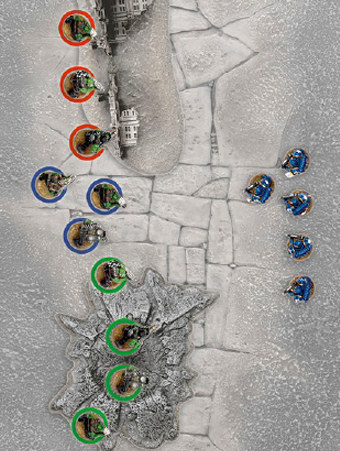
| Units in Cover |
| The Space Marine squad has chosen to fire at the Ork mob ahead of them. The Ork mob is spread out with some models obscured behind cover and some out in the open. 3 Orks (circled in red) have a 4+ cover save as at least one firing model has his line of sight partially obscured by the ruin. 3 Orks (circled in blue) have no cover save as they are in the open, and 4 Orks (circled in green) have a 6+ cover save as they are within a crater. |
Often, you’ll find enemy models are partially hidden or obscured by terrain, which is also known as being in cover. Cover shields troops against flying debris and enemy shots, enabling them to get their heads down or crawl amongst the ruins and (hopefully) avoid harm. Where this is the case the model will be entitled to a cover save.
Even if a Wound, penetrating hit or glancing hit ignores all armour saves, a cover saving throw can still be taken.
If, when you come to allocate a Wound, the target model’s body (see
line of sight) is at least 25% obscured from the point of view of at least one firer, Wounds allocated to that model receive a
cover save.
Unless specifically stated otherwise, all cover provides a 5+ save. Some types of terrain provide better or worse cover saves; when this is the case the cover save provided will be stated in the rules for the terrain.
If a target is partially obscured from the firer by models from a third unit (models not from the firer’s unit, or from the target unit),
it receives a 5+ cover save in the same way as if it was behind terrain. Similarly, if a model fires through the gaps between models in an intervening unit, the target is in cover, even if it is completely visible to the firer. Note that this does not apply if the shots go over the unit, either because the firer has an elevated position or is firing a
Barrage weapon, rather than through it.
A successful cover save in this case might mean that the firer has not shot at all, missing the fleeting moment when the target was in its sights. This is because, in the case of intervening friends, the firer would be afraid of hitting his comrades, while in the case of intervening enemies, the firer is distracted by the more immediate threat.
Scenic rocks and other decorative elements that players might have placed on the bases of their models are always ignored from the point of view of determining cover. You cannot take your cover with you!
Note the exception that, in the same way as they can trace
line of sight through members of their own unit,
models can always shoot through members of their own unit without conferring or receiving a cover save.
Models With More Than One Save
Sometimes, a model will have a normal
Armour Save and a separate
invulnerable save – a good example is a Space Marine
Captain, who is protected by both power armour and a force field from his
iron halo. As if this wasn’t enough, the model might be in cover as well. In these cases,
a model only ever gets to make one saving throw, but it has the advantage of always using the best available save.If a model can benefit from different types of cover, for example, being behind a barricade (4+
cover save) that is also within a Citadel Wood (5+ cover save), the model uses the best cover save available (in this case 4+).
Some models gain additional benefits from rules that may increase any of their saves by +1 or +2 or even more. However,
no save (armour, cover or invulnerable) can ever be improved beyond 2+. Regardless of what is giving the model its save, a roll of 1 always fails.
| Q: | Warhammer 40,000: The Rules states that a model gets ‘the advantage of always using the best available save’. Does that mean we have to use the numerically lowest save, or do we have the option of using any save we have? |
| A: | The controlling player can use their discretion as to which of their model’s saves is ‘the best’. |
If all models in a target unit have the same
saving throw, it is quicker to make saves before allocating Wounds, and then allocate the unsaved Wounds starting with the closest enemy model. Even in units with mixed saves, it is not always necessary to
allocate Wounds one at a time. You can instead allocate them in groups equal to however many models with the same, best save are nearest to the firing unit.
For example, a unit of 17 Ork Boyz (Armour Save 6+) including an Ork Nob with ’eavy armour (Armour Save 4+) comes under attack from a unit of Imperial Guard. They suffer a total of 8 Wounds from the massed lasgun fire. Rather than allocate Wounds one at a time, the Ork player sees that there are 6 Orks with the same save at the front of the unit, before getting to a different save for the Ork Nob. He then picks up and rolls 6 saving throws, fails 4 of them and removes the 4 nearest Orks. This leaves 2 Wounds in the Wound pool and 2 Orks before getting to the Ork Nob. Therefore, he rolls the final 2 saves; he fails both and removes 2 more Orks.
If warriors come under fire, they may decide to keep their heads down to try and stay alive a little longer while they wait for extraction or reinforcements. After the enemy has rolled
To Hit and
To Wound against any of your non-vehicle units, but before any saves are made or Wounds allocated, you can declare that the unit is Going to Ground. To represent this, place a suitable marker next to the unit as a reminder.
- Models in a unit that has Gone to Ground immediately receive +1 to their cover saving throws.
- Models in open ground can still Go to Ground by diving to the floor (or using some other evasion technique) and receive a 6+ cover save, even if they are not 25% obscured.
A unit that has Gone to Ground cannot move, Run or charge. It can only fire Snap Shots when it wishes to shoot, and cannot fire Overwatch. At the end of its following turn, the unit returns to normal, the marker is removed and the unit is free to act as normal from then on. Whilst it has Gone to Ground, a unit reacts normally if affected by enemy actions (for example, it takes
Morale checks as normal). If the unit is forced to move, for example if it has to
Fall Back, it returns to normal immediately – remove the marker. If assaulted, the unit will fight as usual, but because they are not set to receive the charge, enemy units do not receive the
Initiative penalty for assaulting a unit in difficult terrain, even if the unit is in
difficult terrain. If a unit Goes to Ground from Overwatch, then the charge automatically fails.
At times, warriors may have to redeploy quickly, literally running from cover to cover or simply concentrating on movement and giving up their chance to shoot. In their
Shooting phase, units may choose to Run instead of firing. Roll a D6 to determine the maximum Run distance for the entire unit. Models in the unit may then immediately move up to that distance in inches. They may choose not to move after the roll is made, but still count as having Run.
Running movement is not slowed by
difficult terrain but models running through
dangerous terrain must test as normal. Units that Run in the Shooting phase cannot charge in the following
Assault phase.
FAQ
Intervening Models
| Q: | In the rules for cover saves it says that intervening models grant cover even if the model is fully visible unless you shoot over the intervening models. Does this include models that are taller than the intervening models i.e. are taller models able to shoot over shorter models? |
| A: | |
| Q: | Models obscured by intervening models get a 5+ cover save just like the cover rules of terrain. Does this mean that I only get the cover save if the models are obscured by more than 25%? |
| A: | No – the target only needs to be partially obscured. If, on the other hand, the target is completely visible to the firer, but the firer shoots through a gap between models in the intervening unit, then the target still receives a 5+ cover save. |
Saves
| Q: | Warhammer 40,000: The Rules states that a model gets ‘the advantage of always using the best available save’. Does that mean we have to use the numerically lowest save, or do we have the option of using any save we have? |
| A: | The controlling player can use their discretion as to which of their model’s saves is ‘the best’. |
Shooting Phase
| Q: | When does vertical distance matter? For example, are shooting attacks only affected by the horizontal distance? |
| A: | Measurements for shooting are (for most models) measured from base to base. Where one model’s base is more elevated than the other, this will mean measuring the distance diagonally. |