The Rules‎ > ‎Vehicles‎ > ‎

Tanks

Tanks can use their mass as a weapon, driving right into and through densely packed enemies. This often throws the opposing battle line into disarray, as having some monstrous metal behemoth coming straight at you is unnerving for anybody.

When moving a vehicle with the Tank type, the player can declare that it is going to attempt to Tank Shock or Ram instead of moving normally.

Tank Shock

To perform a Tank Shock, first, turn the vehicle on the spot to face the direction you intend to move it and, after pre-measuring, declare how many inches the vehicle is going to move, up to its maximum speed. The vehicle must move at least Combat Speed. Note that, because pivoting on the spot does not count as moving, this is not enough for a Tank Shock.

Once the Tank has been ‘aimed’ and the intended distance declared, move the Tank straight forwards until it comes into contact with an enemy unit or it reaches the distance declared – no other changes of direction are allowed in a Tank Shock.

A Tank Shock is an exception to the rule that enemy models cannot be moved through. Remember, though, that friendly models still cannot be moved through, so the Tank’s movement will be stopped if any friendly models are in the way. Also, a Tank Shock cannot be attempted against enemies that are locked in combat, as the risk of harming allies is too high.

If an enemy unit other than another vehicle is reached, that enemy unit must take a Morale check and immediately Fall Back if it fails. If the test is passed, the unit simply lets the Tank move through, as if it was not there. Regardless of the result of the test, the Tank keeps moving straight on, possibly Tank Shocking more enemy units until it reaches its final position. If the Tank would move into contact with a friendly model, enemy vehicle, impassable terrain or a board edge, it immediately stops moving 1" away.

If some enemy models in the enemy unit would end up underneath the vehicle when it reaches its final position (it makes no difference whether the unit is Falling Back or not), these models must be moved out of the way by the shortest distance, leaving at least 1" between them and the vehicle whilst maintaining unit coherency and staying on the board. Any models that cannot manage this are crushed and removed from play as casualties with no saves allowed. Crunch!

TankShock
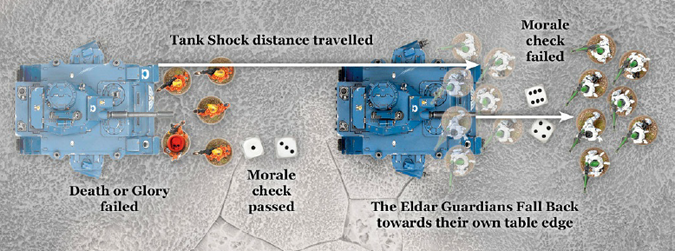
The Predator tank moves until it is in contact with the Eldar Fire Dragons, which pass their Morale check. The Fire Dragon Exarch attempts a Death or Glory attack with his melta bombs, but rolls poorly, fails to stop or destroy the Tank and is removed. The Predator finishes its move, coming into contact with the Eldar Guardian Defenders, which fail their Morale check and Fall Back.

Units Already Falling Back

If a unit that is Falling Back is Tank Shocked, the unit automatically fails its Morale check. This also applies if a unit Falls Back from a Tank Shock and the Tank’s remaining move brings it into contact with them a second time.

Tank Shock from Reserve

A Tank that moves onto the battlefield from Reserve may attempt a Tank Shock. This must be declared before the Tank moves onto the board.

Tank Shock Restrictions

A vehicle that has performed a Tank Shock cannot move Flat Out later in the turn. Units cannot embark onto or disembark from a Transport vehicle in a turn in which it has already performed a Tank Shock. Likewise, a Transport vehicle from which a unit has embarked or disembarked that phase cannot perform a Tank Shock later in the turn. A Flyer cannot perform a Tank Shock – even if it is also a Tank.

Death or Glory

If a unit that has been attacked by Tank Shock passes its Morale check, one of its models in the vehicle’s path can stand and attempt to destroy it rather than move out of the way (potentially a rather suicidal thing to do). The model nominated for this heroic duty makes a single attack against the incoming Tank. Even if the weapon used is Assault 3, for example, or the model is normally allowed more than one attack, only one attack is ever resolved in this case. The attack can be either a shot from a weapon carried by the model, or a single close combat attack using any weapon carried, including grenades. Whatever form it takes, the attack hits automatically. Resolve the hit against the vehicle’s front armour (even if using a close combat attack), and immediately apply any damage results. Cover saves cannot be taken against a Death or Glory attack.

If the model successfully manages to wreck the vehicle, or inflict a Crew Stunned, Immobilised or Explodes! result, the vehicle halts 1" away from the heroic individual (or blows up there).

If the attack fails to stop the vehicle, then the Tank Shock continues as normal, except that the brave (but perhaps foolish) glory seeker is crushed by the vehicle grinding over him – the model is immediately removed as a casualty.

Artillery units may attempt a Death or Glory attack with either a crewman (as normal) or a gun model. If a gun model does this and fails to stop the Tank, both the gun and one crewman are removed.

Ramming

Ramming is a rather desperate manoeuvre and the Tank must concentrate on moving at top speed towards one enemy vehicle. This means that it, and any embarked troops, may only shoot Snap Shots in that turn’s Shooting phase, making it a better idea for vehicles that have no armament left, or are Shaken.

Ramming is a special type of Tank Shock and is executed the same way. Any vehicle that can Tank Shock can also Ram. Units other than vehicles in the path of a Ramming Tank are Tank Shocked as normal, but if the Ramming Tank comes into contact with an enemy vehicle or building, resolve the collision as follows.

Each vehicle immediately suffers a hit against the armour facing where the other vehicle has impacted (so the Ramming vehicle always uses its front armour). The Strength of the hits will often be different for different vehicles, and is calculated as follows for each vehicle:
  • Armour. Half the Armour Value (rounding up) on the facing that makes impact.
  • Mass. If the vehicle has the Tank type, add 1.
  • Excessive mass. If the vehicle has the Heavy or Super-heavy type, or is a building, add 2.
For example, a Land Raider Rams an Ork Trukk, hitting it in the side. The Land Raider has a front armour of 14 (Strength 7), and is a Tank (+1). The total is 7+1, which means that the Trukk suffers a Strength 8 hit against its side armour, and is in serious trouble.

At the same time, the Land Raider suffers a Strength 5 hit against its front armour (for the Trukk’s side armour of 10, +0 because the Trukk is not a Tank), which stands no chance of damaging the mighty vehicle.


Both players roll for armour penetration against their opponent’s vehicle and any results are immediately applied.

If the vehicle that is Rammed is not removed, the Rammer halts. However, if the Rammed vehicle is removed because it suffers an Explodes! damage result, the Rammer continues its move until it reaches the declared distance, moves to within 1" of impassable terrain or friendly troops (at which point it stops immediately) or contacts another enemy unit (which it will Tank Shock or Ram again).

Ramming Restrictions

A vehicle making a Ram manoeuvre is subject to the same restrictions as a Tank Shock.

FAQ

Tank Shock

 Q: How do you resolve a Tank Shock with a squadron (e.g. does it cause multiple Morale checks)?
 A
Each vehicle carries out a Tank Shock individually.
 Q: How does Tank Shock work when you stop on a unit? The rules state that the models ‘must be moved out of the way by the shortest distance’ – but what does this mean? The shortest distance that allows you to be in unit coherency? Or the shortest distance to just be out from under the vehicle, with models dying if not in unit coherency and at least 1" away from enemy units? What happens if a Gargantuan Creature or Monstrous Creature or any other non-vehicle unit gets Tank Shocked, but cannot move to another place in the shortest way? Are they destroyed or just moved further away?
 A
Pick up only those models actively displaced by the Tank Shock, and place them on the battlefield with all models within unit coherency, as close as possible to their starting location and with no models within 1" of an enemy unit. Any models that cannot be placed in this way will be removed as casualties. If the whole unit is displaced, it will be moved together as above, and because of this it is impossible to remove an entire unit from play with a Tank Shock, unless the unit is unable to move; units that have Gone to Ground return to normal immediately, as it counts as being forced to move.
 Q: When determining the Strength of a vehicle’s Ram, are the Tank and Heavy bonuses cumulative?
 A
No.
 Q: When vehicles Ram, they may only fire Snap Shots for that turn. There is no allowance that I can find for Super-heavy Tanks and Thunderblitz does not seem to affect this part of the Ram rule. According to the rules, then, If a Baneblade Rams (with a Thunderblitz roll) a Warbuggy, the Baneblade can only fire Snap Shots. Is this intended?
 A
Yes.
 Q: What happens when you fail a Tank Shock or Ram when arriving from Reserve in such a way that the vehicle would end the movement partly off the battlefield?
 A
Following the rules for Moving On From Reserve, place the model as far onto the table as you can.